Want to engage with your Facebook followers or share something with friends in real time? To go live on Facebook from your iPhone or iPad is the easiest way to enjoy two-way communication with your fans. If you haven’t tried it yet, worry not! To help you, I have created this guide on how to stream live on Facebook from your iPhone, a list of Live tools, and more.
- How to go live in Facebook on iPhone or iPad
- How to stream Live in Facebook group on iPhone or iPad
- What are the features of Facebook Live?
- 6 Tips to improve Facebook Live video quality
How to go live in Facebook on iPhone or iPad
- Launch the Facebook app.
- Tap What’s on your mind → Choose Live Video.
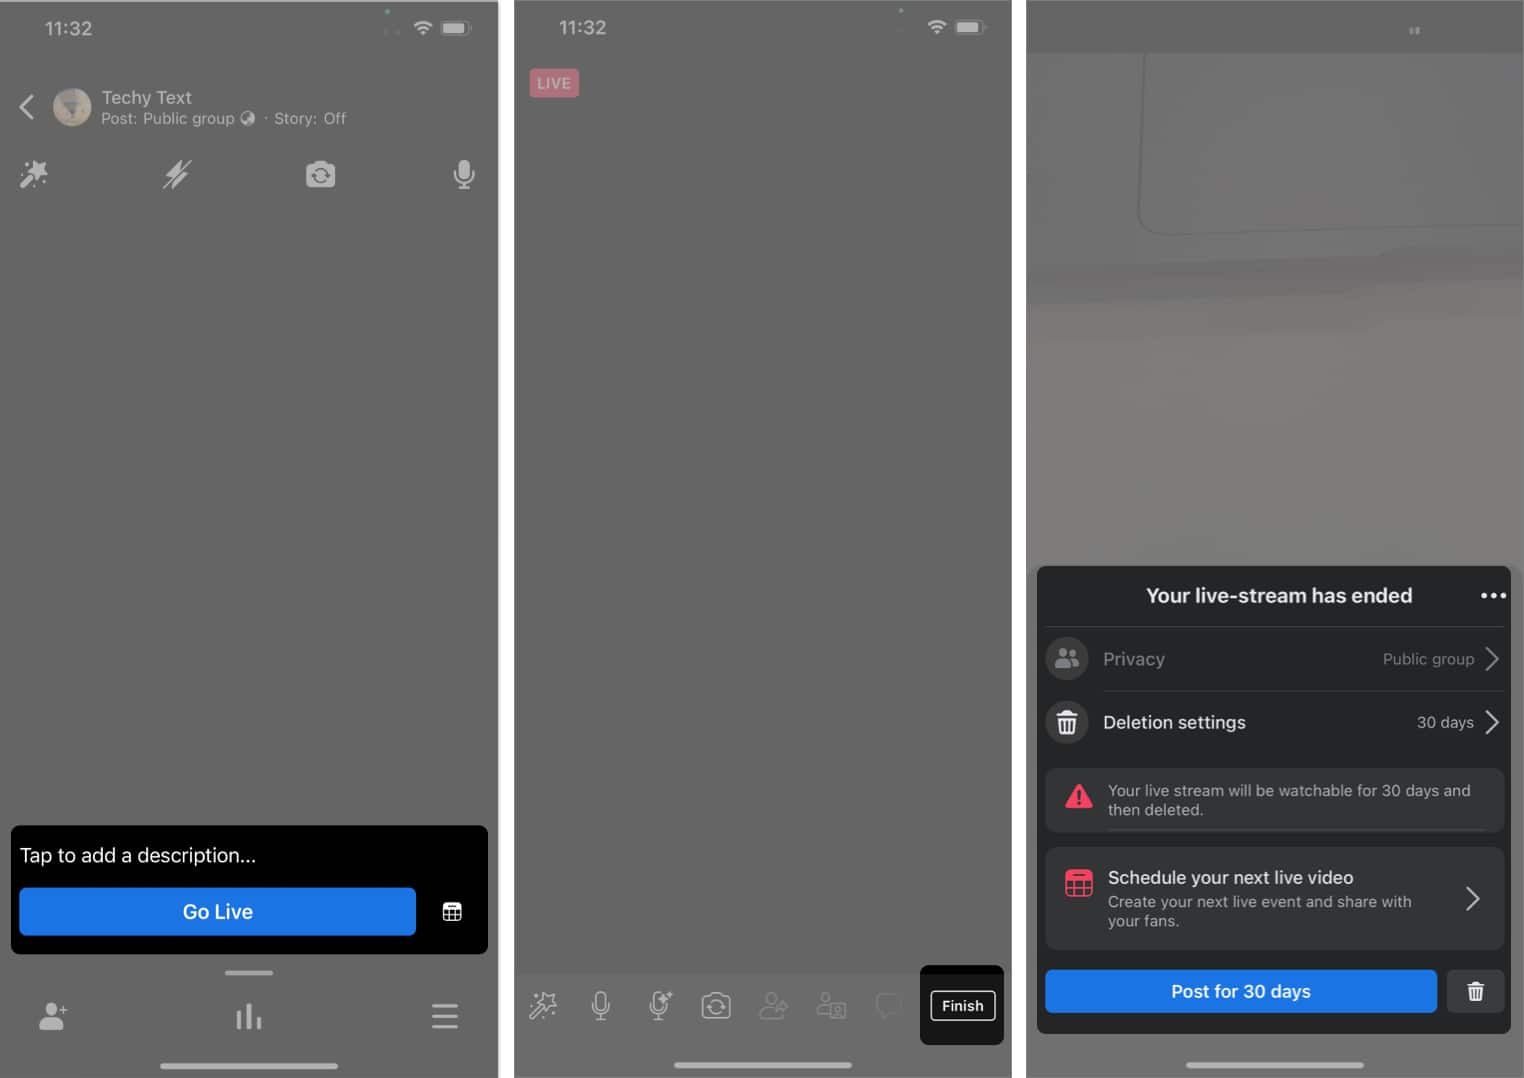
The app requests permission to access your camera and microphone for the first time. - Tap Go Live.
You can add a description and effects to your stream. We will discuss Facebook Live tools later.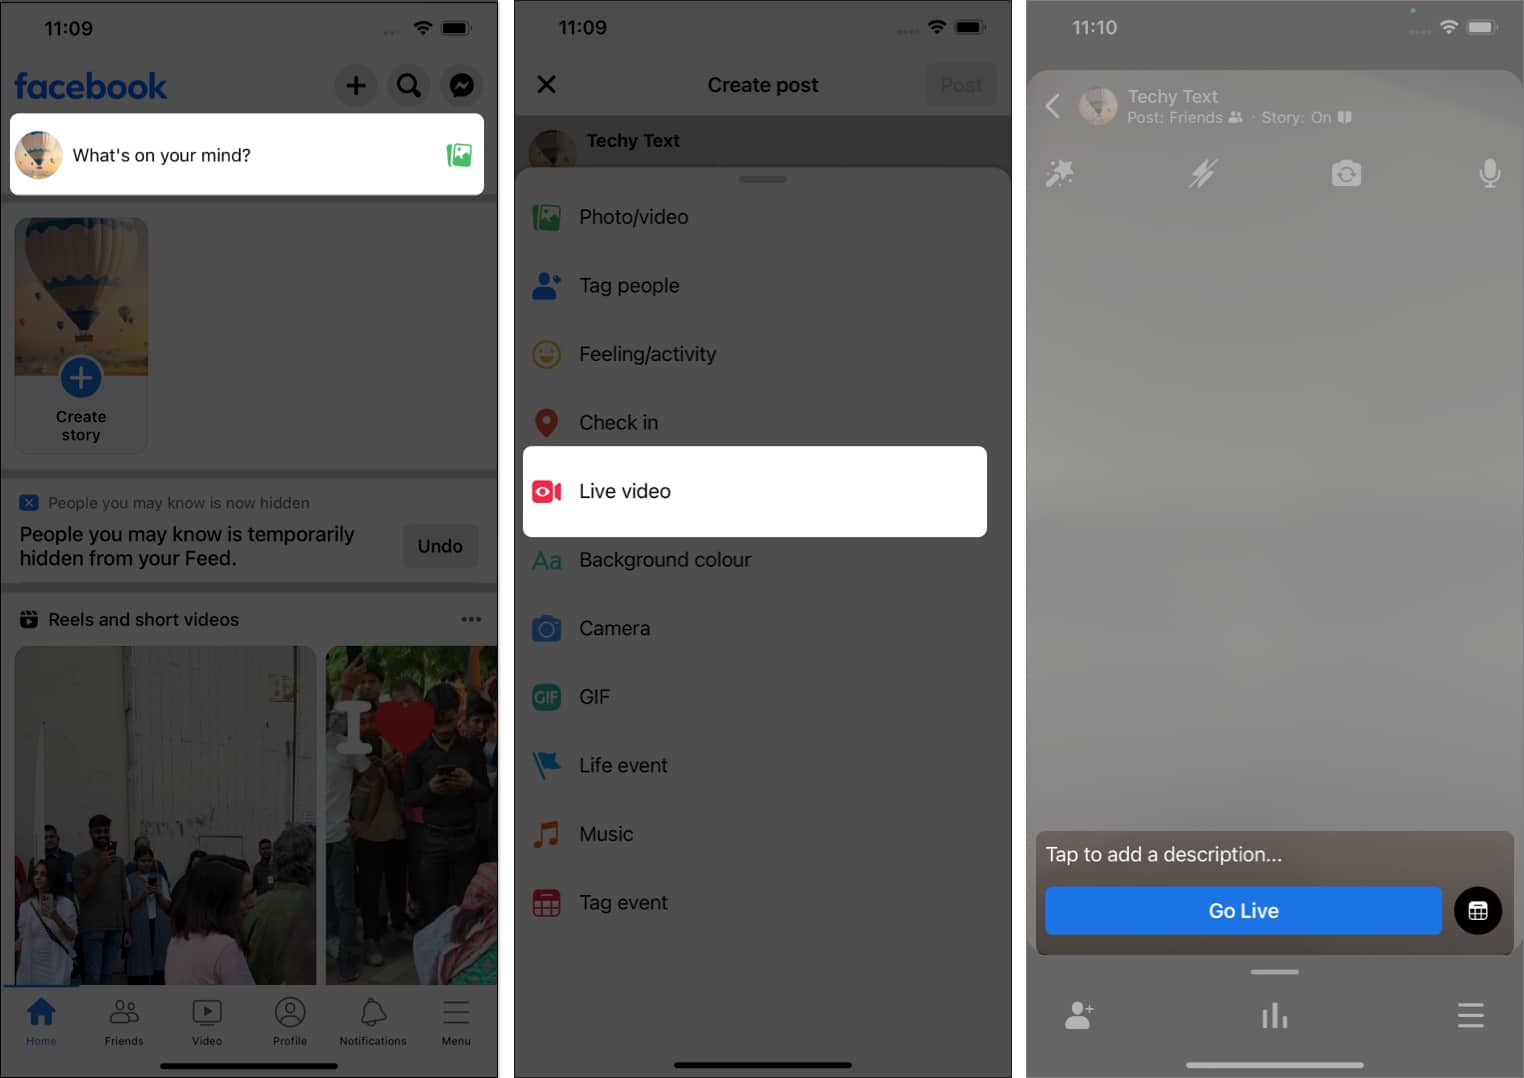
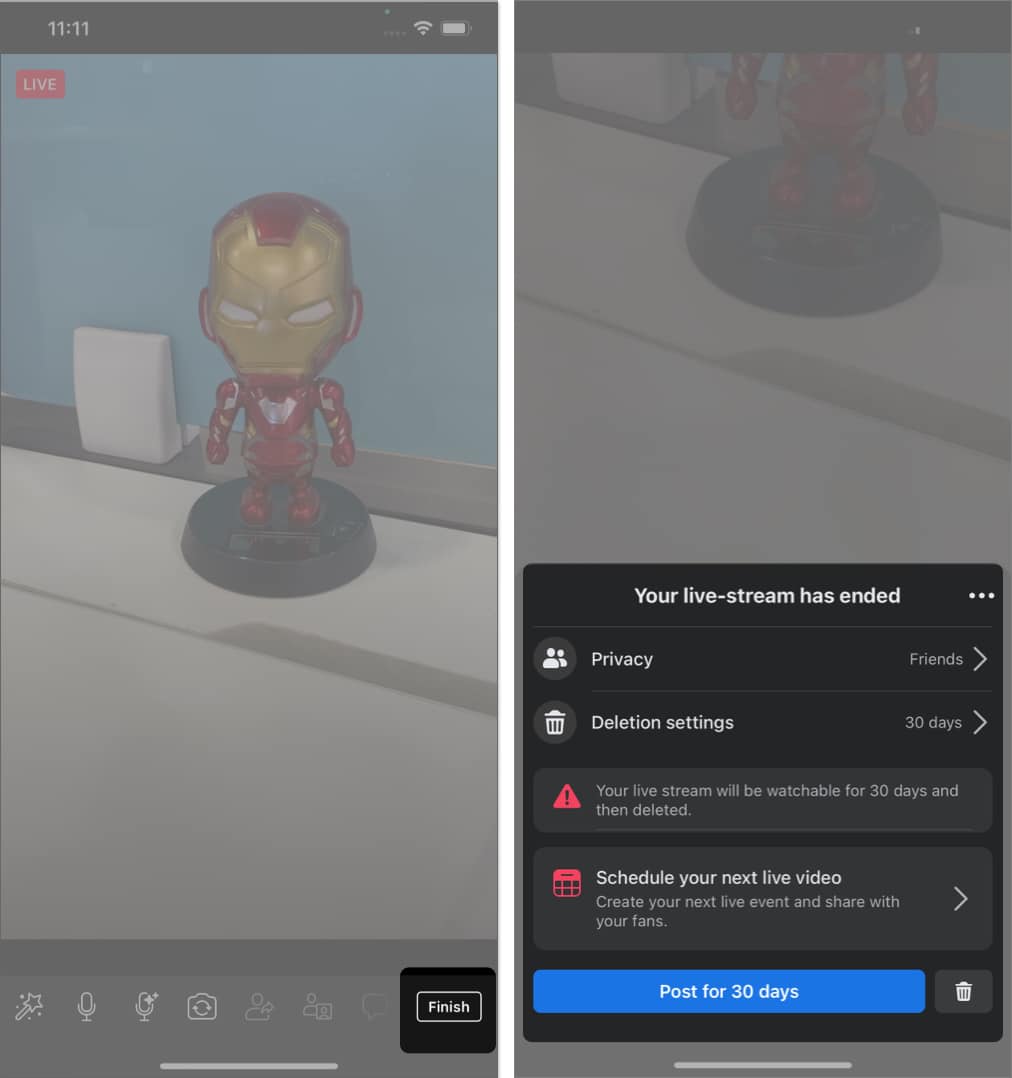
- Tap Finish when you want to end the live stream.
- In the popup menu, you may set the privacy and deletion settings and schedule your next live video.
- Tap Post for (the deletion time).
Things you can do after the Facebook Live Stream ends
Facebook gives you four choices to make after you hit on Finish to end your Live stream. Let’s know about them quickly:
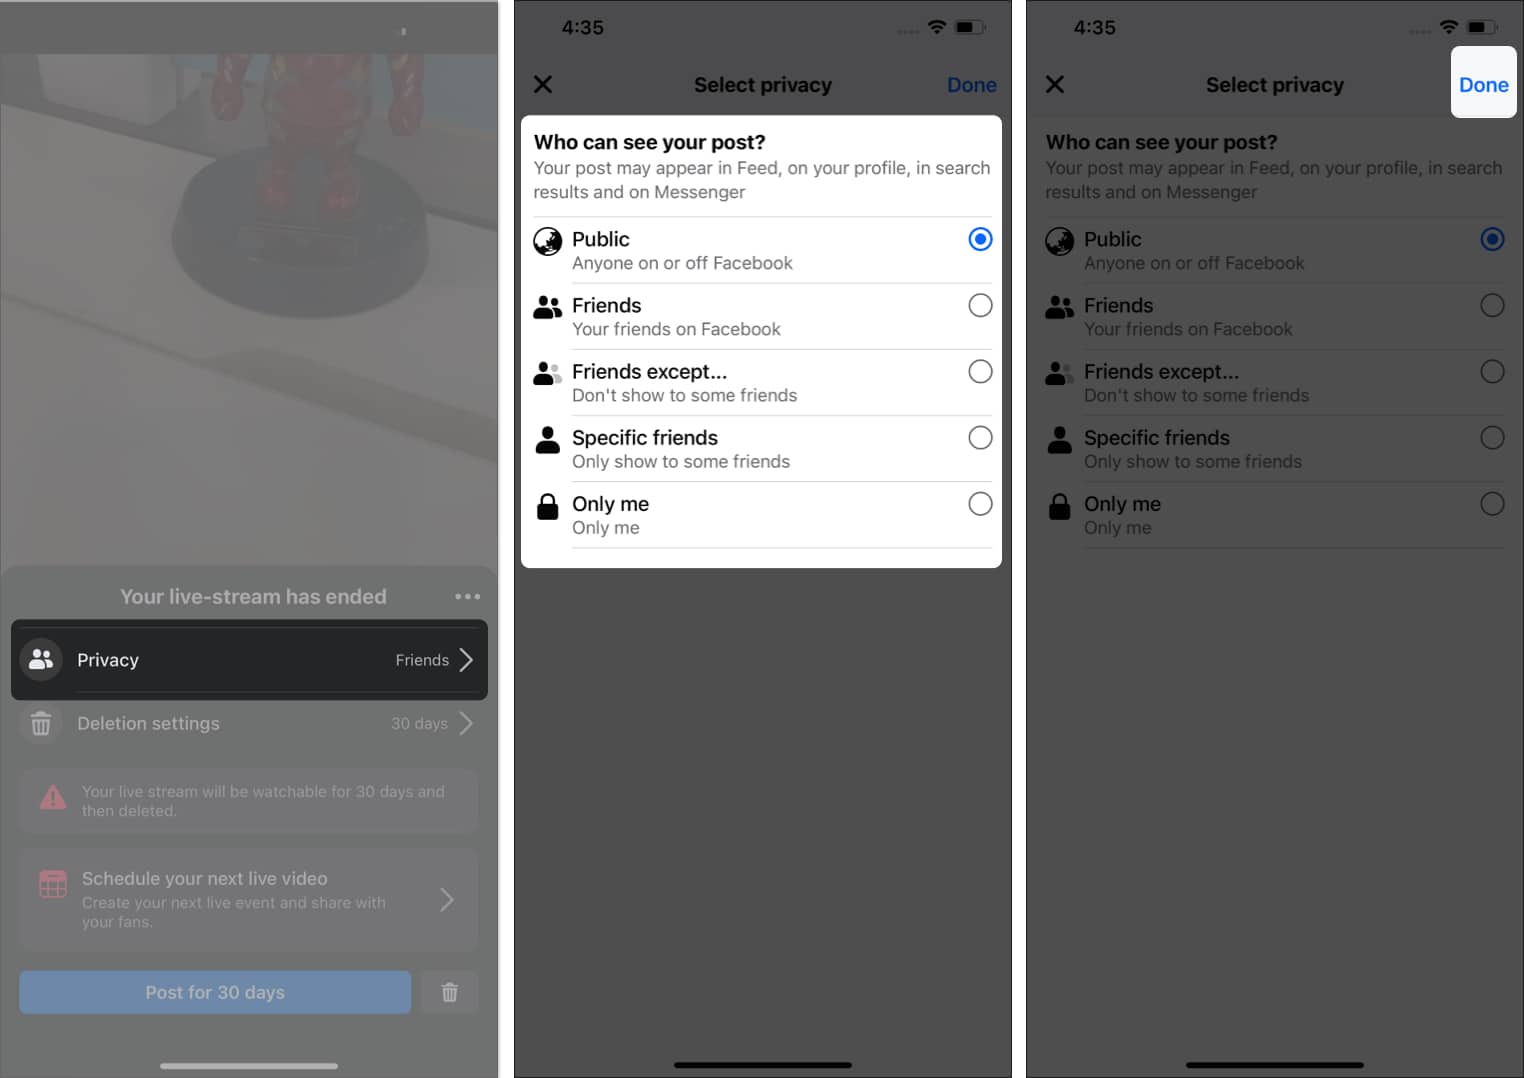
- Privacy: Use this to decide who can see your live video when you post it on your Feed, profile, Messenger, or search results.
Tap Privacy → Choose the privacy setting → Hit Done. - Delete: This will delete your broadcast, and you won’t be able to share or view it later.
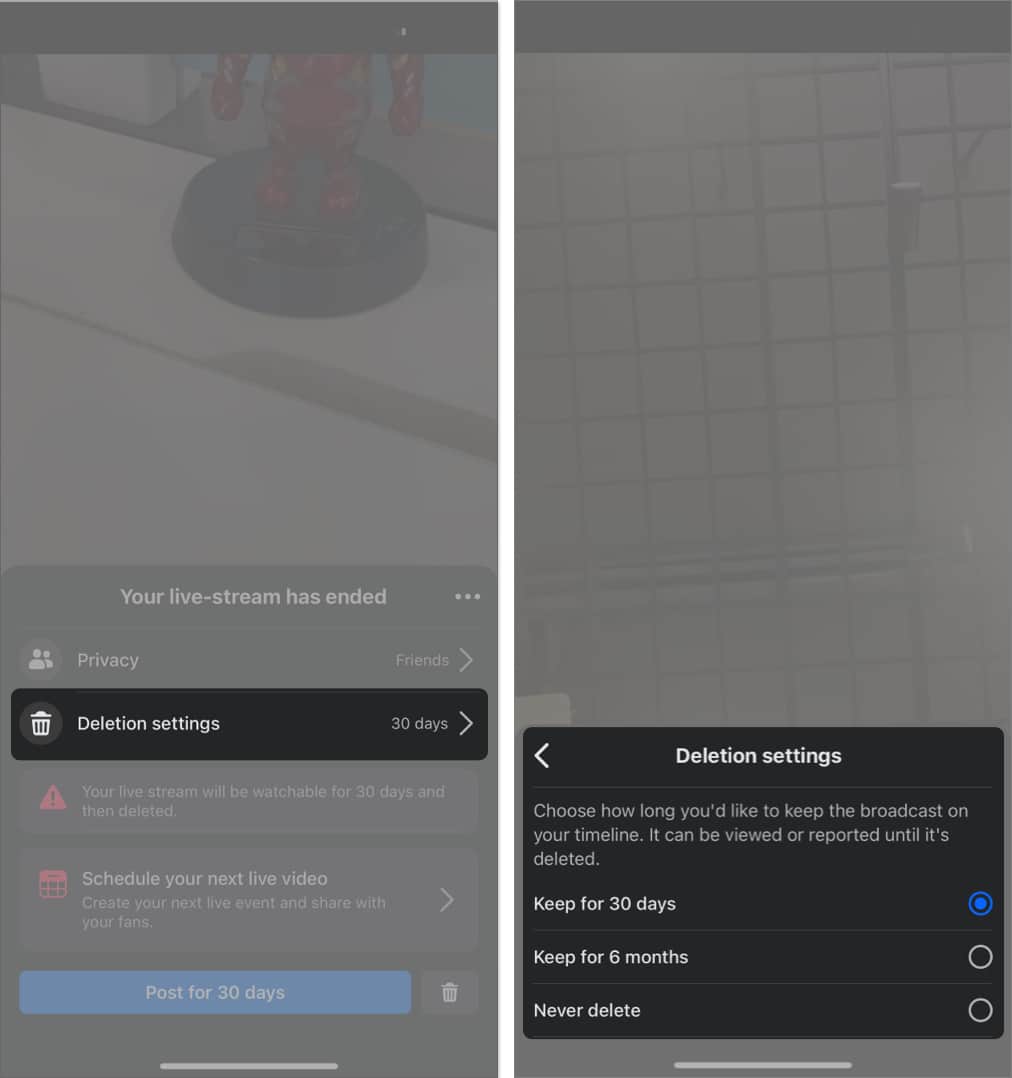
For this, tap the bin icon → Select Delete from the popup box. - Deletion settings: It helps decide the period for which you would like to keep your live video on the Facebook timeline.
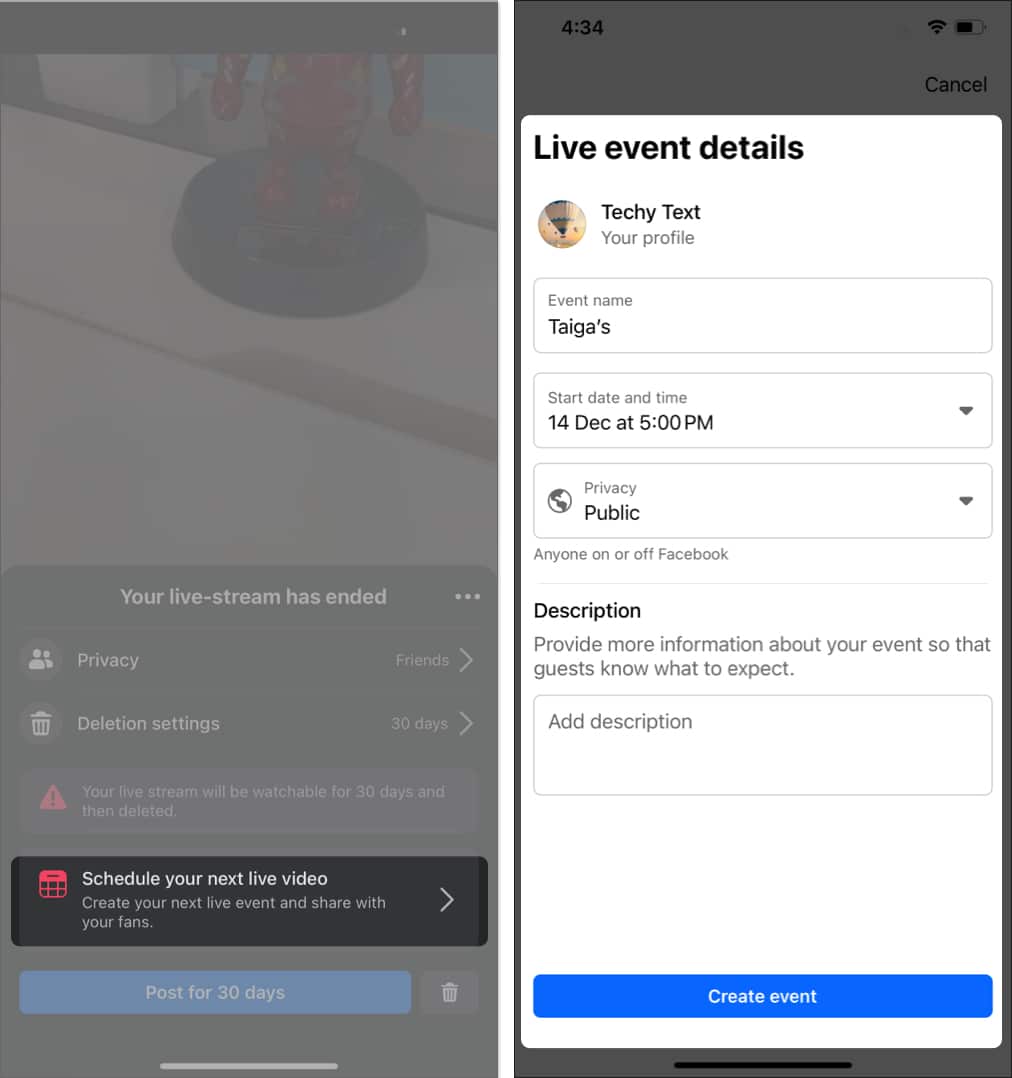
Tap Deletion settings → Choose a time period. - Schedule your next live video: This option helps you create your next live event and share it with your fans.
Hit Schedule your next live video → Fill Live event details → Tap Create event.
How to stream Live in Facebook group on iPhone or iPad
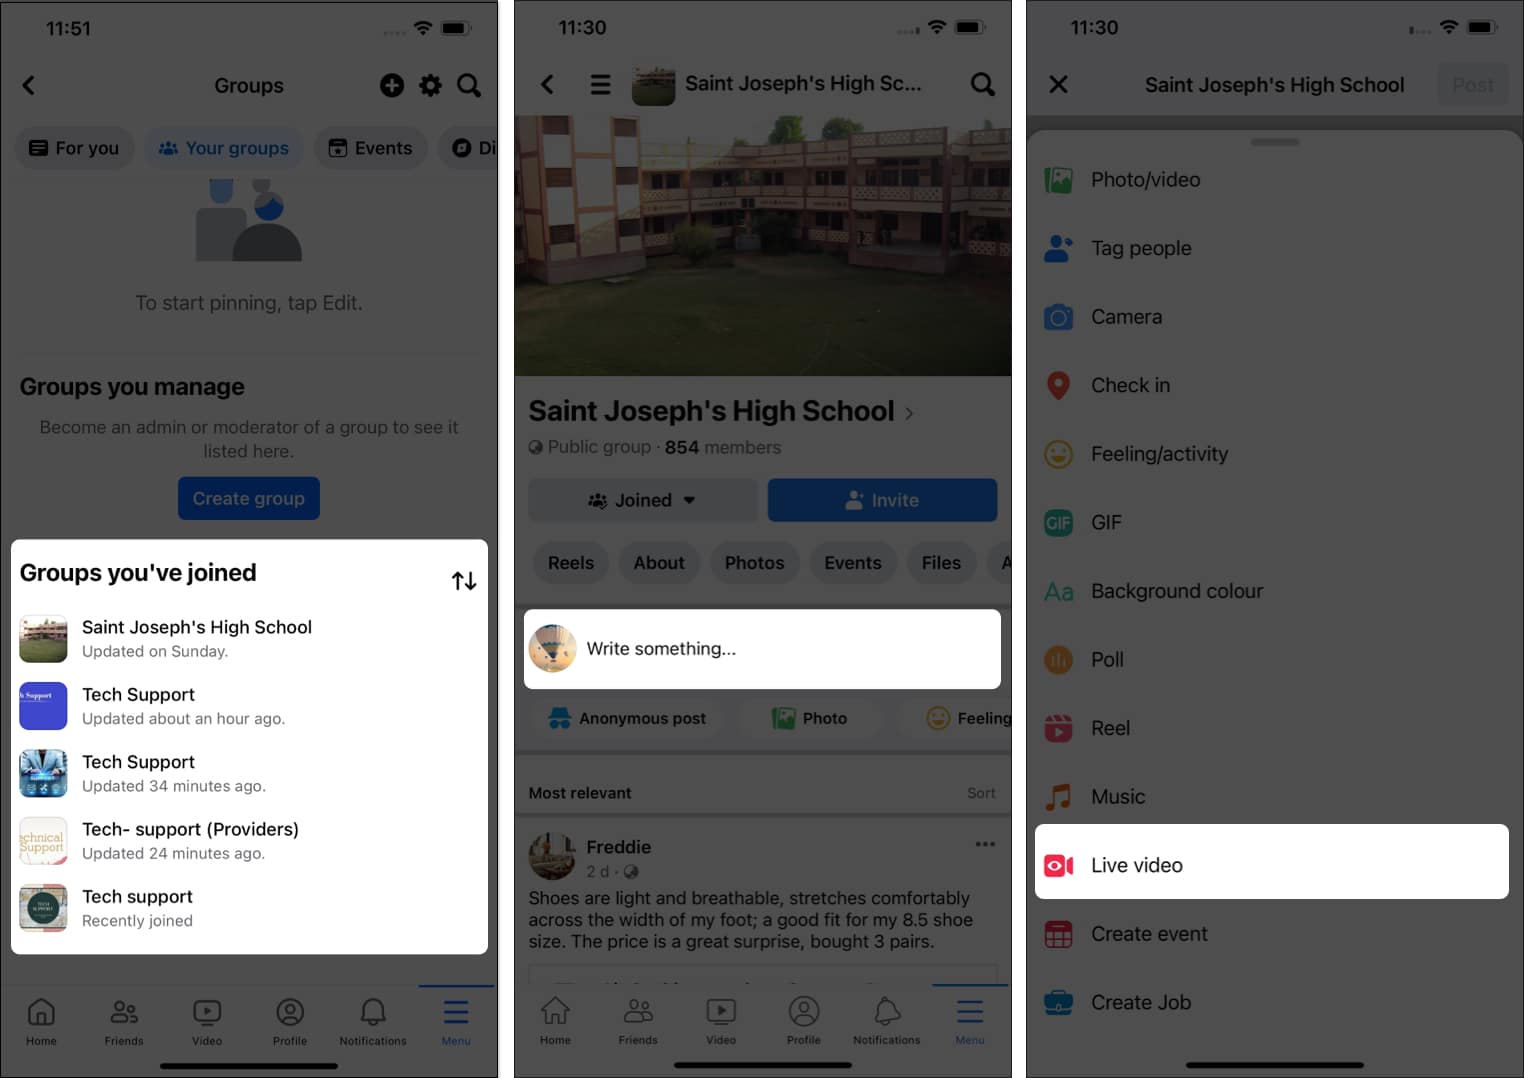
- Open the Facebook app.
- Hit the hamburger icon → Select Groups → Tap Your Groups.
- Choose the group you want to go live with.
- Tap Write something → Select Live video.
- Tap Go Live.
- Once you are done, tap Finish.
- Select Post for (your chosen deletion period).
What are the features of Facebook Live?
Facebook houses plenty of features to make your broadcast fun and interactive. You can trust these Live tools for better engagement with your viewers. Here is a short introduction about them:
Invite guests to your Facebook live:
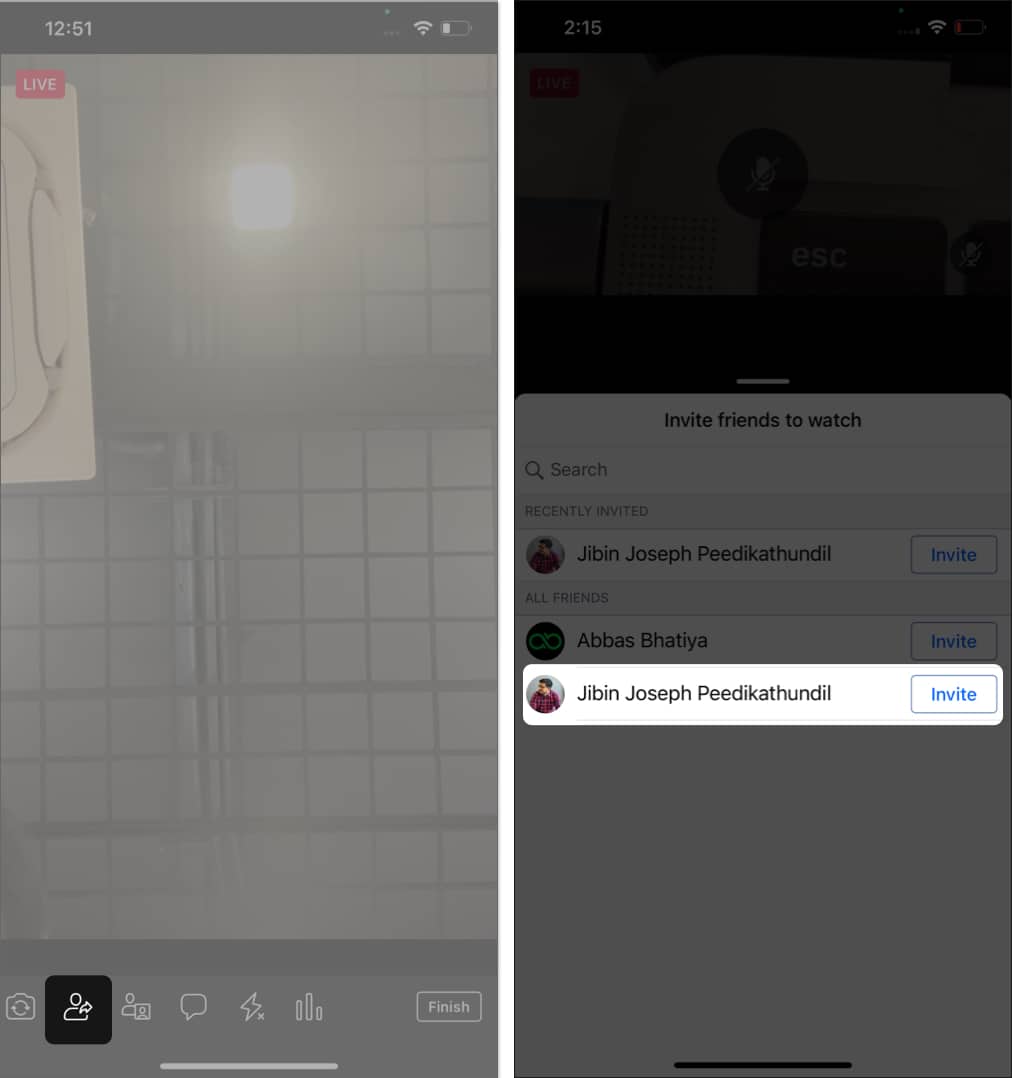
You can rely on this feature to invite your Facebook followers to join your live broadcast.
- Select the Invite friends icon → Tap Invite against the name of your friend.
- Alternatively, you can invite friends before the live starts. For this:
Tap the Add friend icon and include your friends.
Add a live poll to live on Facebook:
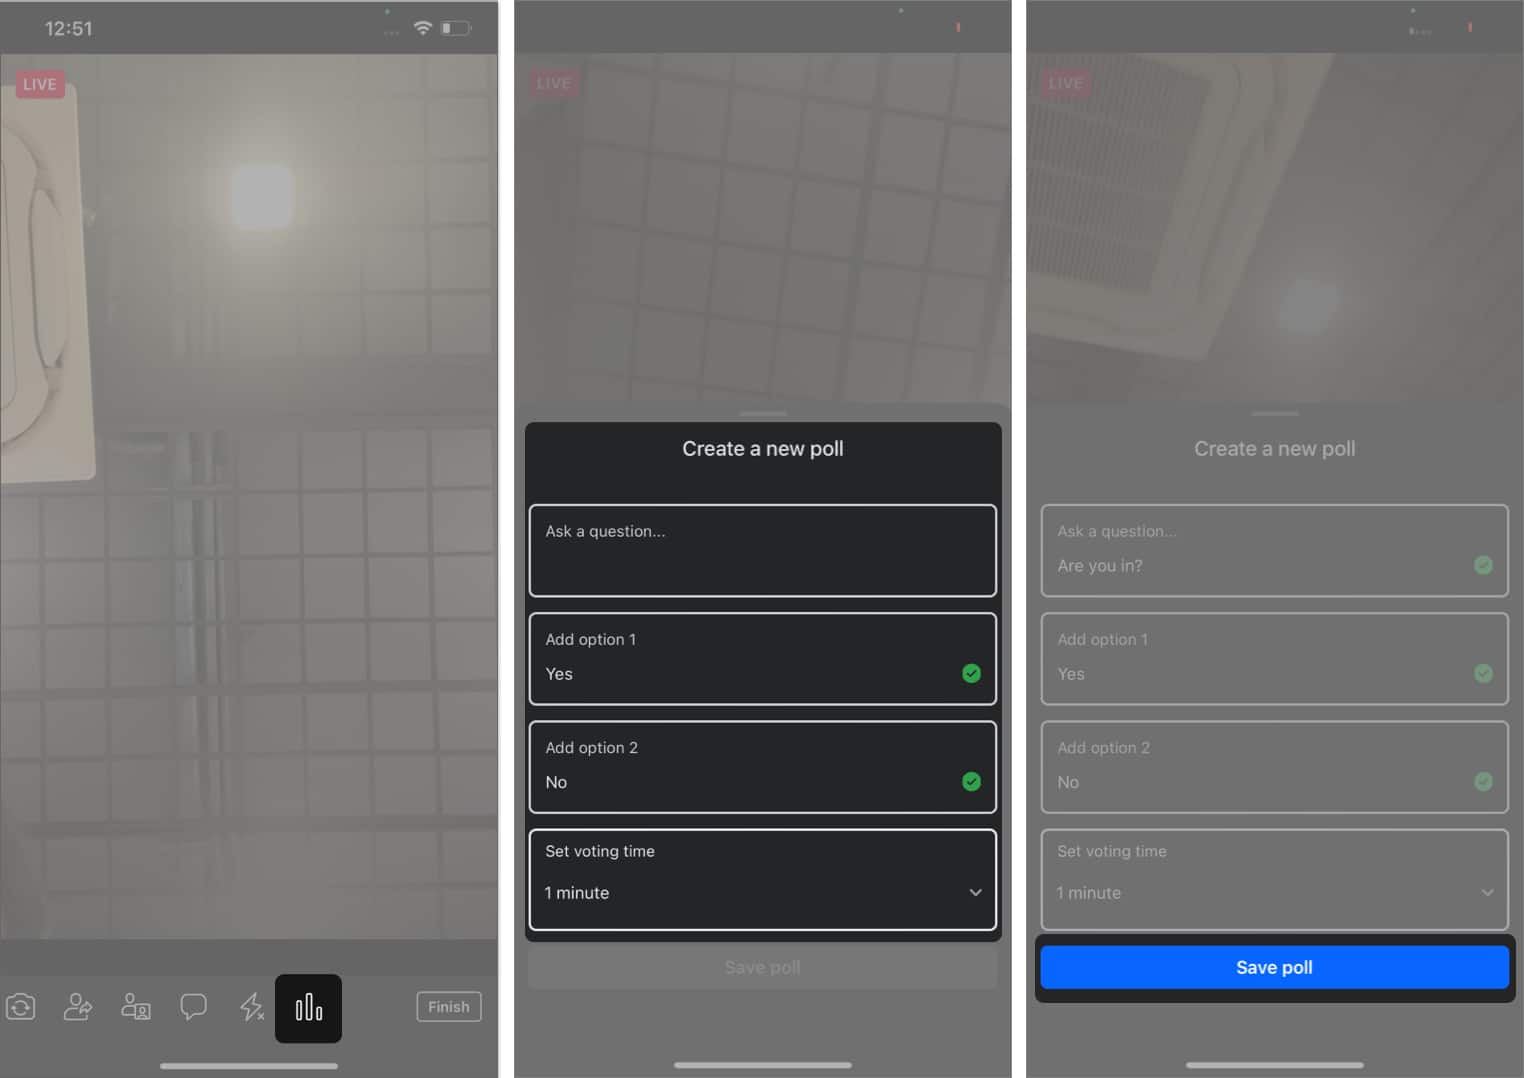
Facebook allows you to organize a live poll to get active audience participation during your broadcast. To start a poll:
- Swipe right on the bottom menu to find the poll icon.
- Enter your question and options and set the voting time.
- Tap Save poll.
Send guest requests on Facebook live:
You must enable this feature to allow your guests to send you requests for joining your Facebook Live.
- Select the Invite Guests icon from the bottom menu.
- Toggle on Guests Requests.
Voice control
It helps eliminate background noises and enhance your voice during your Facebook live.
- Tap the Voice Enhancement icon.
- Toggle on Reduce background noise and Enhance voice.
- Choose Done.
Other Facebook Live features:
- Add filters: The app has plenty of filters to add effects to your live streams.
Tap the Filters icon → Choose the effect you want to apply. - Microphone: You can enable or disable your mic at your convenience. A simple tap the mic icon and you are good to go.
- Camera: You can tap the camera icon to switch between rear and back cameras.
- Comments: Hit the comments icon to interact with your audience.
- Flash: Tap Flash to switch it on/off.
6 Tips to improve Facebook Live video quality
- Use quality accessories: Having a tripod is a must for clear and stable live video. Also, you may buy a Gimbal if you walk around while streaming.
- Connect to a good network: The Live video quality depends on the speed of your connection. So, connect to a high-speed connection, either Wi-Fi or a reliable phone’s mobile data. Don’t enable both simultaneously, as it may interrupt the stream.
- Use a mic: Your iPhone’s built-in microphone may not catch clear audio. So, use an external mic for your live broadcast. Moreover, sit in a quiet place.
- Setup lights: Purchase good lighting accessories, such as LED lights and selfie ring lights, or use daylight. Also, ensure the light source is in front pf you and not behind.
- Make an itinerary: A successful Live video is one where you can deliver your message to your audience. So, create a rough plan describing the purpose of your broadcast and its content.
- Protect your phone: Live streaming on iPhone uses up a lot of battery life and produces heat. Therefore, take off the phone cover and use a fan to cool the device while streaming.
Yes, you can save your Facebook live stream on your Facebook page or download live video to your device after the broadcast.
No, there is no official way to start simultaneous live streams on Facebook and Instagram. However, you can use third-party apps for this.
Yes, you can share your Facebook Live link on your Facebook account, page, group, story, or other social media portals.
Wrapping up
Unlike Facebook stories and posts, Facebook Live lets you indulge in more intuitive conversations with people. You can invite guests, play with fun filters, organize polls, ask questions, and do much more. So why miss the fun? Follow the steps mentioned here and start your first Facebook Live on your iPhone. Go hurry!
Also, don’t forget to share your experience in the comments section!
Read more:
