AirPods are tiny, but they pack a ton of innovation and can do several things that you may not be aware of. Thus to help you get the most out of them, I have listed the 35 best AirPods tips and tricks to elevate your experience. Some of these you may already know, while a few added in iOS 15 or later might be new. So take a look till the end.
Note: Most tips here apply to AirPods 1st gen, 2nd gen, and AirPods Pro unless mentioned otherwise.
Cool tips and tricks for AirPods
1. Conversation Boost
If you, your parents, grandparents, or friends have slight hearing problems, the newly introduced Conversation Boost feature can help them hear better during everyday conversations.
When you talk with someone and the AirPods Pro are in your ear, their beam-forming microphones will take the other person’s voice and isolate it for clarity when you are in a noisy environment. Thus, amplify it ensuring you hear clearly.

To use Conversation Boost, bring the iPhone Control Center and long-press the volume slider. You can enable Conversation Boost and set the ambient noise, adjust the tone and the left-right balance.
2. Announce any app notification in your ears
Earlier, you could have notifications from the Messages app announced to you while wearing AirPods. With iOS 15 or later, only time-sensitive notifications like those from Calendar or Reminder are announced by default. But you can enable it for any app you like.
Here’s how to have any iPhone app announce notifications in your AirPods.
- Open Settings and tap Notifications.
- Tap Announce Notifications.
- From the list of apps, tap the desired one. For example, Basecamp.
- Toggle on Announce Notifications.
3. Announce reminders with Siri on AirPods
This is just an extension of the above feature. Suppose you create a location-based shopping list reminder with multiple entries. When you are in the grocery store, Siri will read your shopping list in your ears. Convenient? Right!
4. Find My for AirPods
Now, your AirPods Pro and AirPods Max can use the Find My network. This lets you locate them even if you left or lost them at a distant place that exceeds your iPhone Bluetooth’s range.
Find My network is a crowdsourced network of millions of Apple devices like iPhones, iPads, Macs, etc., that help you locate Apple devices even if they are offline and even turned off! You can learn more about it here.
Tip: With the Separation Alert feature, your iPhone will notify you if you leave your AirPods behind. For instance, if you exit the restaurant leaving your AirPods on the coffee table.
5. Spatial audio with dynamic head tracking
Currently, you can enjoy thousands of Apple Music songs in Dolby Atmos. We have a dedicated guide that shows you how to do that on iPhone, iPad, Mac, and Apple TV.
Later this year (around September), Apple will introduce spatial audio with dynamic head tracking for AirPods Pro and AirPods Max. This will give you an even immersive experience as the sound dynamically adjusts according to your head movement.
Basic AirPods tips and tricks
6. Pair AirPods with Apple Watch, iPad, Mac, Apple TV, Windows PC, and Android phone
Apple may like to keep its walls closed for various things like iMessage. But when it comes to AirPods, Apple Music, or Apple TV, they have a liberal approach.
You can easily pair your AirPods with almost any laptop, computer, or phone as long as it supports Bluetooth. We have a separate guide that shows you how to connect your AirPods to any Apple or non-Apple devices.
We even have a guide where you can learn how to connect AirPods to PS4 and Xbox One Controller!
7. Customize tap commands of each AirPod
Each AirPod (first and second generation) can perform a set of actions like call Siri, change tracks, or play/pause when you double-tap the top portion of the AirPod. If you use AirPods Pro, the same can be done by pressing its stick.
To assign customized actions to each AirPod, connect them to your iPhone or iPad and follow the steps below.
- Open Settings and tap Bluetooth.
- Tap (i) next to the AirPods name.
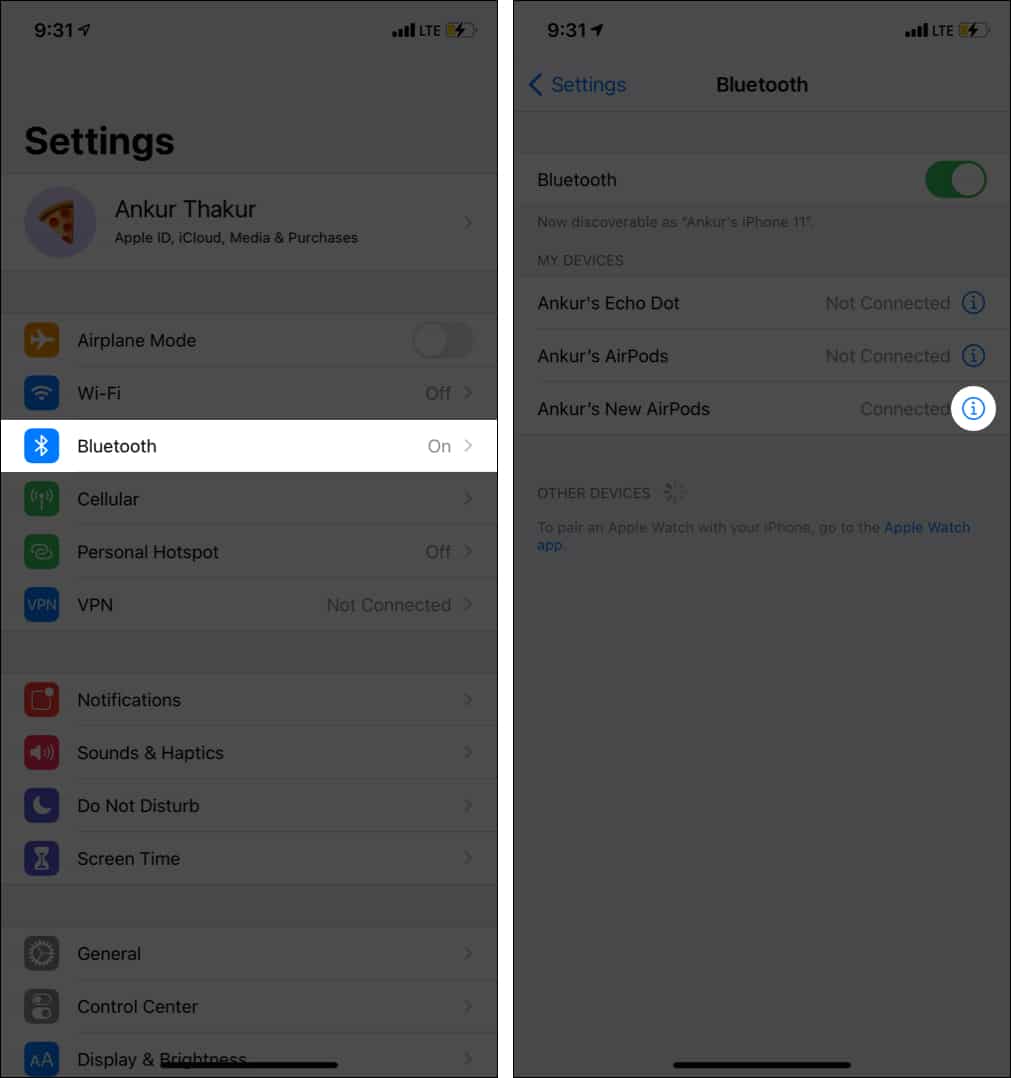
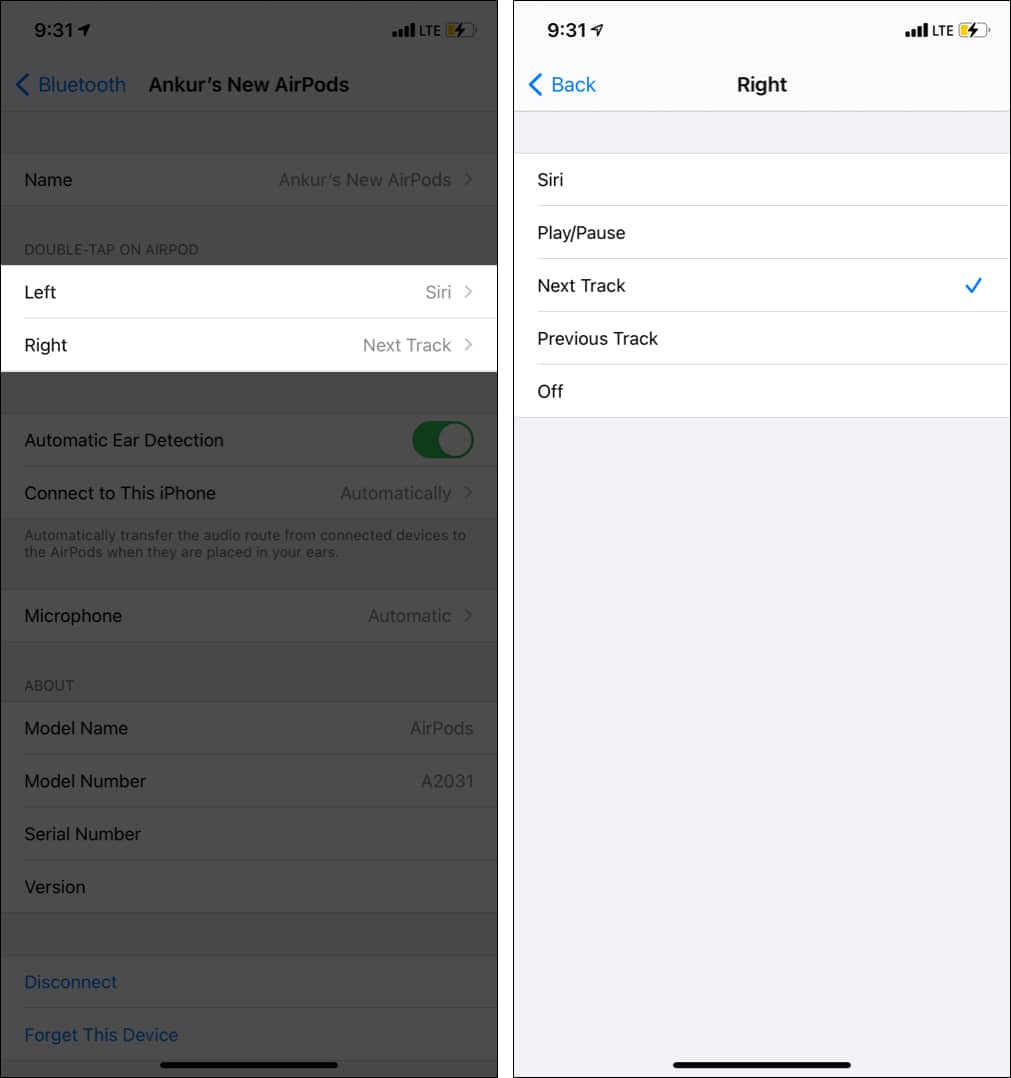
- Tap Left or Right and choose the desired actions for both. I have set left double-tap to call Siri and right double-tap to play the next track.
8. Use Siri on AirPods
Siri is the omnipotent voice assistant on all Apple devices, and AirPods are no exception. You can use Siri (obviously of the paired device – iPhone, iPad, Mac) via your AirPods. For this, double-tap and press and hold the AirPods Pro stick or say, ‘Hey Siri.’ Once you hear the Siri tone, give it a command.
9. Change volume using AirPods
Unlike AirPods Max, there is no easy way to increase or decrease volume using normal AirPods. But you can summon Siri and ask it to ‘set volume to 50%‘ or something similar.
10. Choose between left or right microphone
By default, the microphone (when on calls or Siri) is automatically switched between the two pods. However, you can set to use the microphone of any one side.
- In iPhone Settings, tap Bluetooth.
- Tap (i) next to AirPods name.
- Tap Microphone and choose the desired option.
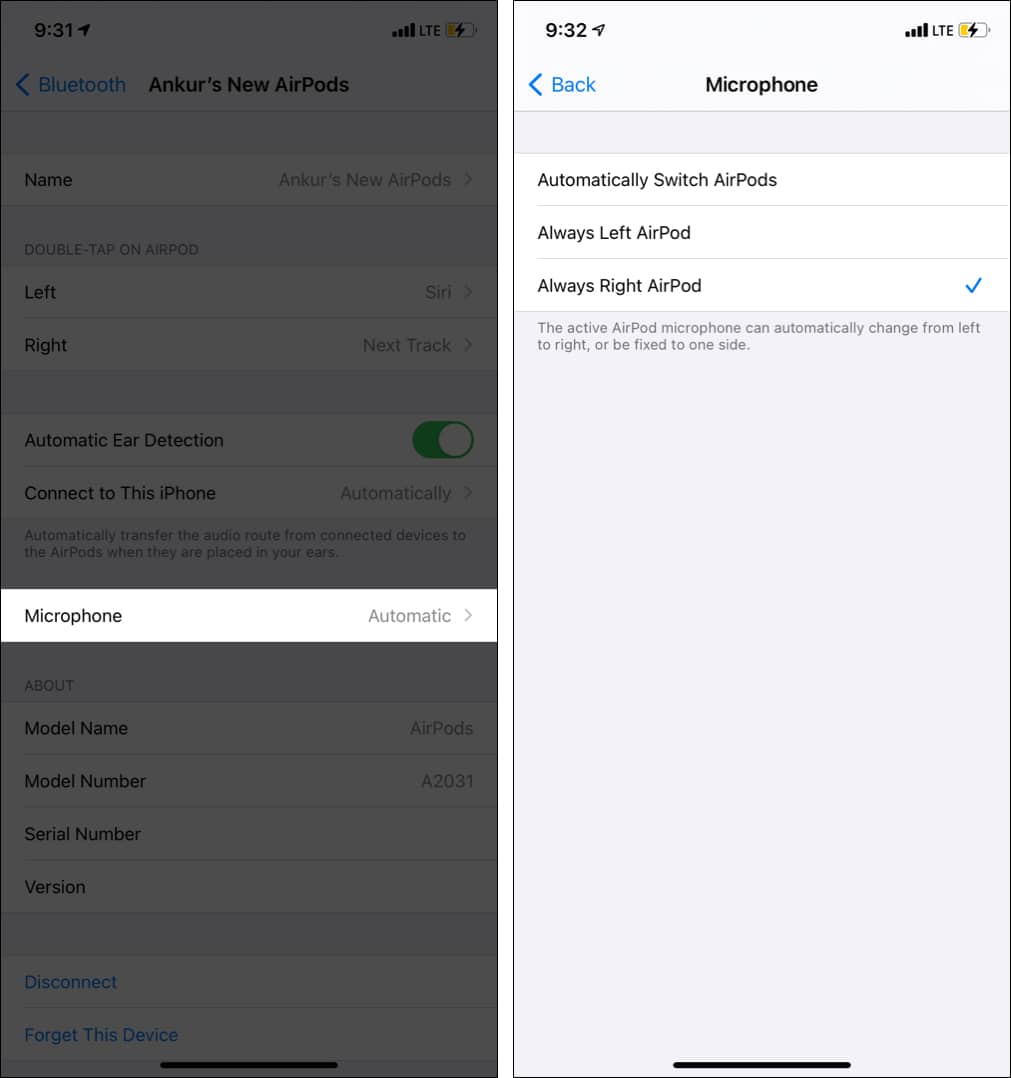
Note: Suppose you set left AirPods as the microphone. Even if it is out of the ear or in the charging case, it will be the assigned microphone. Thus, you might not be able to use the mic if you are using the right AirPod and the left is in the case.
11. Use AirPods as a remote mic using Live Listen
If you have an AirPods 2nd gen or the Pro version, the Live Listen feature turns your iPhone into a microphone, and the AirPods in your ear act as the speaker. This lets you hear the conversation clearly in a crowded place.
You may even use it as a sneaking device; just place the iPhone on a desk, and if you are within the Bluetooth range, you can hear the conversation going there via your AirPods. Head over to our article on how to use Live Listen for better understanding.
12. Share phone calls with another person
At one time, only one AirPod microphone is in action. But if you like, you can hand over one AirPod to someone near you while the other stays in your ear. This allows both to hear the other person talking. Pretty simple but worth reminding.
13. What your Apple AirPods lights say
You might have seen a tiny status light when you open the AirPods charging case. If your case supports wireless charging, this light is outside on the face of the case.
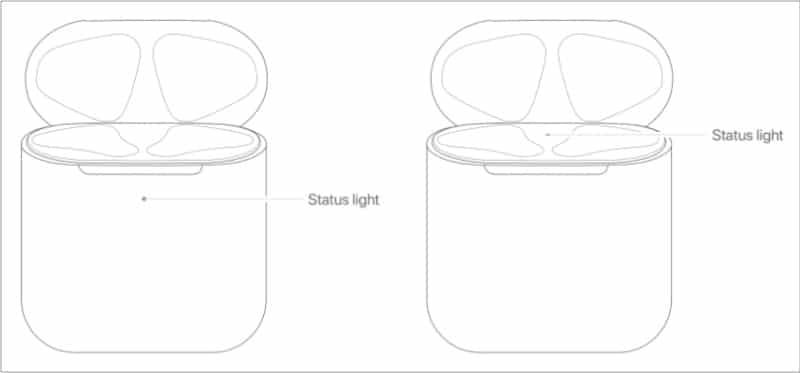
Sometimes it may be white, sometimes green or amber/orange, and sometimes it may blink. Here’s what the different AirPods lights mean.
- Green light when AirPods are in the case and the charging lid is open: means the AirPods are fully charged.
- Green light when AirPods are not in the case and the charging lid is open: means the charging case is fully charged.
- Amber light when AirPods are in the case and the charging lid is open: means the AirPods have less than one full charge.
- Amber light when AirPods are not in the case and the charging lid is open: means the charging case has less than one full charge.
- White flashing light: means pairing mode.
- Amber flashing light: means you have to set up your AirPods again.
- No light: means there is no battery left.
14. Share audio with two AirPods
You can share audio with someone close by. This lets you both listen to the same song playing on your iPhone. You can share audio if you have an iPhone 8 or later, newer iPads, and Apple TV 4K with tvOS 14.
The list of supported headsets are:
- AirPods Max
- AirPods Pro
- AirPods 1st and 2nd generation
- Powerbeats
- Solo Pro
- Powerbeats Pro
- Powerbeats3 Wireless
- Beats Solo3 Wireless
- Beats Studio3 Wireless
- BeatsX
- Beats Flex
If you fulfill the above conditions, head over to this post and learn how to share audio using your iPhone.
15. Let Siri announce the caller’s name
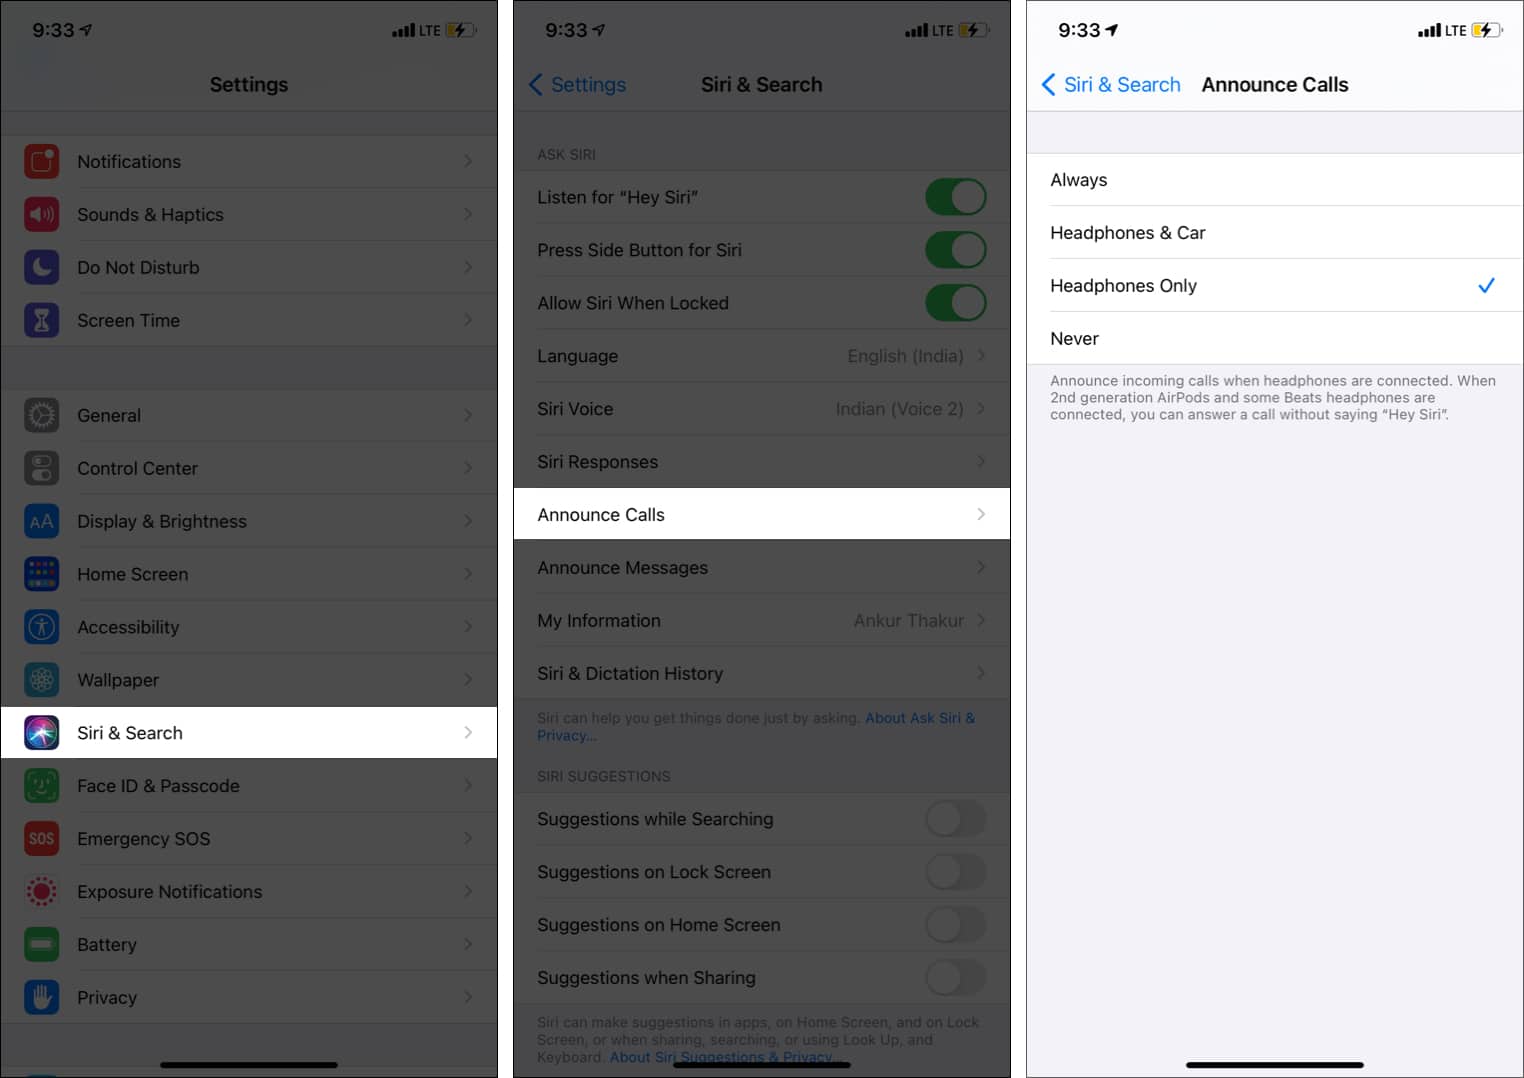
When you get a phone call, Siri can tell you the caller’s name in your ear. This works with all Bluetooth devices, including AirPods. Here’s how.
- Open iPhone Settings and tap Siri & Search (or Phone or FaceTime).
- Tap Announce Calls and select Headphones Only.
16. Announce messages via Siri
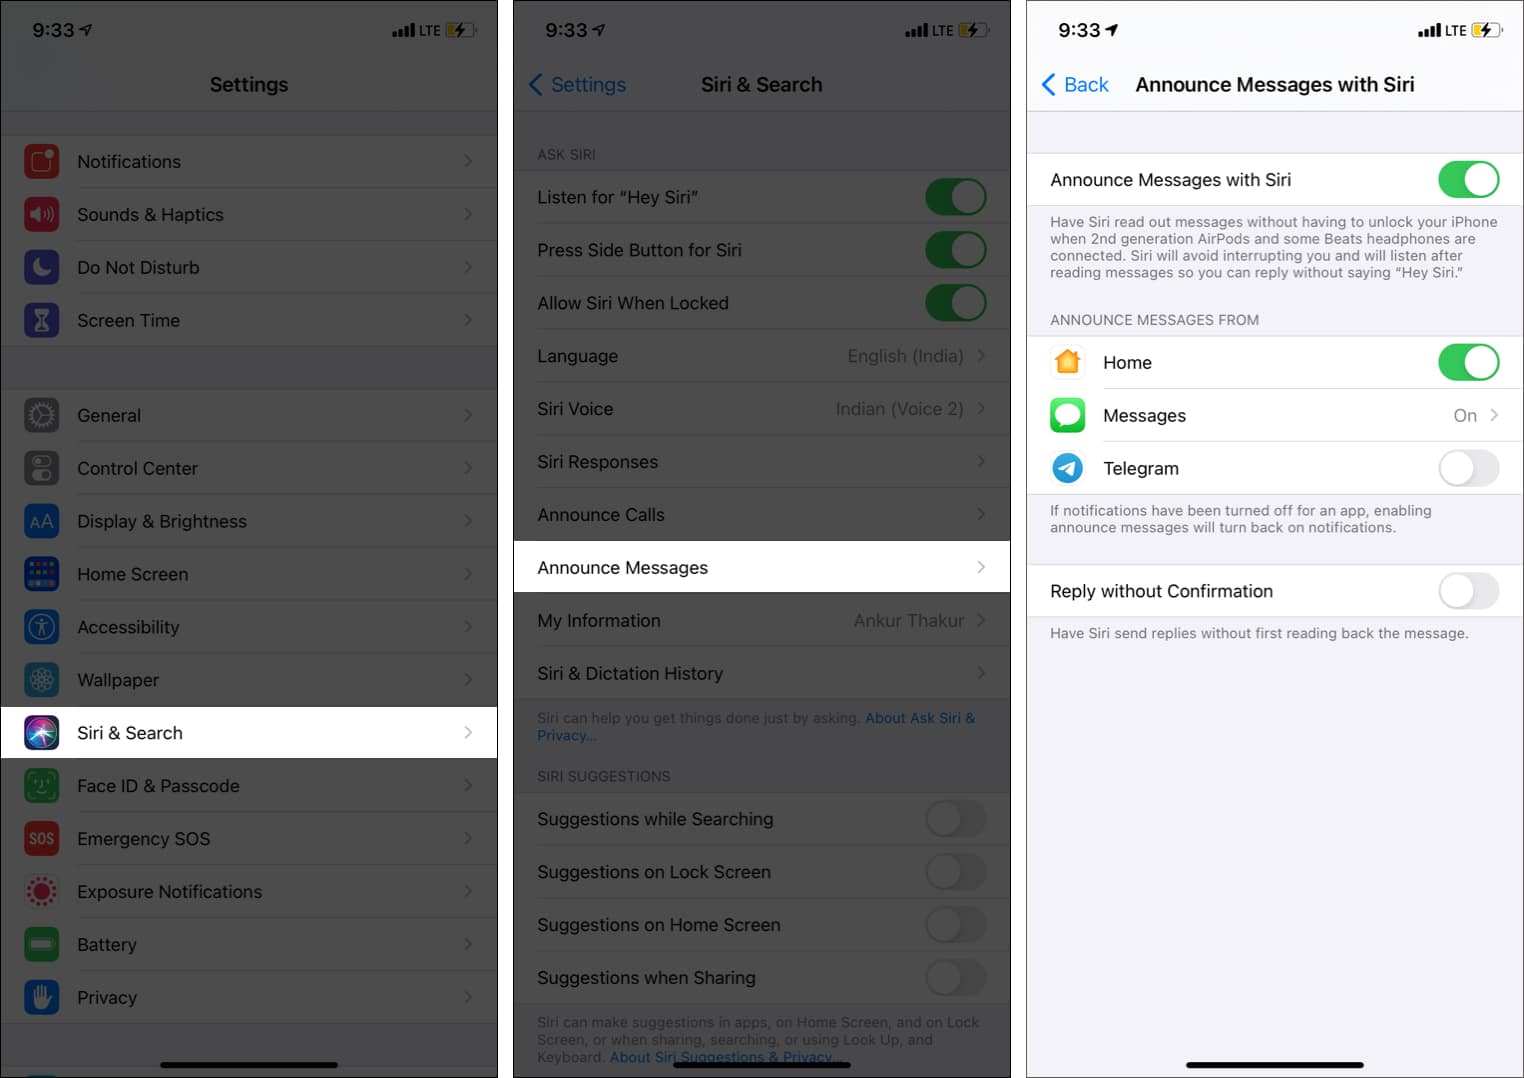
With AirPods 2nd gen, AirPod Pro, and some Beats headphones, Siri can read out messages without the need to unlock the iPhone.
After reading the message, Siri will listen, and you can dictate a reply. You do not need to say, ‘Hey Siri, reply.’ You can simply speak, and Siri will understand that you are replying to that message it read for you.
- Inside iPhone Settings, tap Siri & Search (or Notifications).
- Tap Announce Messages and enable it.
- Choose the app (if you see). For Messages, you may further choose to announce for everyone, contacts, recents, or only favorites.
17. Automatic Ear Detection
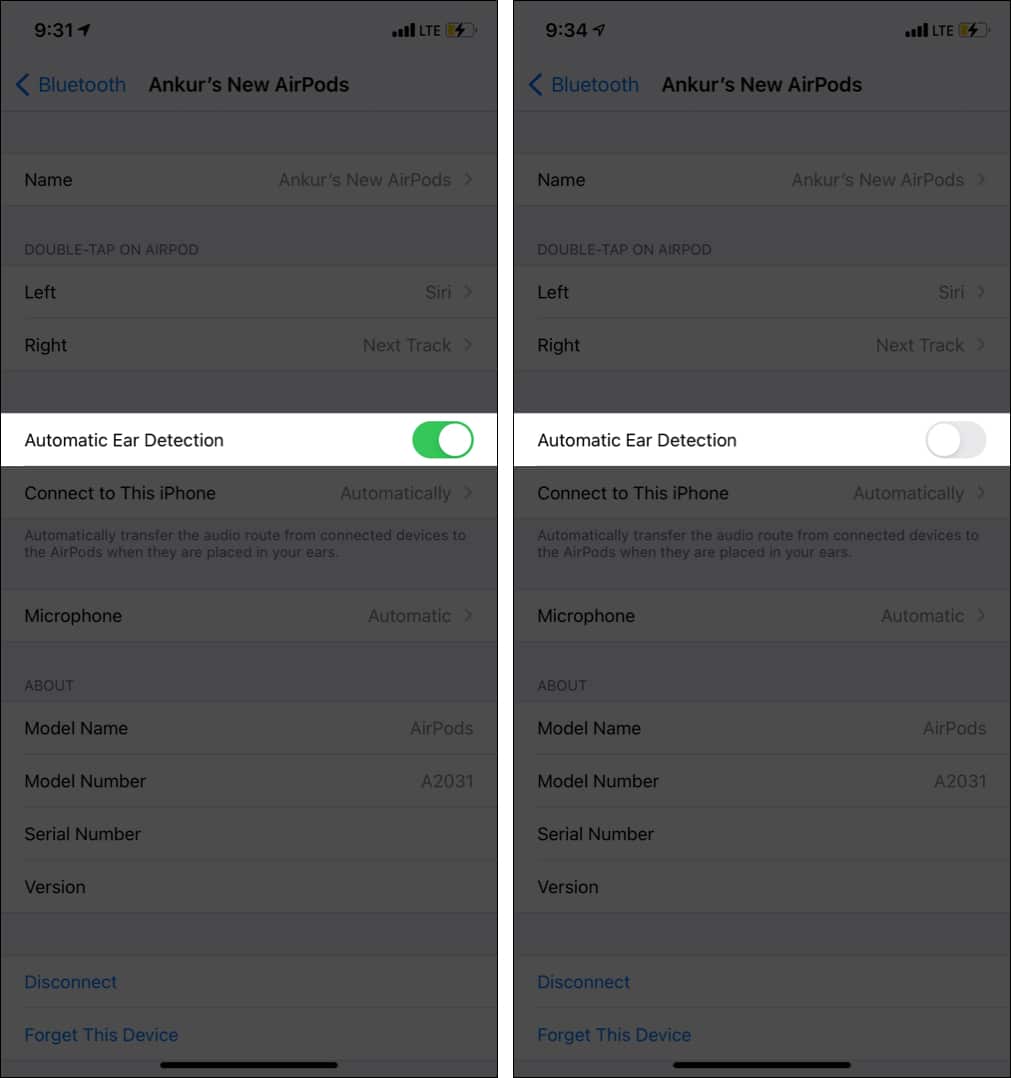
This is a very useful AirPods ear tip. By default, Automatic Ear Detection is on. This means when you take the AirPods out of your ear, the music pauses. When you put it back in, it resumes. This handy feature also saves battery.
But if you are disturbed by the automatic pause of music and videos every time you take one pod out of the ear to hear someone talk, you may disable it.
Become an iGeeksBlog Premium member and access our content ad-free with additional perks.
- Open iPhone Settings and tap Bluetooth.
- Tap (i) next to the AirPods name.
- Turn off Automatic Ear Detection.
- Now, audio will continue playing even if the AirPod(s) are out of your ears.
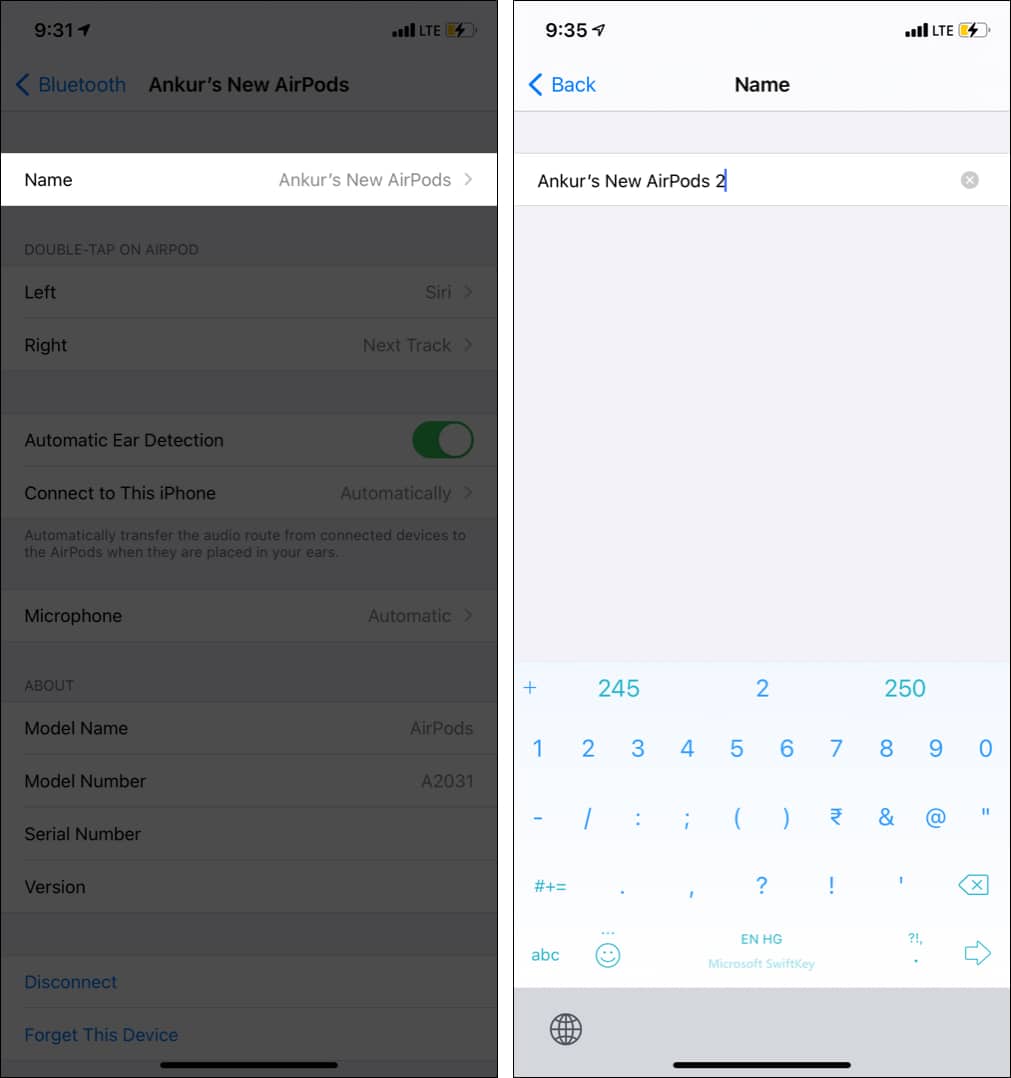
18. Rename your AirPods
- Open iPhone Settings and tap Bluetooth.
- Tap (i) next to the AirPods name.
- Tap Name.
- Type the new name.
19. Switch the audio output on iOS and macOS
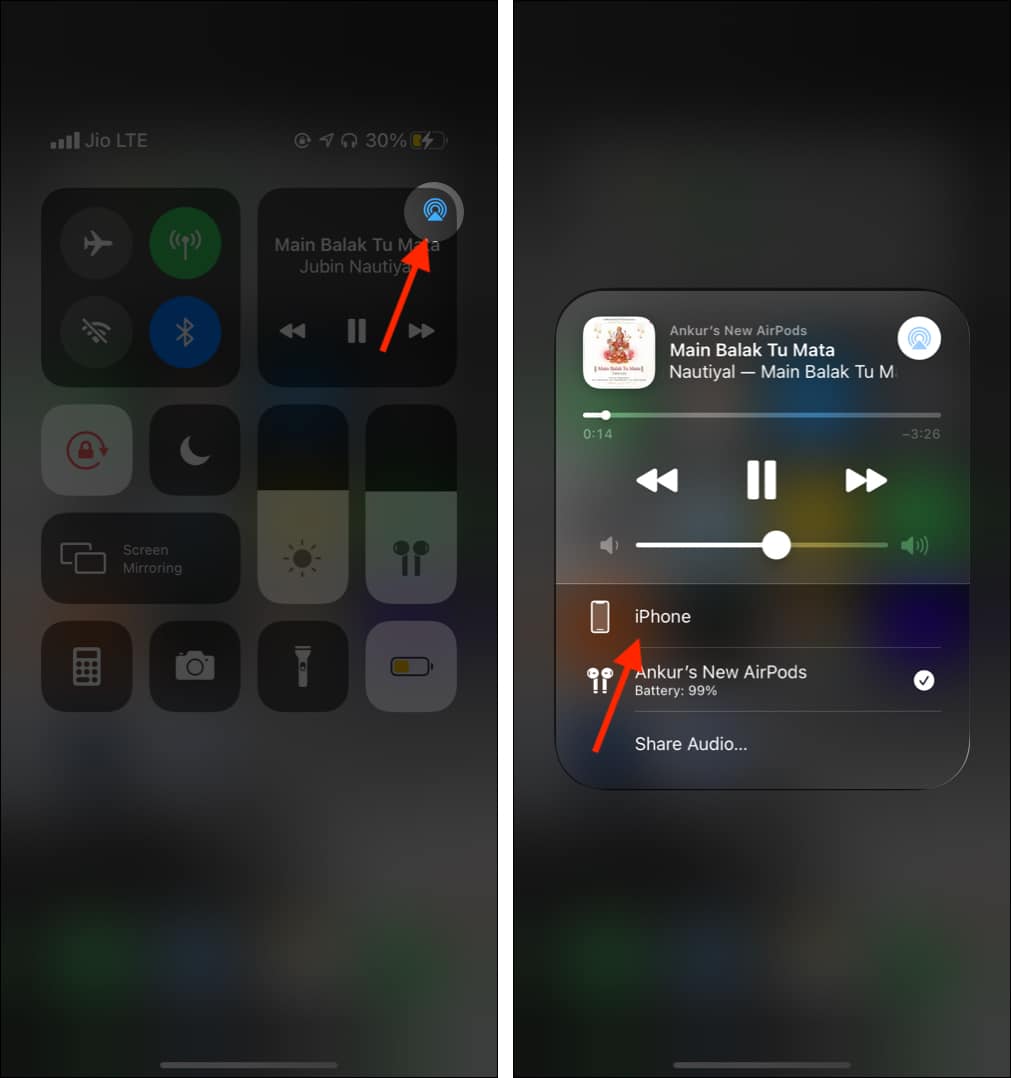
Audio plays via the AirPods, but you can change it to some other device like HomePod or the device’s internal speaker. Here’s how to do that.
- On iPhone or iPad: Bring the Control Center and tap the audio AirPlay icon. Next, choose one of the available output options.
- On Mac running an older version of macOS: Click the speaker icon from the top menu bar and change the output.
- On macOS Big Sur: You can use the Control Center to change the output, just like iPhone.
20. Check AirPods battery status
The AirPods charging case can juice up the tiny pods multiple times. Here’s how you can check the battery status of the case and the AirPods using the iPhone, Mac, or Apple Watch.
21. Use one AirPod
I have been using the AirPods (1st and 2nd gen) for the last three years. And every time, I have noticed that both the pods do not discharge at the same rate. For example, sometimes, the left AirPod has a 34% charge while the right one has less than 10%.
If you, too, have noticed this, you can continue using one of the AirPods while putting the other in the charging case. You may use this trick of using one AirPod at a time to get more listening time out of the charging case.
22. How to find your misplaced AirPods
Find My makes it possible to locate your misplaced or lost AirPods. You can play a sound or get directions to the location it was last connected to your device. I recently wrote a dedicated post that shows you how to find lost AirPods. Take a look.
23. How to clean your AirPods
If you are like me, you may be taking extra steps to keep the AirPods and their case clean. But still, you might see dirt and wax accumulated in the AirPods grills and inside the lid. We have a dedicated post to help you keep your AirPods clean.
24. Check your AirPods firmware version
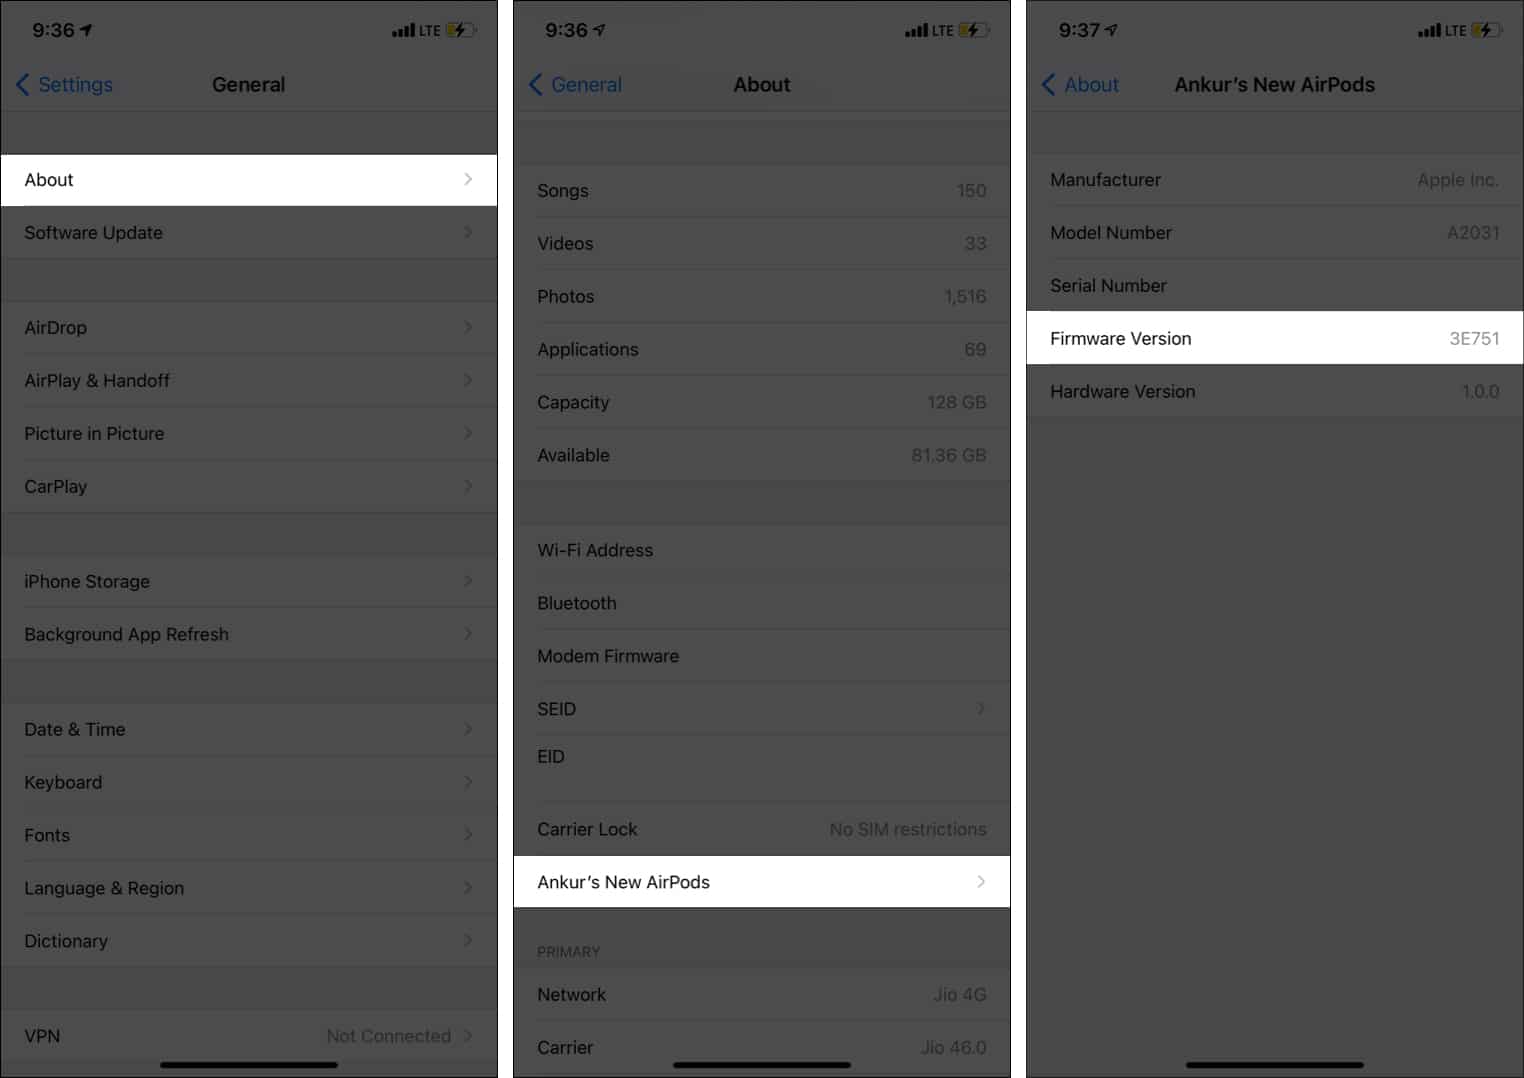
You can check the firmware version by following the steps below.
- Connect your AirPods to the iPhone and go to Settings.
- Tap General → About.
- Scroll down, and tap your AirPods name.
- On the next screen, you have the Firmware Version.
Tip: You may even follow these steps to ensure your AirPods have the latest firmware.
25. Reset AirPods
If you face problems/difficulties using the AirPods, resetting it may help. This will disconnect them from the paired devices, and you will have to pair them again. You can learn how to reset your AirPods.
26. Get accessories for your AirPods
You might be using an excellent case for your iPhone, a screen protector, and some other helpful accessories. Similarly, you can customize your AirPods with ear hooks, a cover for the charging case, strap, etc. Here are some posts that might help you find the right accessory.
Advanced AirPods hacks
27. Use Spatial Audio on AirPods Pro
Spatial Audio on AirPods Pro and AirPods Max let you enjoy a theater-like sound that elevates your video experience. It gives you a feeling that the sound is coming from various directions.
Here’s how to use it if you have iPhone 7 or later or a new iPad running iOS 14 or iPadOS 14. The video content, too, must be from a supported app (and Dolby Atmos 5.1 or 7.1 audio supported)
- Open iPhone Settings and tap Bluetooth.
- Tap (i) next to AirPods Pro or Max.
- Switch on Spatial Audio.
Tip: You can control and see the status of Spatial Audio from the Control Center. For this, touch and hold the Volume slider. You will see one of the following icons.

28. Measure real-time headphone audio levels
Constant sounds above 80db can potentially harm your listening abilities. Thus, you must also keep your headphone level in control. iOS 14 with AirPods and some Beats headphones can now show you real-time headphone audio levels on your iPhone. If you often play media on high volume, take a minute to learn more about this safety feature and see how to use it.
29. Headphone Accommodations on AirPods Pro
If you have difficulty hearing low sounds, Headphone Accommodations in iOS 14 and iPadOS 14 help you by amplifying soft sounds and specific frequencies, making them easier to hear. It works with the following headphones.
- AirPods (2nd generation)
- AirPods Pro
- AirPods Max
- Apple EarPods (with 3.5 mm Headphone Plug or Lightning Connector)
- Powerbeats
- Powerbeats Pro
- Beats Solo Pro
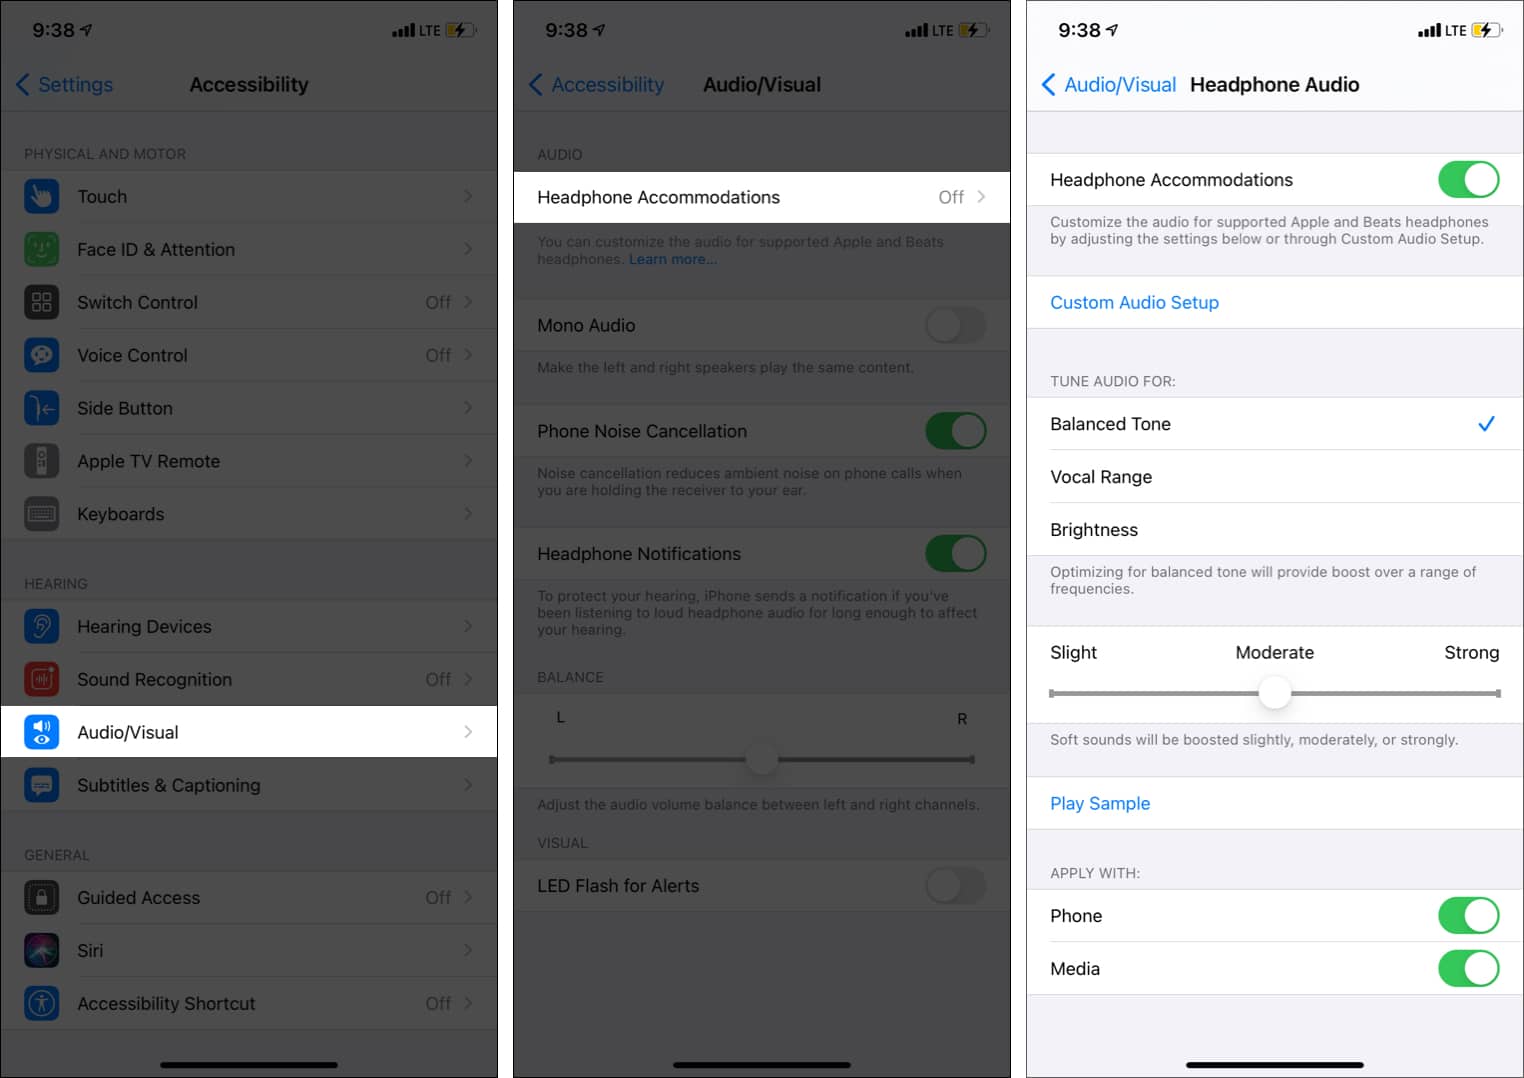
Next, here is how to set up Headphone Accommodations:
- Open iPhone Settings and tap Accessibility.
- Tap Audio/Visual.
- Tap Headphone Accommodations and turn it on from the next screen.
- You can choose it to work with all calls (including FaceTime and third-party app calls) or Media (Siri, music, movies, podcasts, audiobooks, voicemail, and Live Listen).
- Tap Custom Audio Setup to fine-tune it.
- You may also use the slider to choose among Slight, Moderate, or Strong.
30. Enable noise cancellation on AirPods Pro
You can use the Control Center to turn on ANC effortlessly. For this, press and hold the volume slider and choose Noise Cancellation. You can use Transparency mode via the same steps.
Tip: One of the coolest things about AirPods Pro is that you can choose to enable noise cancellation even for one AirPod Pro. Open iPhone or iPad Settings → Accessibility → AirPods. Now, toggle on Noise Cancellation on One AirPod.
31. Control AirPods Pro noise cancellation and Transparency from Apple Watch
If you think that controlling noise cancellation or Transparency mode is quite simple from the iPhone, let me tell you that it’s equally straightforward from Apple Watch. When listening to audio through your smartwatch, simply wake the screen of your watch and hit the tiny AirPlay icon. After that, choose Noise Cancellation, Transparency, or Off.
32. Use AirPods Pro noise cancellation and Transparency Mode
Switching between Active noise cancellation and Transparency Mode is as straightforward as it can ever get. Simply press and hold either AirPod Pro stems to cycle between noise cancellation and Transparency. A tiny ding sound will confirm that you have successfully switched to ANC or TM.
33. Customize AirPods Pro Force Sensor
Depending on your convenience, you can fine-tune the duration of Force Sensor. For instance, you can choose to keep the default option when it seems to be in line with your taste. But if you want to get the better of it, you have the option to choose short or shorter.
- Open iPhone Settings and tap Accessibility.
- Tap AirPods Pro.
- Under Press and Hold Duration, choose one of the options – Default, Short, or Shorter.
34. Customize AirPods Pro control press speed and duration
While most folks would find the default press speed of the AirPods Pro up to the task, it might not suit everyone’s convenience. If you feel the same, you can choose to fine-tune your earbuds’ press speed with ease.
- Inside iPhone Settings, tap Accessibility.
- Tap AirPods Pro.
- Under Press Speed, choose among Default, Slow, or Slowest.
35. How to take out the AirPods Pro comfortably out of the case
While it’s easy to take out the AirPod from the case, some may find it inconvenient – especially those who hold the earbud wrongly. To take the earbuds out comfortably, push on the back of each bud, and it will pop out between your forefinger and thumb.
These are some of the tips and tricks that will help you use your AirPods to the fullest. Next, I would like to answer two related questions that several people ask.
AirPods are compatible with almost any unrestricted Bluetooth device. This means you can pair it with iPhone, iPad, Apple Watch, Mac, Windows PC, Android phone and tablet, Chromebook, and much more.
AirPods 1st and 2nd generation are neither sweat/water-resistant nor waterproof. AirPods Pro are sweat and water-resistant but not waterproof. This makes AirPods Pro ideal for heavy, sweaty workout and water splashes, but they can not be used while swimming, showering, rain, etc. The charging case of any AirPods are neither water-resistant nor waterproof.
You may also like to read:

