Is your MacBook microphone not working, and you find it a pain to connect over FaceTime, Zoom, Skype, or use things like Siri, audio recording, and more? This can be due to a basic glitch or a faulty microphone setting. But worry not! Let me show you the tested solutions to fix the built-in microphone not working issue.
- First, let us start with a microphone test
- Learn about the various microphones you can use
- How to fix MacBook’s microphone not working
First, let us start with a microphone test
Press and hold Command + Spacebar to summon Siri. You may also click its icon at the top left. Now, ask it something like ‘How is the weather?‘ If you see the transcript of your voice command, your microphone is working perfectly.
This is a good sign as it means on the hardware level, the built-in MacBook’s microphone is working, and you do not have to spend money or time at the Apple Store.
So the problem may be due to app permission, mic input levels, or temporary glitch. Let me show you how to fix it. But before that, a few words on different mics you can use with your Mac.
Learn about the various microphones you can use with Mac
1. Your MacBook Pro, MacBook Air, other versions of portable Apple notebook or iMac have at least one built-in microphone. You can use it for FaceTime, Zoom, Skype calls, audio recording, and everything else a microphone typically does.
Note: Any other Mac, like Mac mini, Mac Pro, etc., do not have a built-in microphone.
2. You can use an external wired compatible microphone bought from Amazon, Best Buy, a local computer shop, etc. Depending on the model, they may plug into the MacBook’s 3.5mm headphone jack or the USB port.
3. Apple wired EarPods or wired headsets from other manufactures could also be connected to your Mac, and the microphone on it can be used for calls, audio recording, etc.
4. Finally, in this wireless age, you can use your AirPods or other third-party Bluetooth earbuds, headphones, etc., and use its microphone.
Now that you have the basics cleared, let’s jump to the fixes.
How to fix MacBook’s microphone not working
1. Fix the sound input settings
- Click the Apple logo at the top left and choose System Preferences.
- Click Sound.
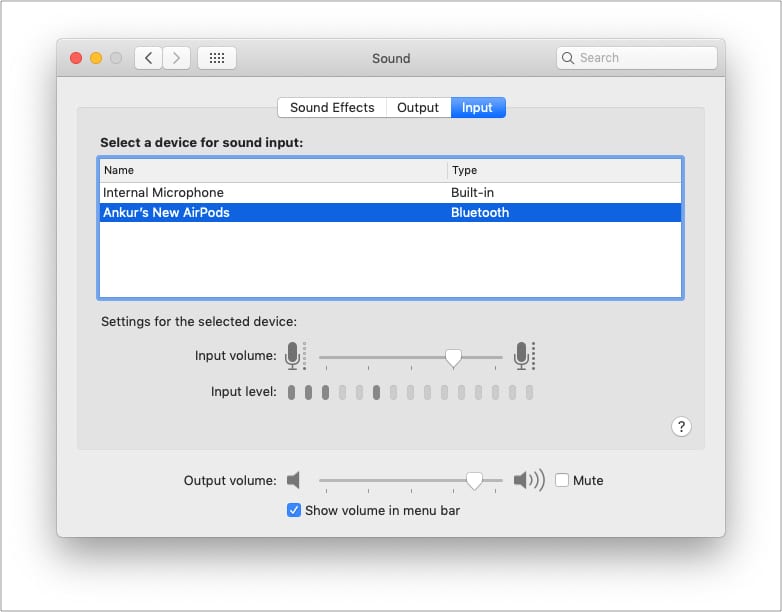
- Now, click the Input tab.
Here you will see all the available microphones. For example, in the image below, you can see I have two mics – Internal Microphone and the mics on my connected AirPods. From here, you may select one. - Let us tweak the settings for the selected microphone. Speak something at a normal pace.
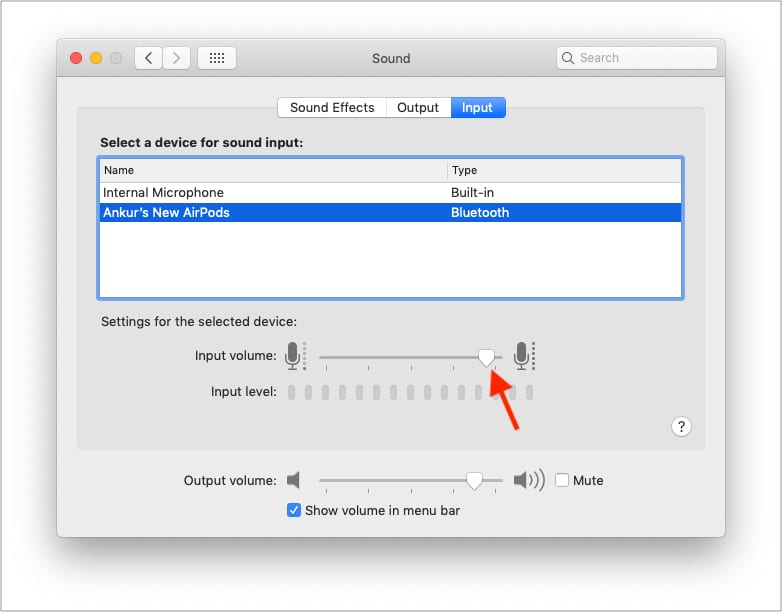
Do you see the holes next to the Input level fill up? If yes, the microphone is catching your sound. If you speak louder, more holes will fill up. - Next, you can increase the input sensitivity of the microphone by sliding the Input volume slider to the right.
When it is on the right, the microphone can sense and pick up even low sounds. If it is on the far left, you will have to speak very loudly for the microphone to pick up your voice.
2. Give microphone permission to the app
On modern macOS versions, you have the control if you want to allow an app to access your Mac’s microphone or not.
For example, if the Mac microphone is not working with Zoom, you likely denied the Zoom app the mic access when it asked you. Follow the steps below to permit an app to use the microphone.
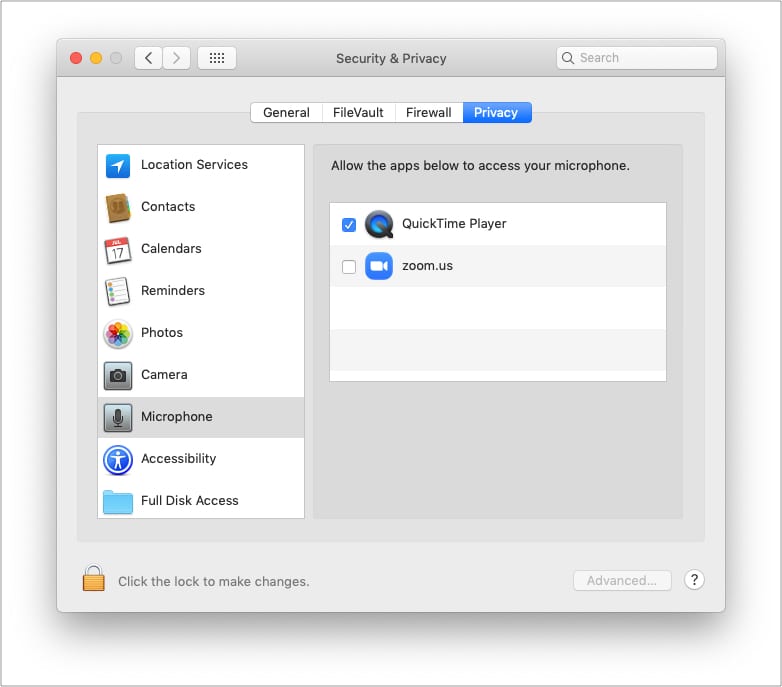
- Open System Preferences → Security & Privacy.
- Click the Privacy tab.
- From the left sidebar, select Microphone.
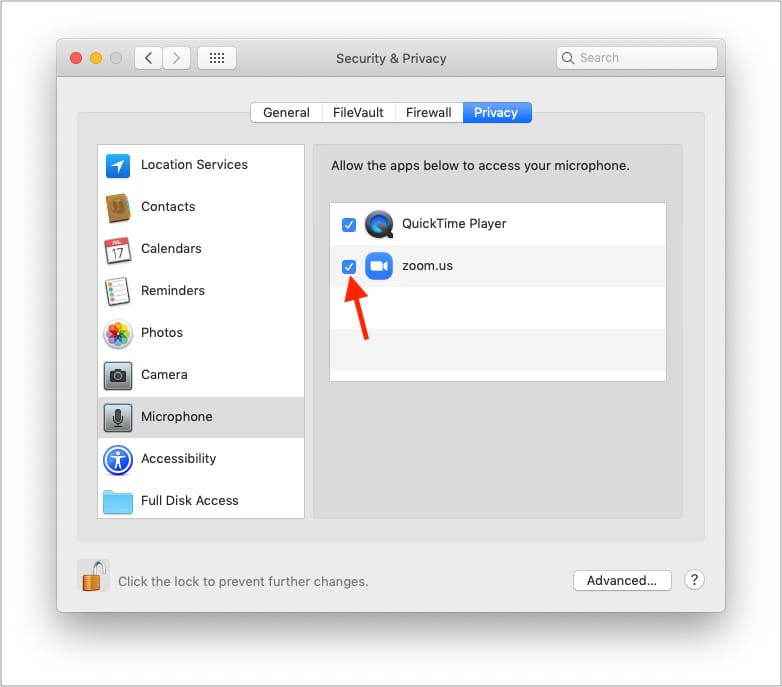
Now, you will see all apps with mic access or the denied status. - To allow an app, click the padlock icon at the bottom left and authenticate using your MacBook’s password.
- Now, check the box for the app to allow it to access the microphone.
- Finally, quit the app and reopen it. The app can now use the microphone.
3. Restart your MacBook
This is an excellent solution to fix temporary glitches that your Mac picks up during regular use. Save your ongoing work → click the Apple logo at the top left → choose Restart.
Note: If a simple restart does not help, try to restart your Mac in safe mode. If the microphone works in safe mode, this means there are conflicting apps that are causing trouble. To address this, update the Mac apps and make sure you are running the latest version of available macOS for your computer.
4. Check the Mac app’s internal microphone settings
Some audio recording apps, video editing apps, video calling apps have their internal microphone setting. Make sure everything is working correctly there.
Most likely, the mic settings would be in the app’s preferences. To enter the app’s preferences, open the app and press Command key + , (comma key).
5. Reset NVRAM/PRAM
Another reliable fix to address the internal microphone not working on Mac is to reset NVRAM/PRAM. We have a separate guide showing you how to do that on Intel-based MacBooks. Have a look.
Note: If your computer has an Apple Silicon, you may skip this.
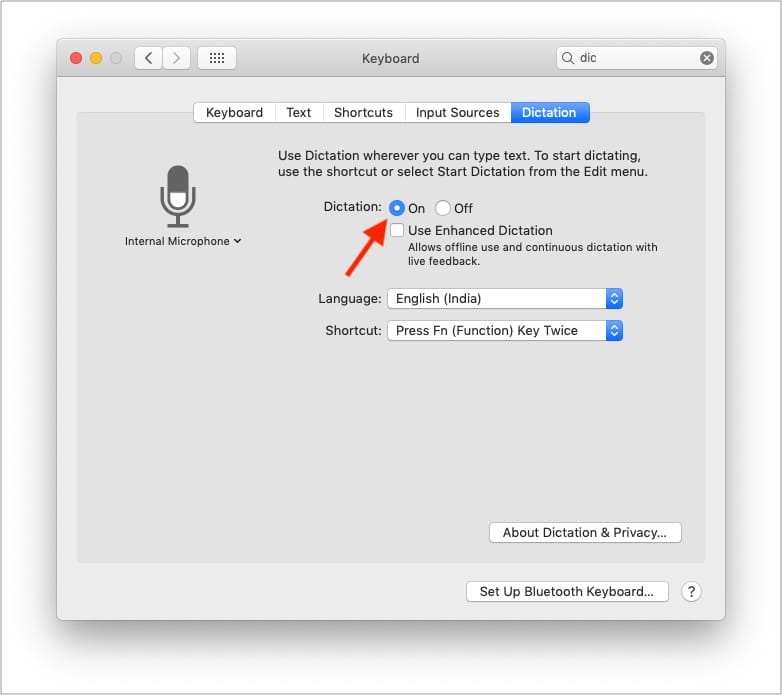
6. Give Dictation a shot!
If the above solutions did not help, enable dictation and see if this brings any luck.
- Open System Preferences and click Keyboard.
- Click Dictation.
- Turn on Dictation.
- After this, try using the microphone. It should work.
These are the ways to fix the Mac microphone not working issue. I hope these were helpful. If they weren’t, please use an external microphone for the time being and contact Apple Support for additional help.
Read next:
