We’re now in a world where you can easily purchase a latte without digging through your bag for your credit card or loose cash. With technologies like Wallet and Apple Pay, a few taps on your iPhone or Apple Watch let you efficiently and securely pay for items, whether in-store or online.

But Apple Pay isn’t limited to the iPhone or Apple Watch. You can also use Apple Pay on your Mac for a more speedy checkout experience. Here’s everything you need to know about setting up and using Apple Pay on your Mac.
Things to know before using Apple Pay on Mac
- Before diving in, you need a compatible Mac model, which includes any of the following:
- Mac models with Touch ID
- Older Mac models (introduced in 2012 or later) paired with an Apple Pay-enabled iPhone or Apple Watch
- Mac computers with Apple Silicon paired with a Magic Keyboard with Touch ID
- Aside from a compatible Mac device, you’ll also need an Apple ID signed in on your Mac and:
- a card from a compatible credit card issuer or bank
- an Apple ID signed in on your Mac
How to set up Apple Pay on Mac with Touch ID
Setting up Apple Pay on Mac requires two basic steps: enabling your Touch ID (which you’ve been prompted to do during initiate setup) and updating your payment information.
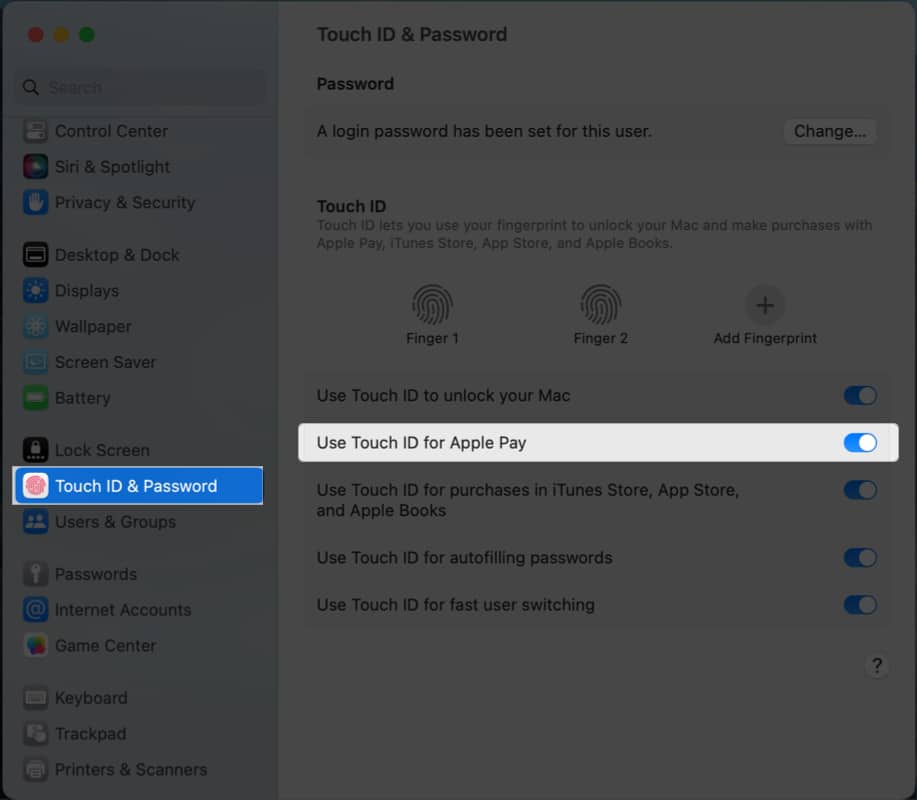
If you haven’t yet, here’s our guide to enabling Touch ID on your Mac. Make sure to toggle on Use Touch ID for Apple Pay.
The next part is adding payment details to your Mac. Here’s what you need to do on your device:
- Go to the Apple menu → System Settings.
- Scroll down and select Wallet & Apple Pay from the sidebar.
- Click Add Card. Enter your payment information. You can use your existing payment method if you’re already using Apple Pay on your iPhone or another Apple device linked to your Apple ID for iTunes Store and App Store purchases.
- Click Use a card on file. You might be asked to enter the card’s security code. Click Next to confirm.
- If you don’t have a payment method stored on file yet, select Add a new card and scan your card’s details by placing it in front of your Mac’s camera, ensuring that it fits on the frame shown on the screen.
Alternatively, you can select Enter Card Details Manually and manually provide all the requested card information. Verify your card number and click Next. - Verify your card’s expiration date and enter your three-digit security code. Click Next.
- Click Accept to confirm your understanding and acceptance of the terms and conditions.
- Select your preferred verification method and click Next.
- Type in the code you received and select Next. Your credit card should immediately be added to your Apple Pay wallet. However, some banks and credit card issuers may need more time to verify your information.
You also need to ensure that your email address and shipping information are correct to ensure that you won’t have any delays with the checkout process. Click Contact and Shipping button below the list of cards and double-check your information.
Note: Signing out of your Apple ID account will require you to set up Apple Pay again—this includes adding any cards you’ve previously added to Apple Pay on your Mac.
How to set up Apple Pay on Mac without Touch ID
If you’re using an older model of Mac, you may feel worried that you can’t use Apple Pay without a Touch ID.
Fortunately, Apple’s fantastic ecosystem lets you pair your Mac with another Apple device with a biometric sensor. That said, you can still set up Apple Pay on your Mac without a Touch ID if your Mac has a Handoff feature and a credit card stored on your iPhone or Apple Watch.
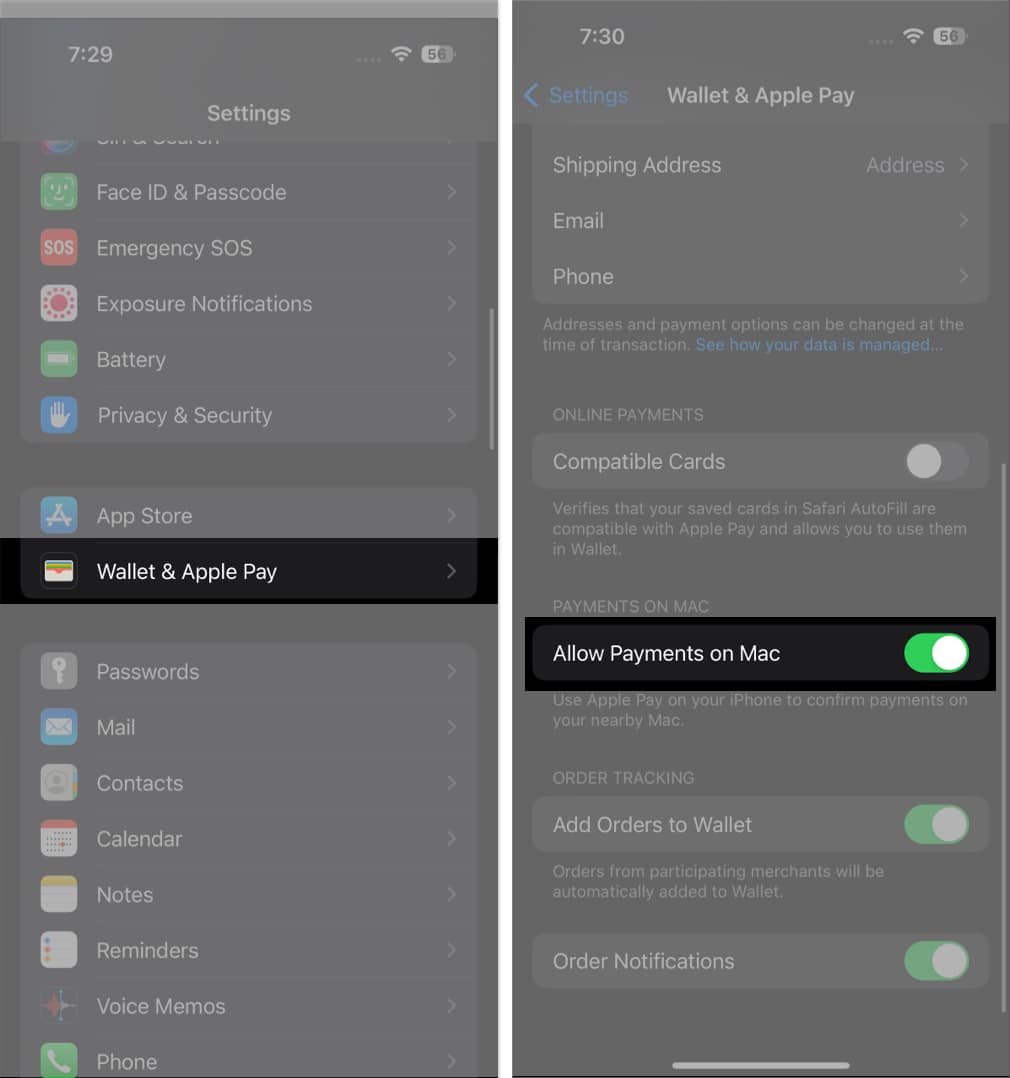
To set it up, do the following on your iPhone:
- Open Settings → scroll down and tap Wallet & Apple Pay.
- Toggle Allow Payments on Mac.
On your Apple Watch:
- Launch the Watch app on your iPhone.
- Tap Wallet & Apple Pay.
- Tick Allow Payments on Mac.
Once you’ve sorted out these basic requirements, go through the steps below to begin using Apple Pay on your Mac.
How to manage cards in Apple Pay on Mac
You can easily manage your cards and access your card information directly from your Mac if you add a card from your Mac with Touch ID.
- Just go to System Settings → Wallet & Apple Pay.
- Click a card in the sidebar and view the card’s information, including its account number, billing address, bank contact information, and transaction details.
You can also remove payment cards on your Mac with Touch ID:
- Go to System Settings → Wallet & Apple Pay.
- Select the card you want to remove → click the Remove (–) button.
How to use Apple Pay in Safari on Mac
Before you go on a shopping spree, note that Apple Pay is only available for Safari on Mac.
So if you’re using a different web browser, you’ll need to switch to Apple’s built-in browser to make a purchase.
To add, not all websites accept Apple Pay, but if you see an Apple Pay logo during checkout, it means that the site you’re on supports Apple Pay.
Here’s a comprehensive list of stores that accept Apple Pay. This is continuously updated, so you can bookmark this article as a reference.
Make purchases in Safari
- To make a purchase, just click Apple Pay in the checkout options. If you have more than one card, select which card you want to use. You can also change your contact information and shipping address.
- If you’re using a Mac with a Touch ID, place your finger on the sensor to complete the purchase.
- If you haven’t set it up yet, tap the Pay button in the Touch Bar and type your password.
- If your Mac doesn’t have a Touch Bar, double-tap the Touch ID and enter your password (for Macs with Apple Silicon) to go forward.
- If you’re using your Mac along with another Apple device, complete your purchase by doing the following:
- On your Mac computer: Use the Touch ID on your Mac computer’s Magic Keyboard.
- On your iPhone: Double-click the side button and authenticate the purchase using Touch ID, Face ID, or your iPhone passcode.
- On your Apple Watch: Double-click the side button on your unlocked Apple Watch.
View transaction details
Transaction details aren’t available on all cards, and viewable transactions depend on the card. Some may include only the transactions you’ve made on your Mac, while other cards may list all the card’s recent transactions.
To review your transaction details on your Mac:
- Go to Apple menu → System Settings.
- Click Wallet & Apple Pay in the sidebar.
- Click a card.
- Turn on Show transaction notifications. You should see the most recent transactions with the card on the right.
Most recent Mac and even older models support Apple Pay. If you’re using an old Mac without a Touch ID, you can still use your Apple Pay on your old Mac, provided you also have an Apple Pay-enabled iPhone or Apple Watch with you.
Just make your purchase as usual and select Apple Pay during checkout. Complete the purchase using your iPhone’s Face ID, Touch ID, passcode, or your Apple Watch’s side button.
Note that Apple Pay uses Handoff to transmit payment-related information from your Mac to your iPhone or Apple Watch.
Wrapping up…
Apple Pay on your Mac simplifies your checkout experience and keeps your transactions private. This feature isn’t limited to Macs with Touch IDs — even your old Mac can benefit. Remember, it’s not just about saving time — it’s also about enhancing security and maintaining privacy.
Were you able to set up Apple Pay on your Mac? Share your experience below!
Read more:


