Google Chrome is an excellent browser, and even Mac users love to use it as their primary window to the internet. If you also prefer the most-used browser globally, learn about some handy tips and tricks to enhance your browsing experience. So, let us get straight in and show you 36 tips and tricks for Google Chrome on macOS.

- Make Chrome your default Mac browser
- Use Groups in Chrome
- Need a text editor? Use Chrome for it
- Reopen recently closed tab
- Quickly compose an email from the URL address bar (Omnibar)
- Use other search engines like Yahoo, Bing, etc., from Chrome Omnibar
- Search for your emails from the Omnibar
- Control YouTube or other music sites using a tiny handy button
- Use URL address bar for simple mathematical calculations and conversions
- Create website shortcuts in the Launchpad
- Use private mode
- Search something quickly from a page
- Bookmark all open tabs
- Show or hide the bookmarks bar
- Import bookmarks and settings from Safari, Firefox, etc.
- Use Chrome as a multimedia player to open files like PDF, videos, etc.
- Choose what to open when you startup Chrome
- Pin tabs just like Safari
- Use Apple’s Chrome extension for iCloud Keychain passwords
- Keep everything in the cloud
- Autofill passwords, address, etc.
- Set Chrome appearance according to your liking
- Choose not to use Google as the search engine
- Change Chrome download location on Mac
- Use Extensions to enhance your Chrome experience
- Move open tabs to left or right
- Manage site permissions
- Clear browsing data
- Use Chrome’s Task Manager
- Add different profiles like personal, office, wife, or guest browser
- Cast Your Screen
- Instantly create a QR code of a webpage
- Use Chrome experimental features
- Use Chrome URLs
- Keyboard shortcuts for Chrome on Mac
- Restore Chrome to default settings
1. Make Chrome your default Mac browser
If you love using Chrome, let us start by making it the default Mac browser instead of the inbuilt Safari. For this, click the Apple logo at the top-left and choose System Preferences. Now, click General → Default web browser and select Google Chrome.
2. Use Groups in Chrome
The newly introduced ‘Group’ feature in Chrome is fantastic for organizing tabs. It lets you have one or several open tabs in neat groups. This declutters your top Chrome bar and keeps all tabs explicitly bundled to a topic (or as you desire).
For example, when I was writing this article, I had several Google Support pages open in different tabs. I added them to the Tips group. Now, it is clean and organized. I can see all those tabs after expanding the group in a click.
- To create a new Google Chrome Group: Right-click at the top of a tab and choose Add tab to new group. Or, click Tab from the top Mac Menu Bar and choose Group Tab. Next, give the group a name and choose a color. You may also see and set some other options as desired.
- Finally, press the enter key.
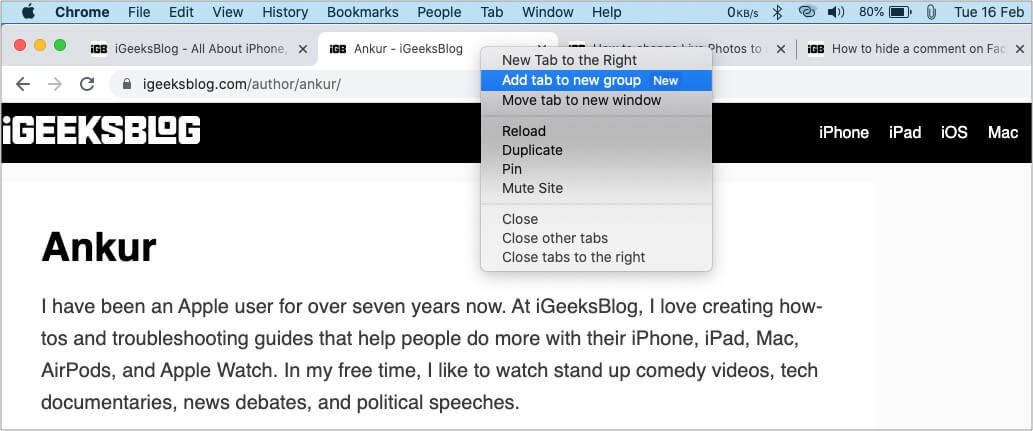
- To add a tab to a Google Chrome Group: Right-click the tab → Add tab to group → click one of your created group names.
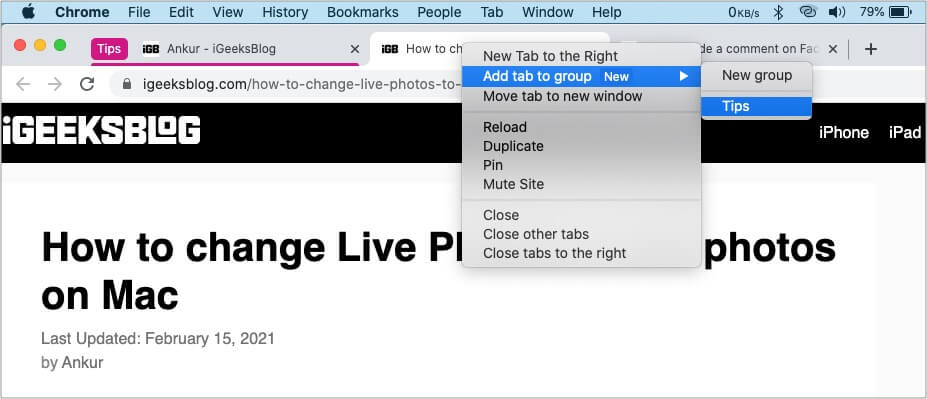
- Click the Group name to expand or hide all the tabs inside it.
- Tip: I like to drag the Group to the left for more organization.
- To remove a tab from a Google Chrome Group: Right-click at the top of the tab from the group and choose Remove From Group.
3. Need a text editor? Use Chrome for it
I used to love editpad.org. But recently it started showing numerous ads. Thus, I discovered a handy inbuilt trick in Chrome that lets you use it as a simple text editor.
For this, type or copy-paste this address data:text/html, <html contenteditable> in the Chrome URL box, and you have a handy text editor. Brilliant, right!
4. Reopen recently closed tab
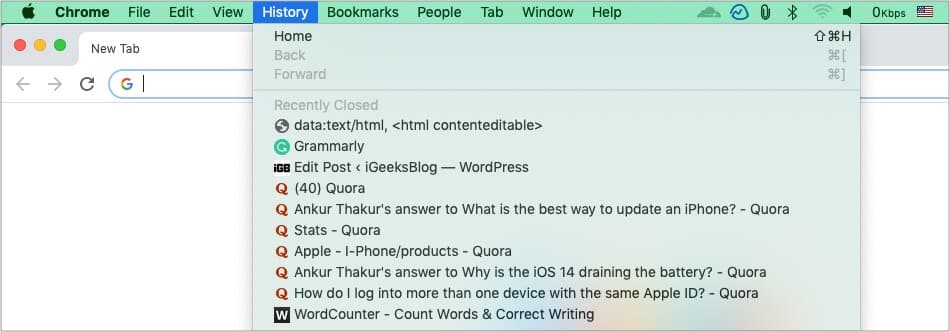
Accidentally closed a tab? Fret not. Click History in the top menu bar, and you will see your recently closed tabs. You may also press command + shift + T.
5. Quickly compose an email from the URL address bar (Omnibar)
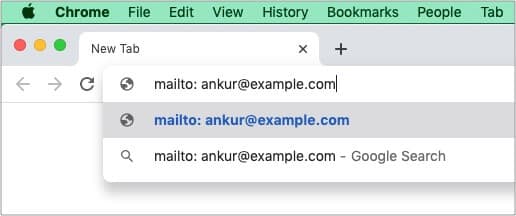
Type mailto: in Chrome’s URL address bar, and it will open your Mac’s email app ready to compose a new mail.
You may follow mailto: with an email address to accelerate the process. For example: mailto: ankur@example.com
6. Use other search engines like Yahoo, Bing, etc., from Chrome Omnibar
- In the address bar, type bing.com, yahoo.com, youtube.com, or igeeksblog.com, etc.
- Click Search Bing (or whatever it is).
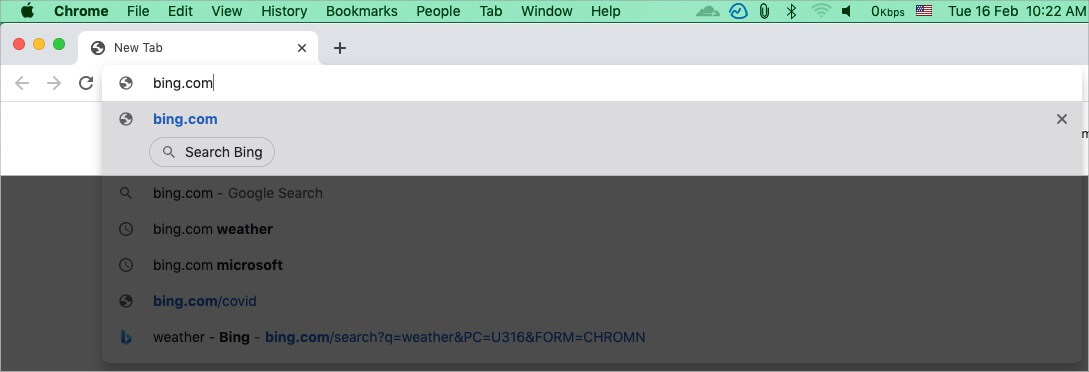
- Type the search query and hit the enter key.
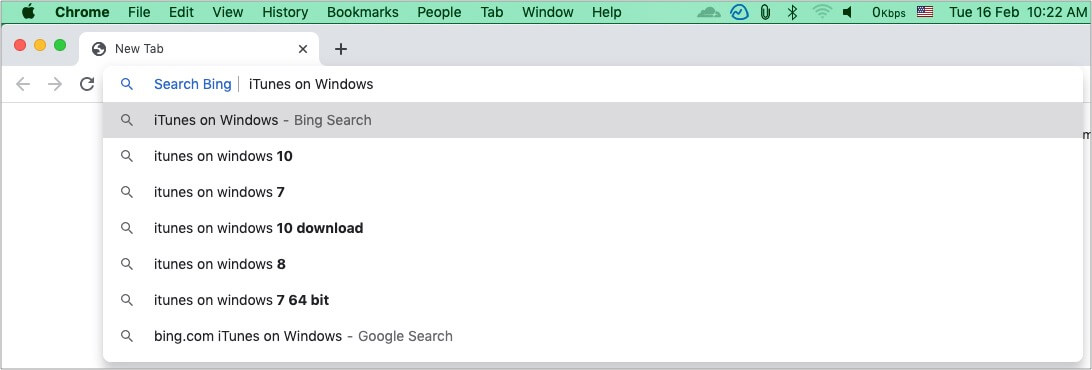

- Important Note: Search website will appear in step 2 only if you have visited that said site at least once before using Chrome.
7. Search for your emails from the Omnibar
- Click Chrome in the top menu bar and choose Preferences.
- Click Search engine in the left Sidebar.
- Next, Manage search engines.
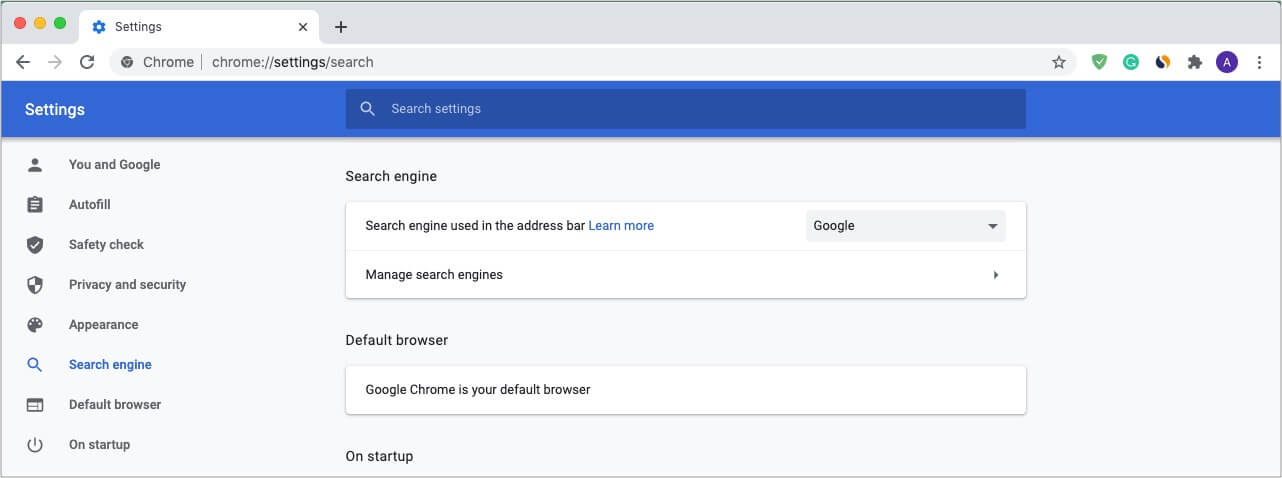
- Click Add next to Other search engines.
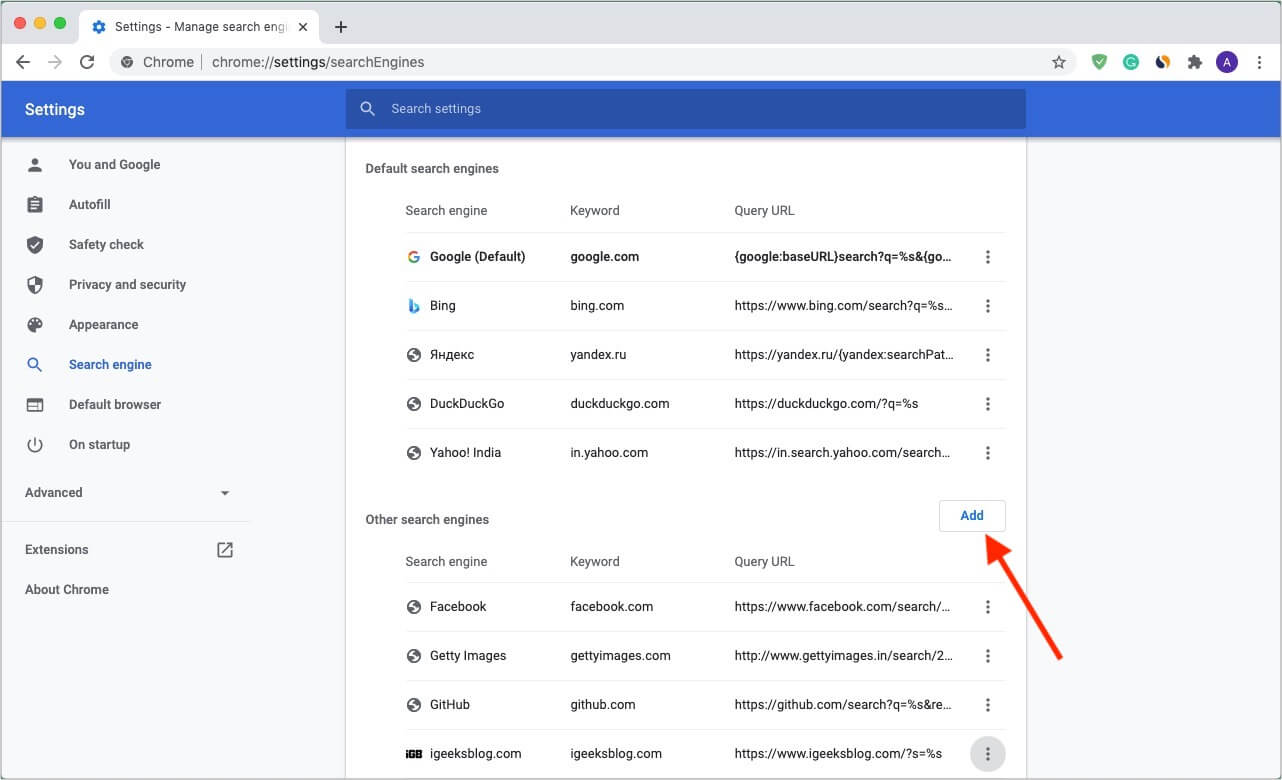
- Give a name and keyword. In URL, copy-paste this
https://mail.google.com/mail/ca/u/0/#search/%sand click Add.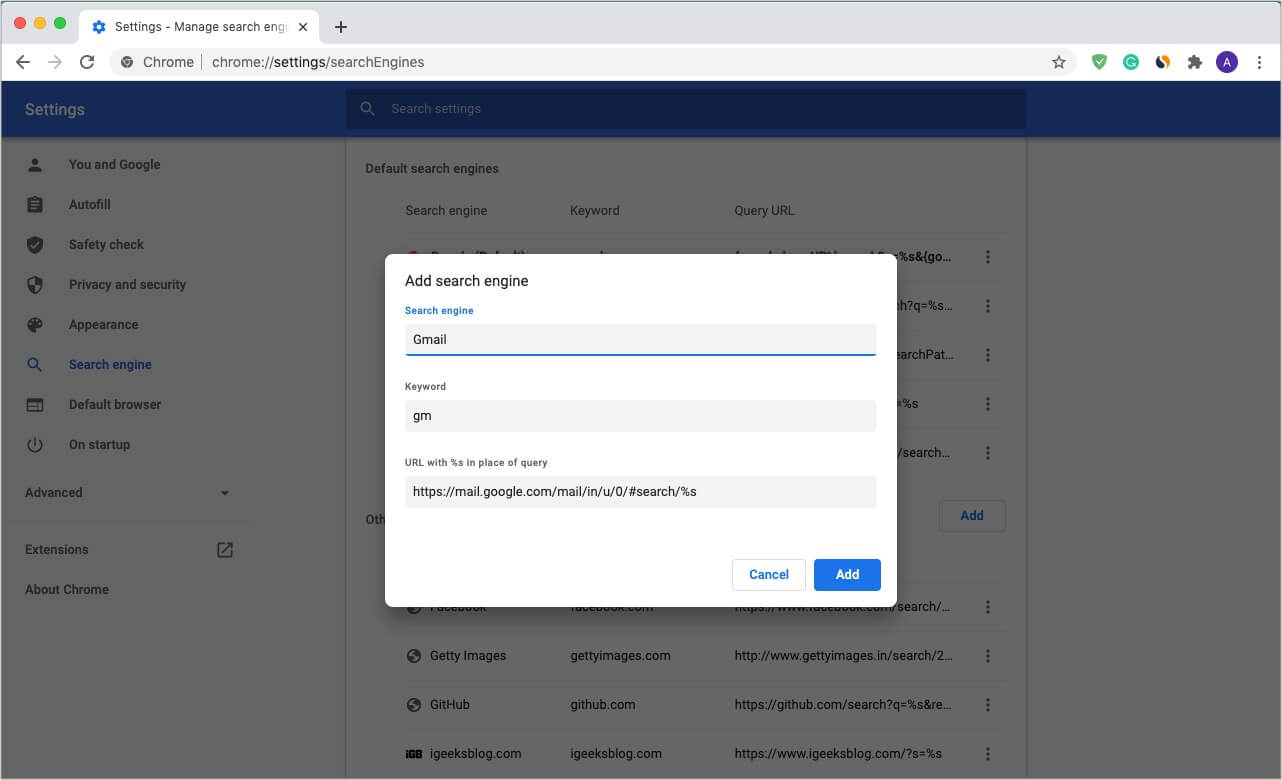
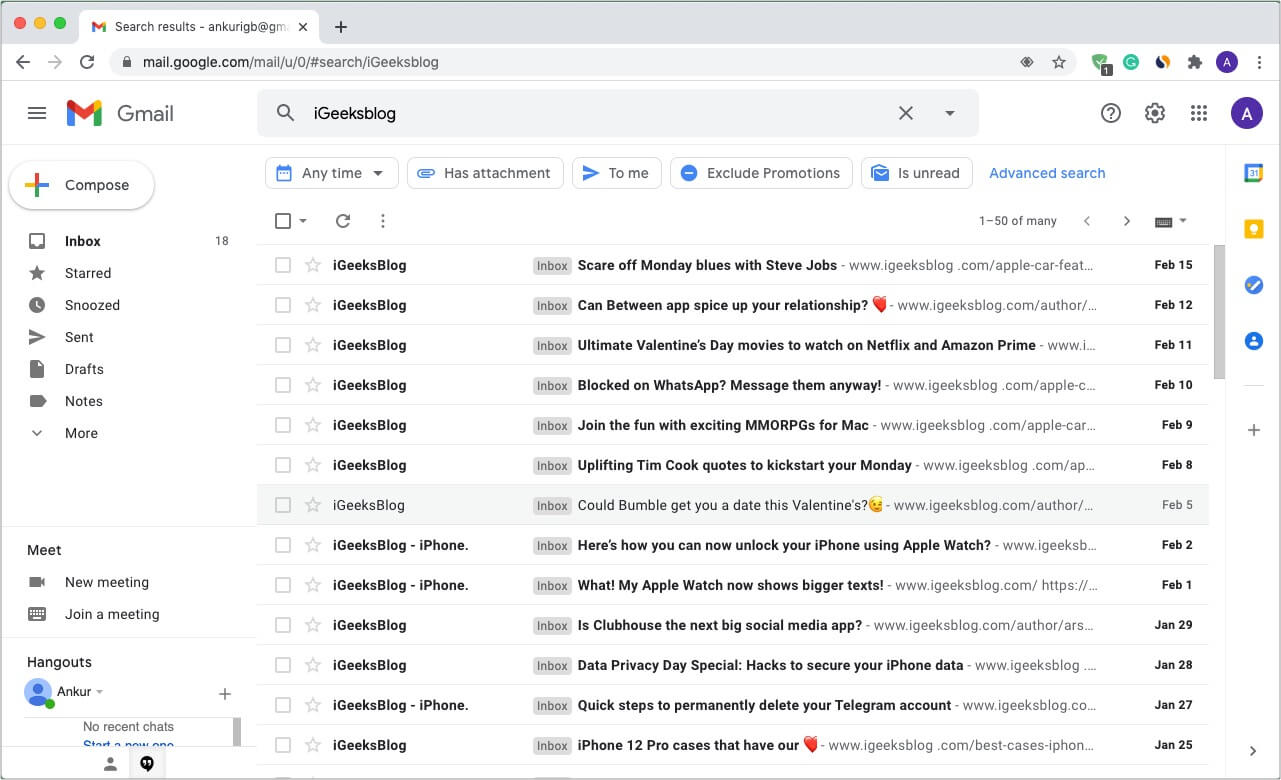
- Type the keyword in the address bar and then click Search Gmail. Next, enter your search term to see the results from your Google mail. Nice. Isn’t it!



When you play YouTube videos or other music streaming websites in Chrome, you will notice a tiny music icon in the top-right. Click it to control music playback.
Tip: Chrome on Mac also lets you enjoy YouTube in picture-in-picture mode. For this, right-click twice and choose Picture in Picture.
9. Use URL address bar for simple mathematical calculations and conversions
The Chrome Omnibar is a handy place for basic calculations and conversions. You can say it is a tiny version of your Mac’s Spotlight Search.

Type 78/3 or 60 feet to inches and things like this in the URL address bar. You will immediately see the answer below.
10. Create website shortcuts in the Launchpad
- Visit the desired site using Chrome and click the three vertical dots icon at the top-right.
- Click More Tools → Create Shortcut → Create. You will see the shortcut for this website in your Mac Launchpad (where all other Mac app icons are).
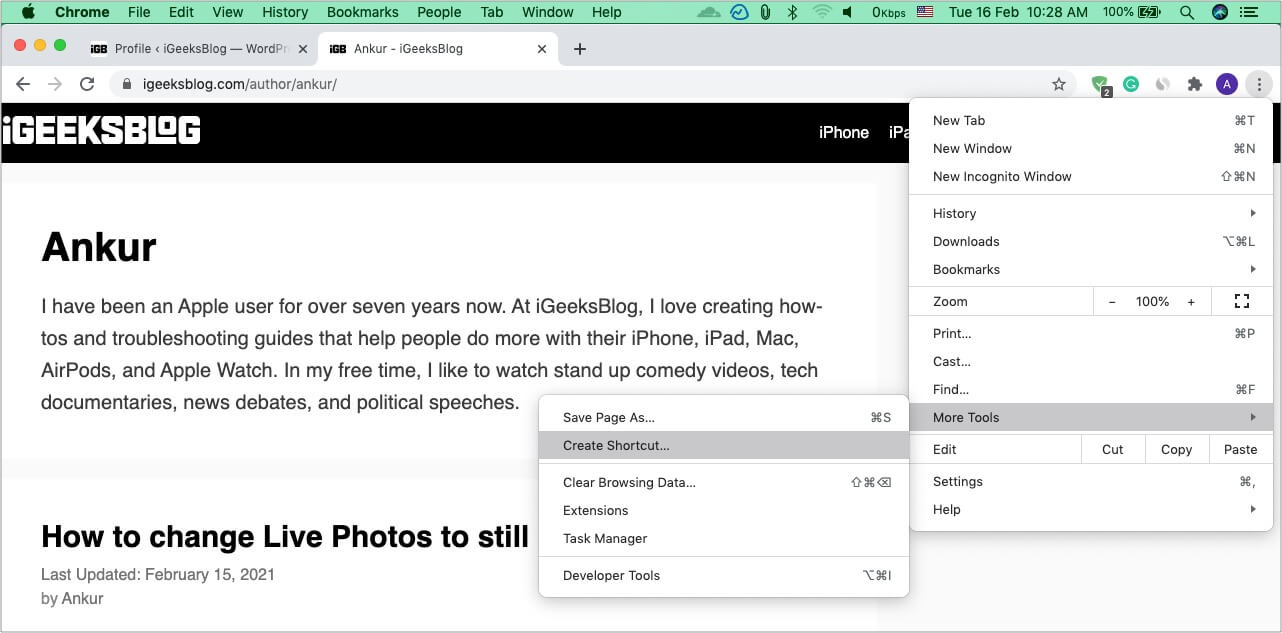
To Delete this shortcut: Press command + spacebar to open Spotlight and search for Chrome Apps. Open the folder and delete the app icon.
11. Use private mode
Open Chrome and press command + shift + N to open a new incognito window. Whatever you browse in this window will not be saved as history, cookies, or site data.
12. Search something quickly from a page
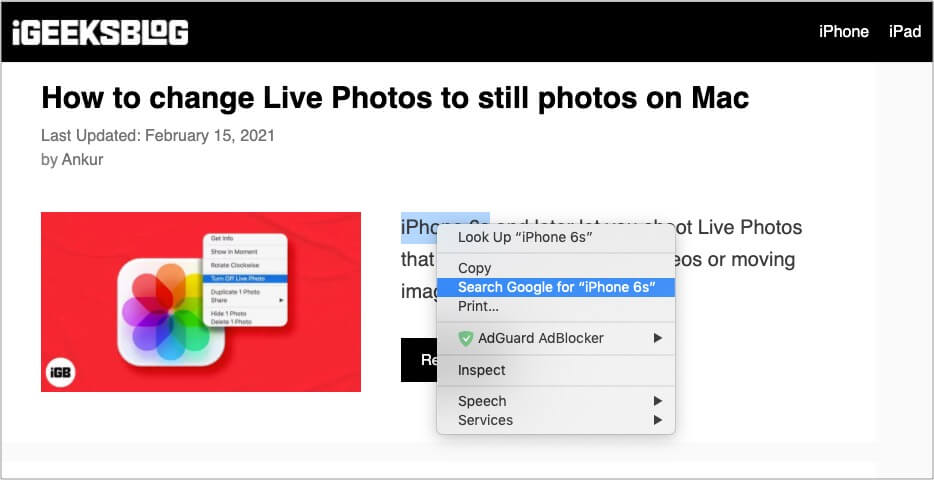
Select a word or phrase on the page and right-click it. Choose Search Google for ‘selected word or phrase.’
13. Bookmark all open tabs
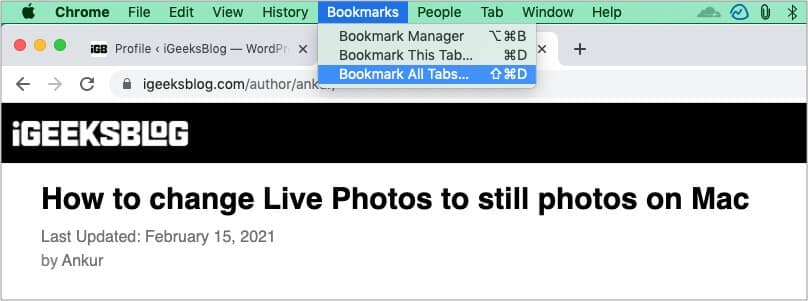
To bookmark a single page, click the star icon on the right side of the URL address bar. But what if you have several open tabs that you want to save for the future? Well, in this case, just bookmark them all in a few clicks!
- Click Bookmarks at the top menu bar.
- Choose Bookmark All Tabs.
14. Show or hide the bookmarks bar
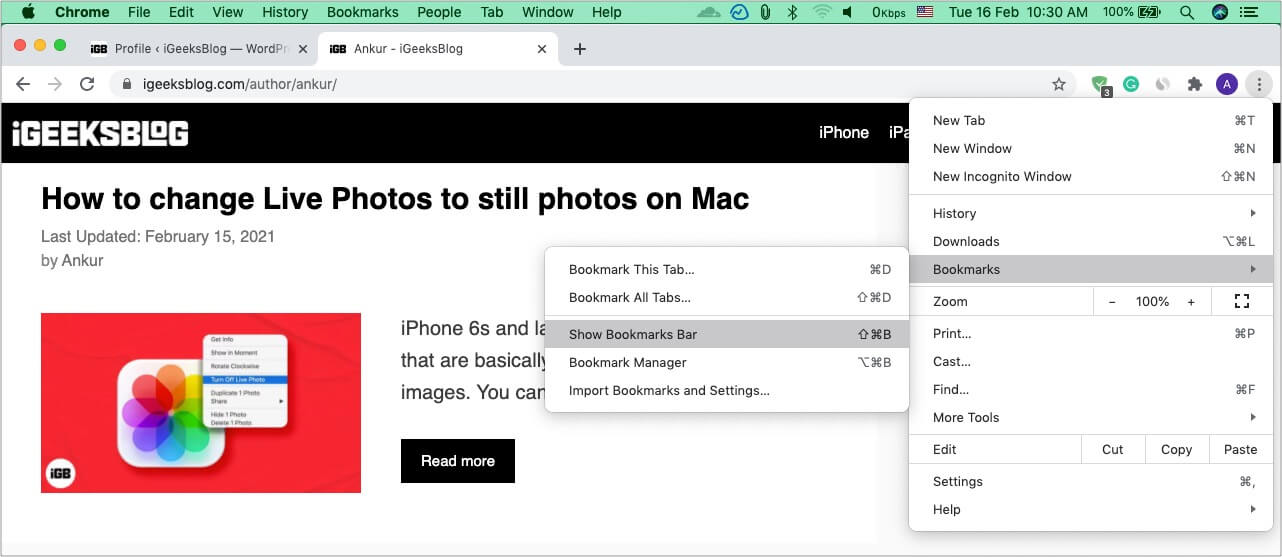
On my office Mac, I keep the bookmarks bar on the top (just below the URL address bar). While on my personal Mac, I choose to hide it to get more screen while browsing or reading docs. To show the Bookmarks bar, click the three-dots icon at the top-right of Chrome. Next, click Bookmarks and choose Show Bookmarks Bar.
15. Import bookmarks and settings from Safari, Firefox, etc.
- Click Chrome at the top Menu Bar and choose Preferences.
- Click Import bookmarks and settings.
- Choose the desired browser and click Import.
16. Use Chrome as a multimedia player to open files like PDF, videos, etc.
Chrome is a handy multimedia player as it lets you open several files effortlessly. Just drag and drop a PDF, image, movie, or music file into Chrome to open/play it!
17. Choose what to open when you startup Chrome
If you are like me, you may be happy to have a single clean homescreen when you launch Chrome. But did you know that you can set it to open anything you desire!
Become an iGeeksBlog Premium member and access our content ad-free with additional perks.
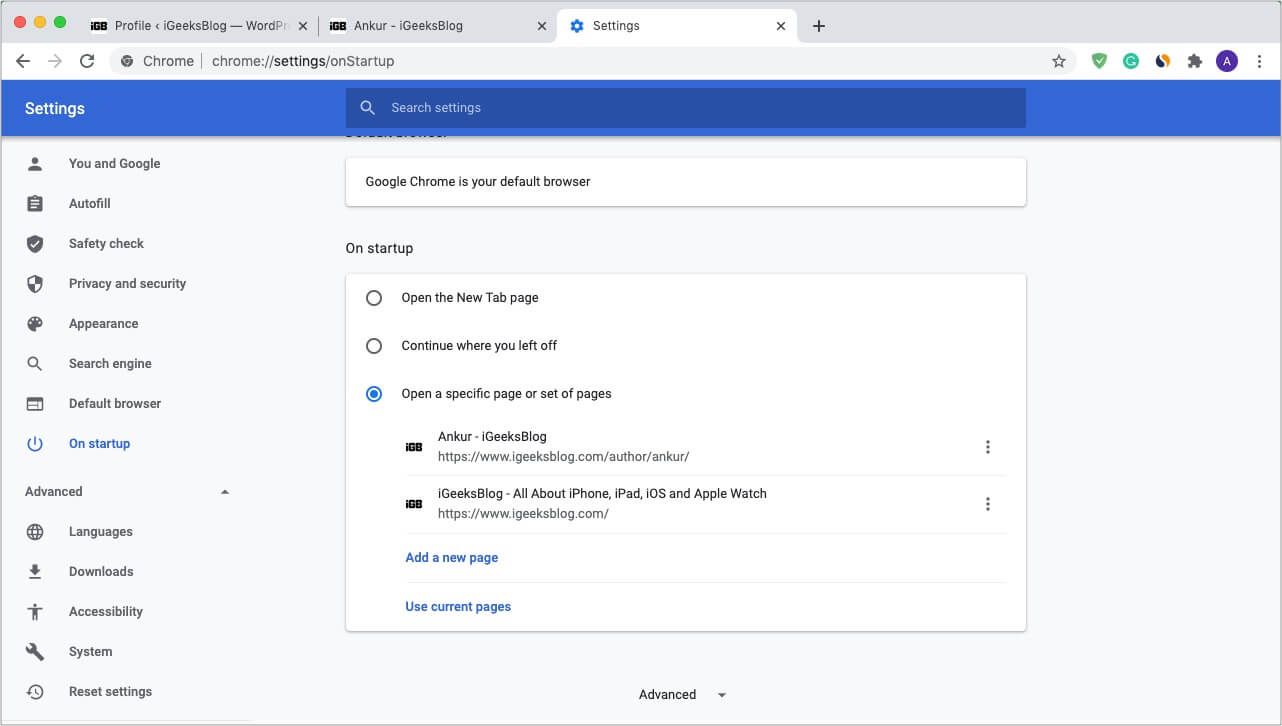
- Click Chrome at the top menu bar and choose Preferences.
- Click On startup from the left Sidebar.
- Choose Continue where you left off or Open a specific page or set of pages. If you choose the latter, make sure you add the desired pages to it.
18. Pin tabs just like Safari
- Right-click the top of a tab and choose Pin.
- This tab will be pinned on the top-left corner of Chrome. I love this feature!
19. Use Apple’s Chrome extension for iCloud Keychain passwords
Apple recently launched the iCloud Passwords extension for Chrome. This lets you fill password stored in iCloud Keychain while using Chrome. You can download the official extension from here and take it for a spin.
20. Keep everything in the cloud
When you sign in to Chrome with your Google account, it lets you have your passwords, bookmarks, history, etc., in the cloud, which can be accessed on multiple devices, including smartphones or other computers.
For this, click the profile picture icon at the top-right, sign in, and turn on sync.
21. Autofill passwords, address, etc.
If you make purchases or have to type in your passwords, addresses, email, phone numbers often, it is possible to let Chrome do these automatically for you. Here’s how.
- Click Chrome at the top Menu Bar and choose Preferences.
- You will see various options under Autofill.
- Click Passwords to view and manage your saved login info.
- Click Payment methods and Addresses and more to add and choose optimal settings for these.
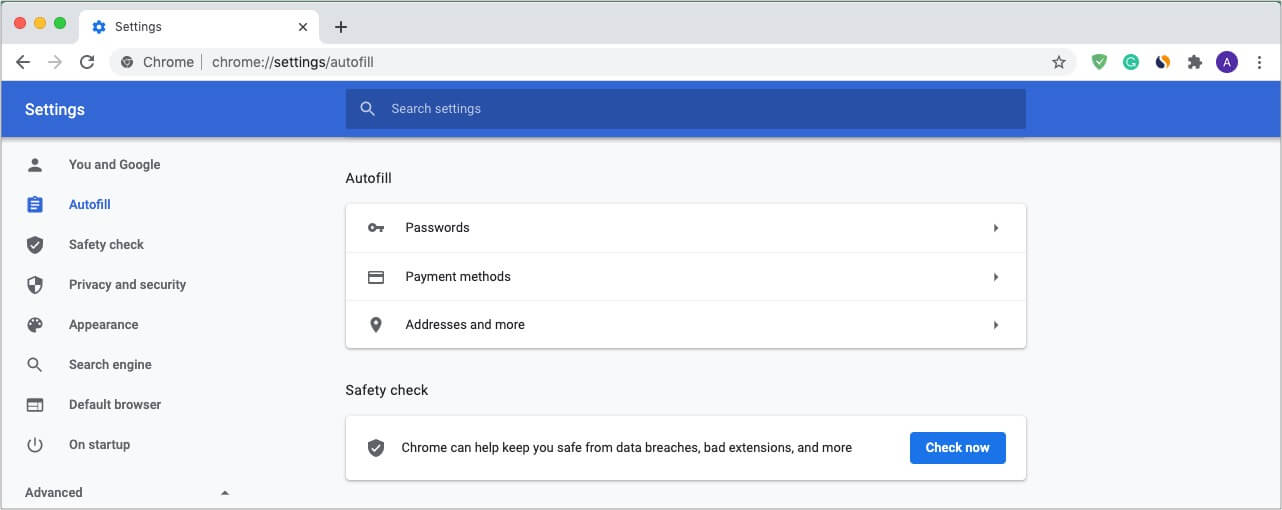
Extra info: You may click Check Now to perform a safety check that may keep you safe/informed from data breaches, vulnerable extensions, etc.
22. Set Chrome appearance according to your liking
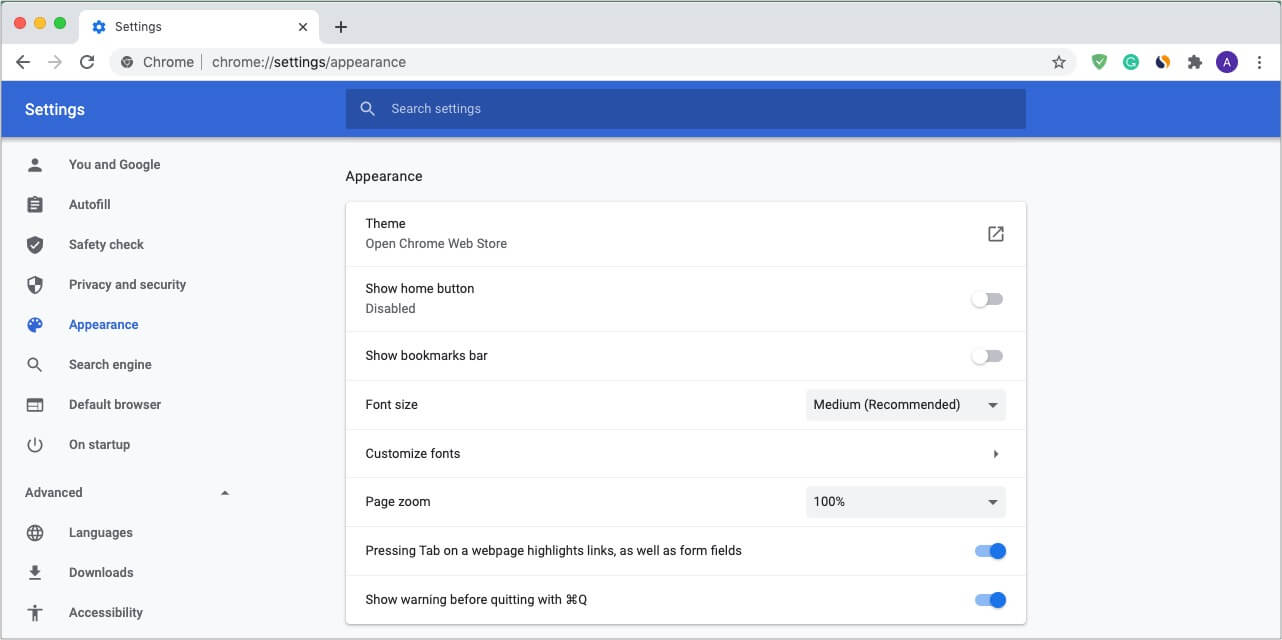
Chrome lets you use different themes, font size & type, zoom, and more to offer you an experience you love and enjoy. For this, go to Chrome Settings and click Appearance. From here, you can click individual options and set them as desired.
23. Choose not to use Google as the search engine
Want to use something else instead of Google search? What about DuckDuckGo that is more privacy-focused, or Bing, which is a good alternative to Google?
- Go to Chrome Settings and click Search engine.
- Click Google and choose one of the options from the dropdown menu.
24. Change Chrome download location on Mac
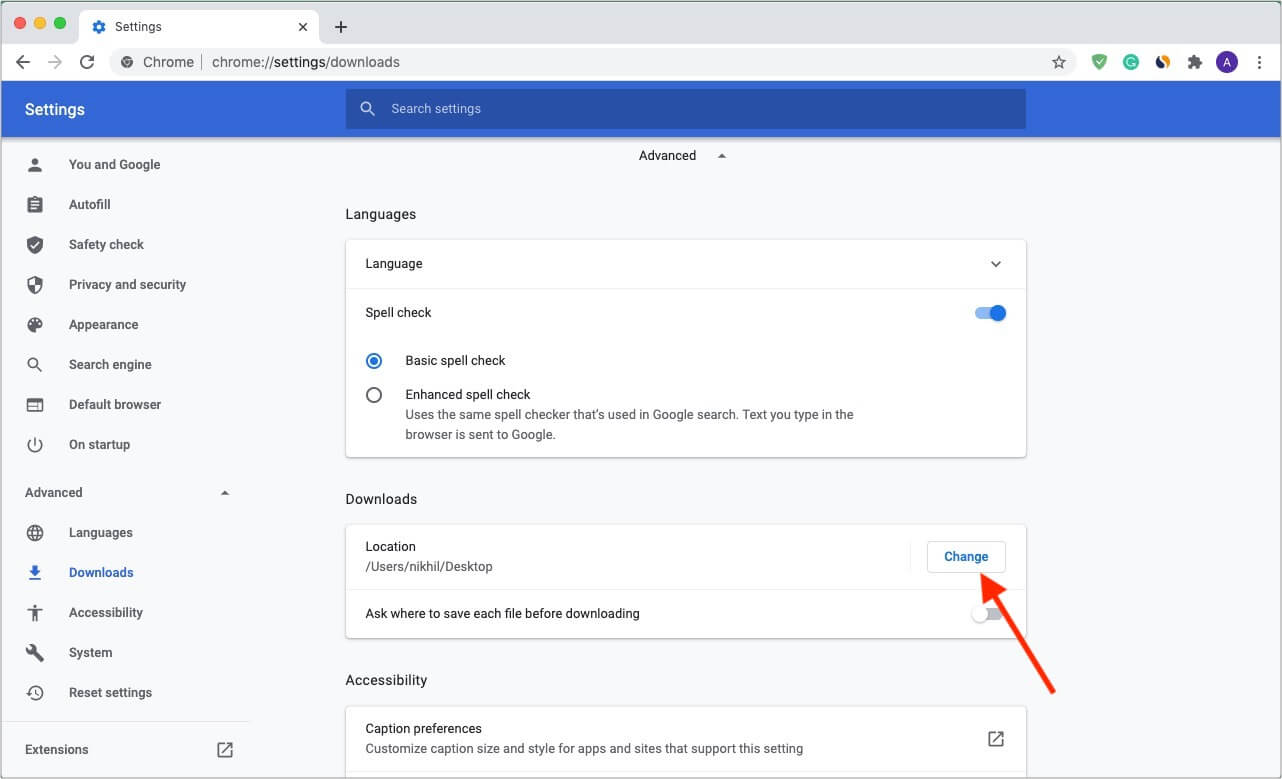
I like to have my new downloads on the desktop. You may want it somewhere else, like a deep folder. You can easily set the download location in Chrome via the following steps.
- At the left Sidebar in Chrome Settings, click Advanced.
- Choose Downloads.
- Click Change next to Location.
- Choose the desired folder and click Select.
25. Use extensions to enhance your Chrome experience
Extensions are a massive part of Chrome that let you add features to it. I wouldn’t be wrong to say what apps are to smartphones; extensions are to Chrome (or other browsers). You can add new extensions from the Chrome web store.
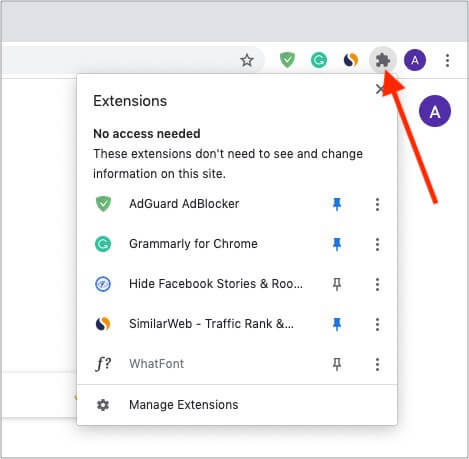
To remove or manage extension settings, click the extension icon at the top-right of Chrome. Next, click Manage Extensions at the bottom. You may also click the three-dots icon next to an extension to reveal more options.
26. Move open tabs to left or right
Place the mouse pointer on the top of a Chrome tab and drag it left or right.
Pro Tip: To move multiple tabs, press and hold the command key and click multiple tabs. Now, leave the command key and drag the tabs left or right. All selected tabs will move together.
27. Manage site permissions
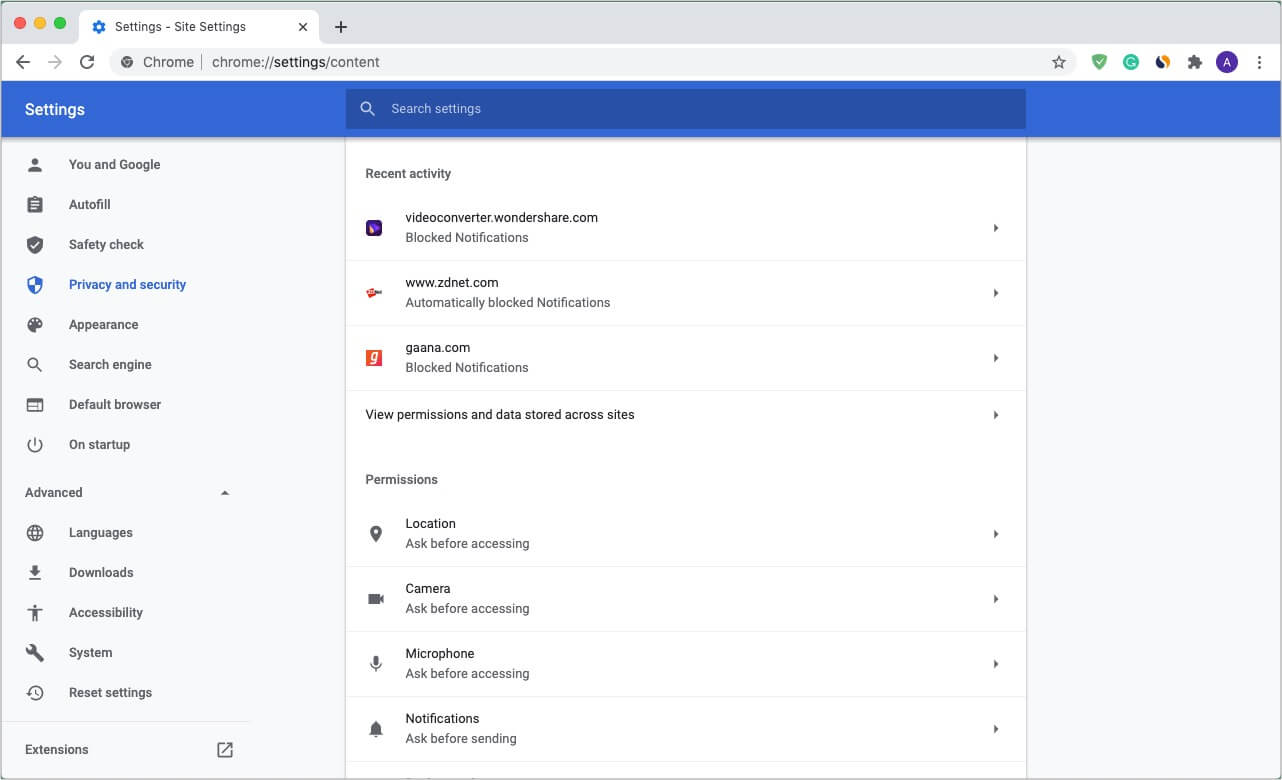
You see a small popup before a site that can access your location, Mac’s microphone/camera, send notifications, etc. You can manage all these permissions on a single screen.
- Click Chrome at the top menu bar and choose Preferences.
- On the left Sidebar, choose Privacy and security.
- Click Site Settings.
- Under Recent activity, click a site name to manage its permissions.
- You may also go back and from under Permissions, choose Location, Camera, Microphone, Notifications, etc., to manage them.
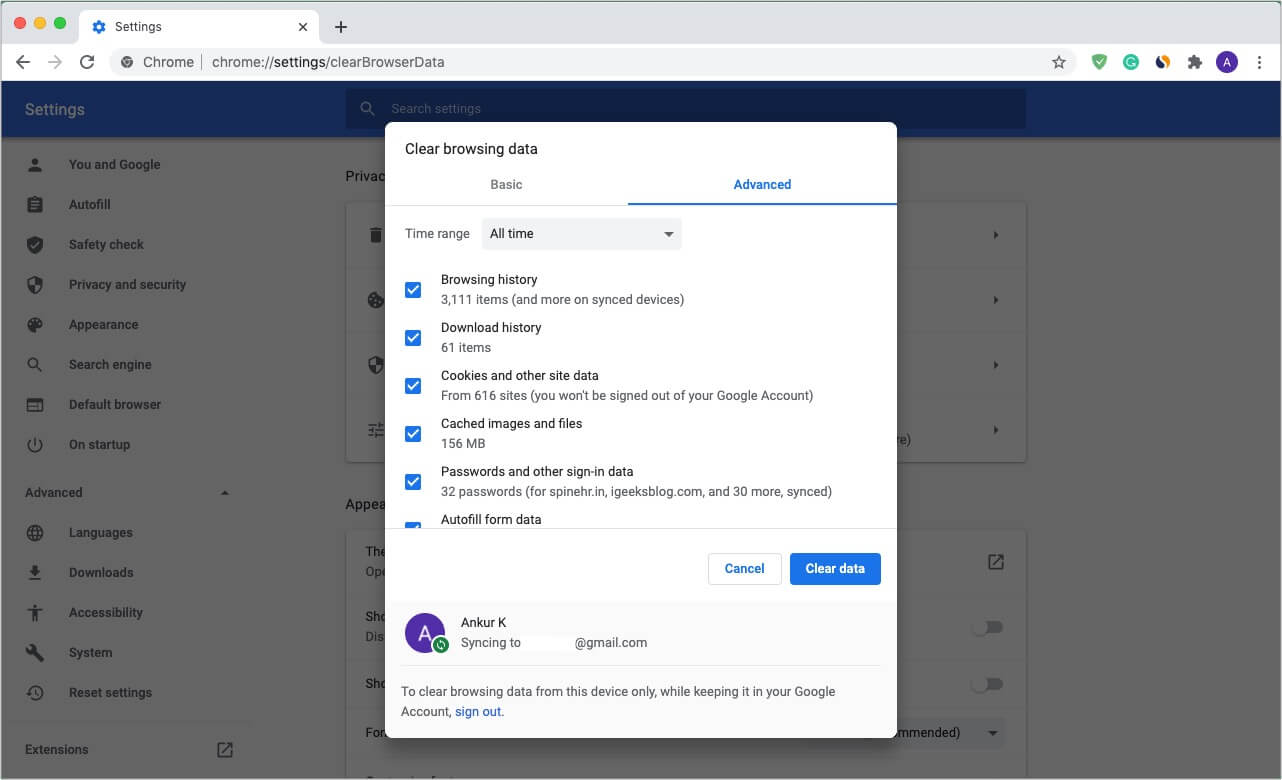
28. Clear browsing data
- Click Chrome and choose Preferences.
- On the left Sidebar, click on Privacy and security.
- Click Clear browsing data.
- Select the time range and click Clear data.
29. Use Chrome’s Task Manager
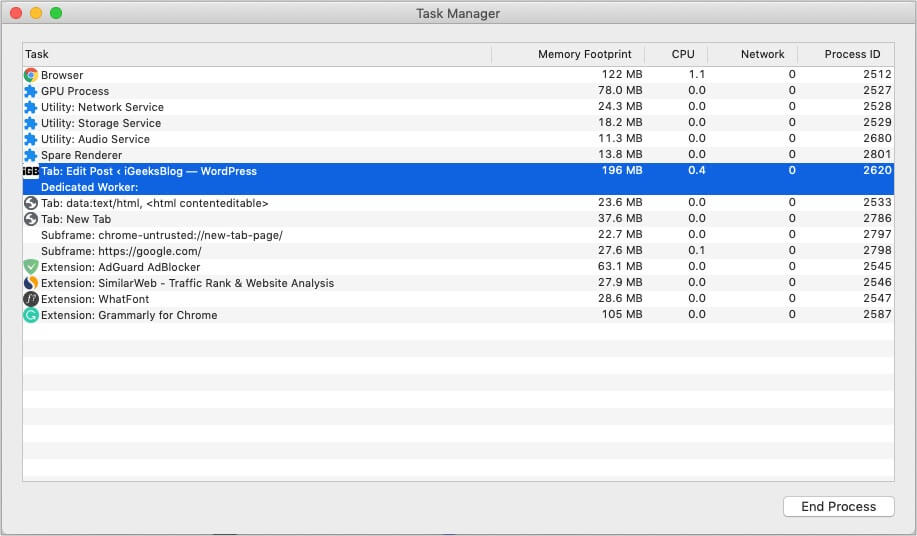
The browser’s Task Manager lets you view which Chrome tabs, extensions, and processes are utilizing how much resources. From here, you can also end the process if something is consuming resources extensively and slowing down your Mac.
- To see the Chrome Task Manager, click on Window from the top Menu Bar and choose Task Manager.

- Next, select an option and click End Process, if required.
30. Add different profiles like personal, office, wife, or guest browser
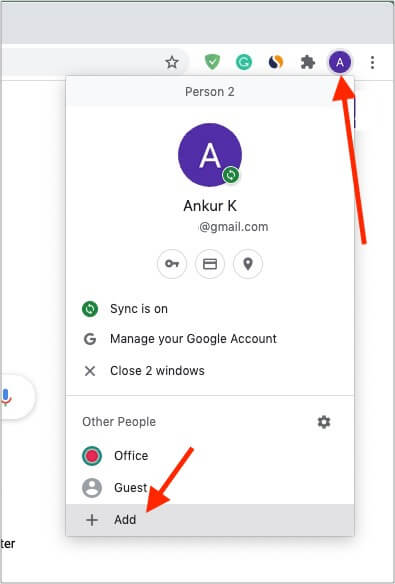
Multiple profiles let you have Chrome for different tasks or other people (kids, wife, siblings, etc.). For example, during this ‘work from home’ time, you may be using a single Mac for both office and personal use. It is best to keep things organized. All these profiles have separate bookmarks, history, saved passwords, settings, etc.
Here’s how to do it:
- Click your profile picture at the top-right of Chrome.
- Click + Add.
- Finish the simple process by giving it a name, profile picture, background, etc. It would be best if you sign in as well.
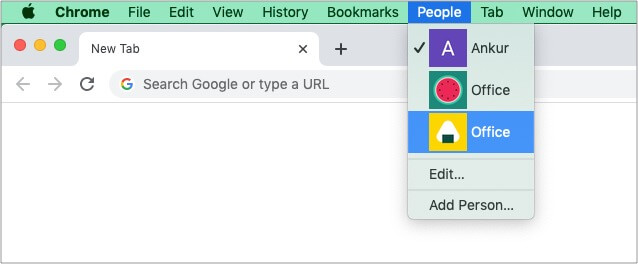
- To use a different profile, click People at the top Menu Bar.
31. Cast your screen
If you own a Google Cast-enabled TV or Chromecast, right-click an empty area of a page and choose Cast.
32. Instantly create a QR code of a webpage
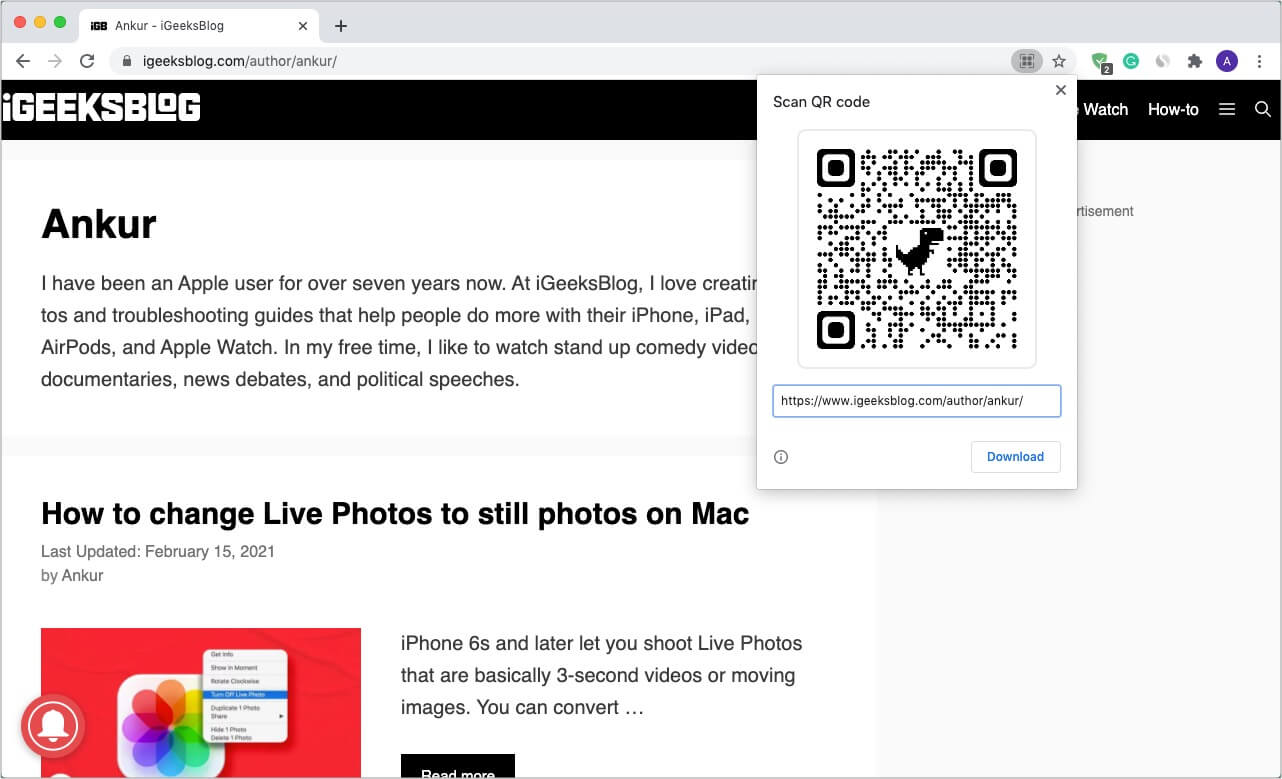
If you are signed in to the same Google account on Chrome on your Mac (and even smartphone), you will see the tabs on both. But what if you are reading something on a site using a friend’s computer or you want to look professional? In this case, creating a QR code for the page comes in handy. Earlier I used to use a site called QR Code Generator. But now, Chrome takes care of it. Here is how.
- Right-click in an empty area of a site.
- Click Create QR code for this page.
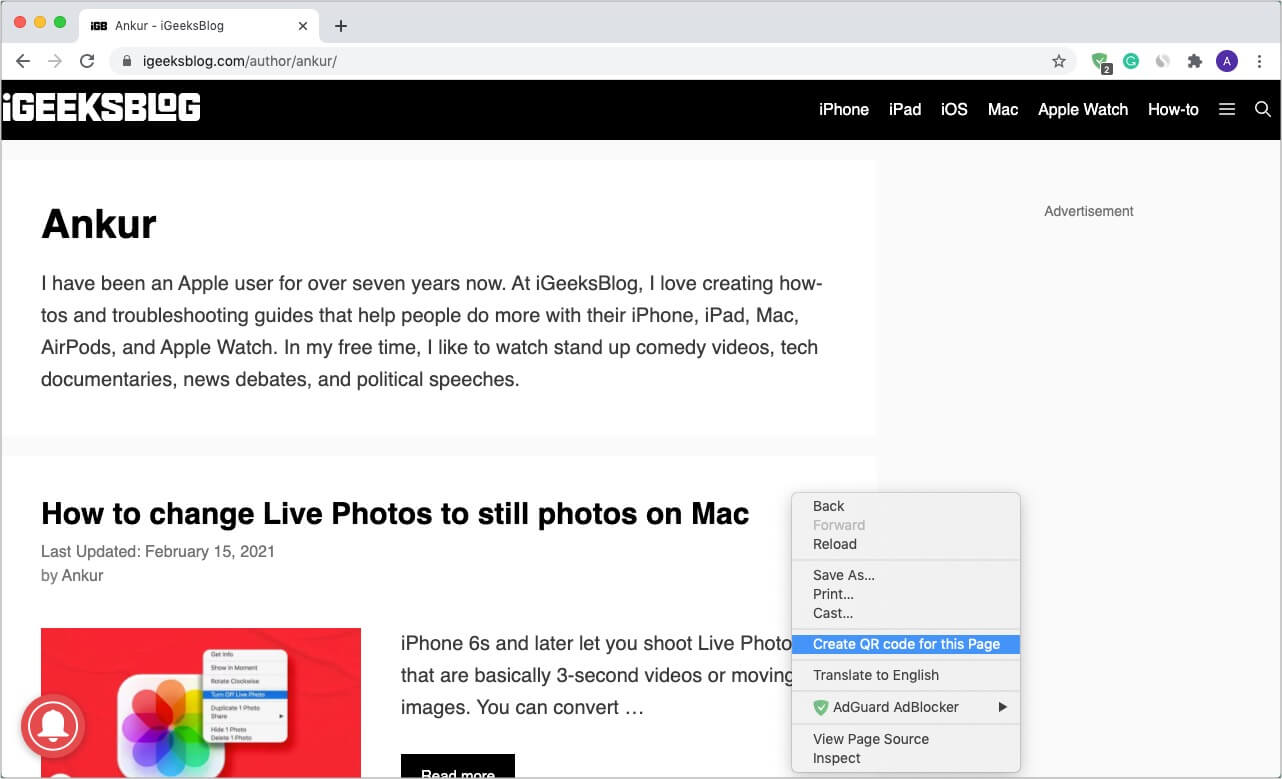
- Now, open the camera app on your iPhone or Android phone and scan this QR code to open it there. Easy!
33. Use Chrome experimental features
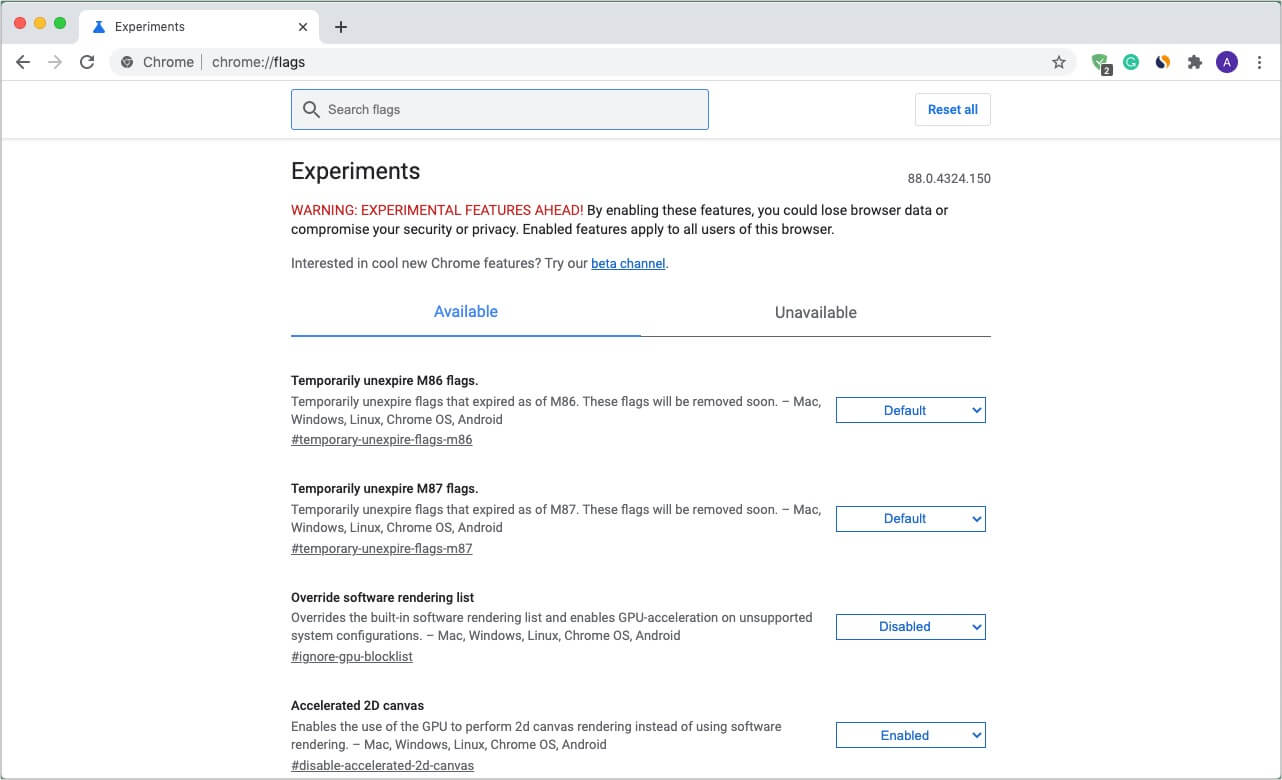
Want to see what all is in work? Well, Chrome lets you test experimental features if you are curious about them. For this, type or copy-paste chrome://flags in the URL. From here, you can choose to enable certain experimental features you like.
34. Use Chrome URLs
In addition to using the menu options and keyboard shortcuts, you can use Chrome URLs to go to certain settings. For example, typing chrome://downloads in the URL address bar takes you to downloads. chrome://settings takes you to Chrome Preferences (settings), chrome://extensions opens the extensions screen, and so on. You can see a long list of such URLs on this GitHub page.
35. Keyboard shortcuts for Chrome on Mac
Keyboard shortcuts make any task fast and efficient. Chrome is full of keyboard shortcuts that you can use. Some of the helpful ones are listed below. For a detailed list, please visit this official Google support page.
- Quickly switch among tabs: Press command + option + left or right arrow to switch tabs.
- Go to a different tab: command + 1 to 9. 1 is the first tab.
- Go to the right tab: control + tab
- Go to the left tab: control + shift + tab
- Instantly go to the URL address bar: command + L
- Scroll quickly: Press the spacebar to scroll pages.
- Go to the top or bottom of a page: Press command + up or down arrow key.
- Open incognito window: command + shift + N
- Open an accidentally closed tab: command + shift + T
- Close a window: command + shift + W
- See downloads: command + shift + J
- Go back: command + [
- Go forward: command + ]
Tip: On MacBook’s trackpad, you may also swipe right using two-fingers to go back and swipe left to go forward. Press and hold the arrow keys at the top-left of Chrome to see the history.)
36. Restore Chrome to default settings
At last, if you feel that Chome is not working as expected for you or has altered several settings and are having a tough time figuring things out, you can restore everything to the default state.
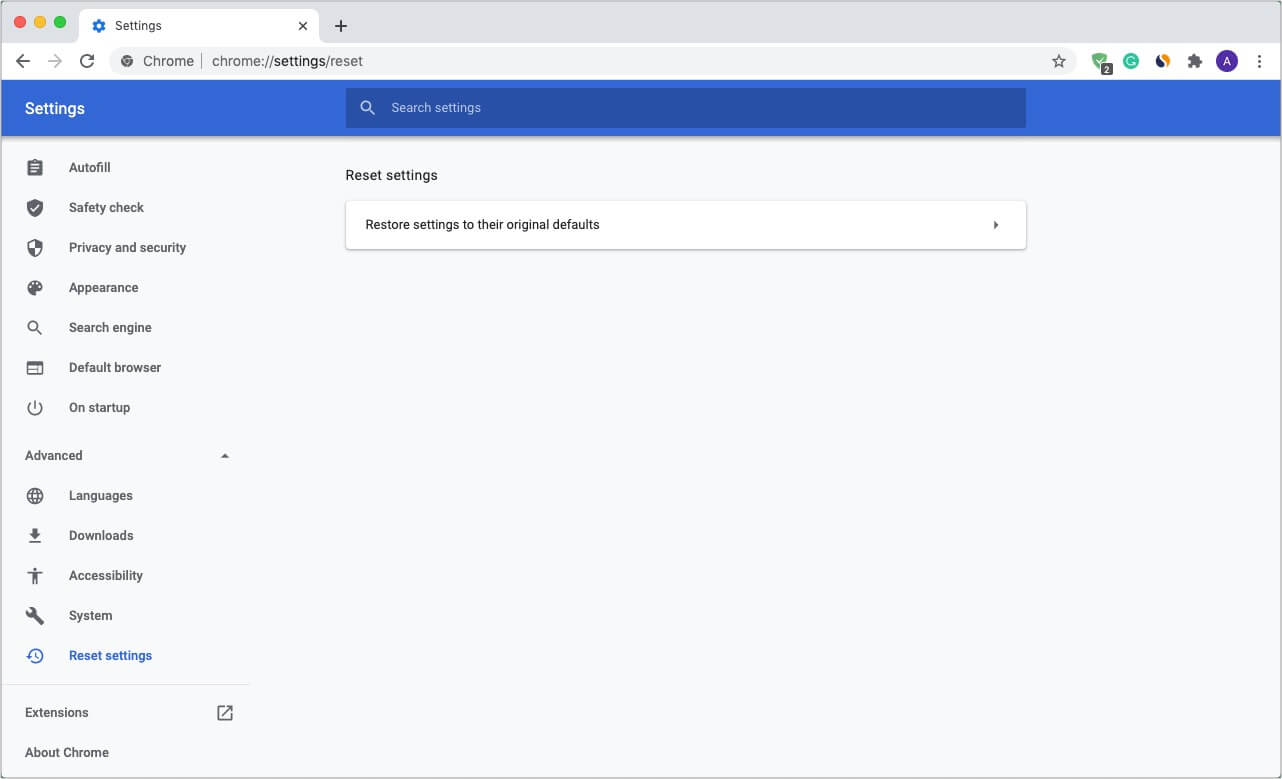
- Go to Chrome Settings and click Advanced.
- Click Reset settings.
- Click Restore settings to their original default.
- Finally, click Reset Settings.
Ready to use Chrome like a pro?
I hope you learned some cool new tips and tricks for Chrome above. If you have a tip that you think should be shared, please put it in the comments below.
You may also enjoy reading:
