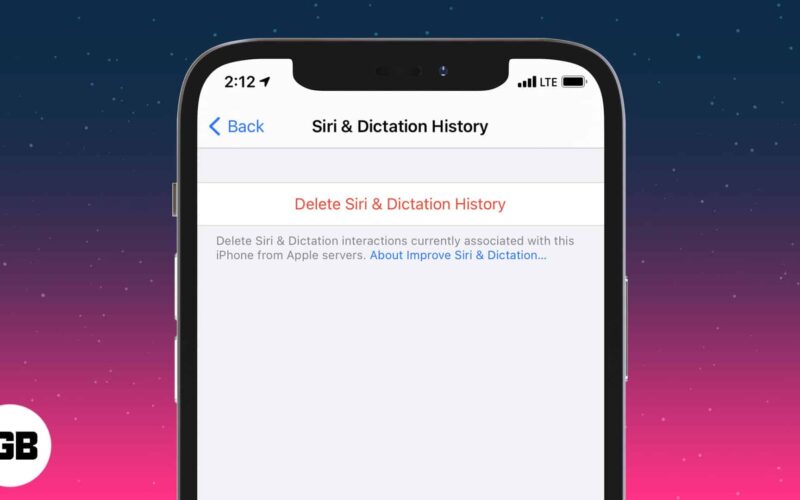
Siri is the default voice assistant on Apple devices like iPhone and iPad. Every time you summon it and give a command, Siri sends the audio recordings and some additional data about you to Apple servers. There, your request is processed, and then you see the result on your iPhone screen. Shockingly, Apple can store these for six months, two years, or even more! For privacy reasons, if you wish to delete Siri data from iCloud on your iPhone or iPad, here are the steps to do that.
- A word regarding your Siri data
- How to delete your Siri history on iPhone or iPad
- How to stop Apple employees from reviewing your Siri data
- Disable Siri for with third-party apps on iPhone and iPad
- How to stop an app from using Siri for transcription
- How to turn off location services for Siri
- Disable Siri personalization to sync across your Apple devices
- How to completely turn off Siri on your iPhone or iPad
- How to restrict Siri & Dictation altogether on iPhone or iPad
- Turn off dictation on iPhone
A word regarding your Siri data
“Your request history is associated with the random identifier for up to six months. Your request history may include transcripts, audio for users who have opted in to Improve Siri and Dictation, Siri Data, and related data such as device specifications, device configuration, performance statistics, and the approximate location of your device at the time the request was made.
After six months, your request history is dissociated from the random identifier and may be retained for up to two years to help Apple develop and improve Siri, Dictation, and other language processing features like Voice Control. The small subset of requests that have been reviewed may be kept beyond two years, without the random identifier, for ongoing improvement of Siri.”
Before you begin: If you own more than one Apple device, you will have to follow the steps below on them individually. For example, to delete your iPhone Siri history, you have to follow the steps on your phone. And to clear your iPad Siri history or another iPhone’s Siri history, you have to follow the steps on those again.
How to delete your Siri history on iPhone or iPad
- Open iPhone Settings, scroll down, and tap Siri & Search.
- Tap Siri & Dictation History.
- Tap Delete Siri & Dictation History and confirm.
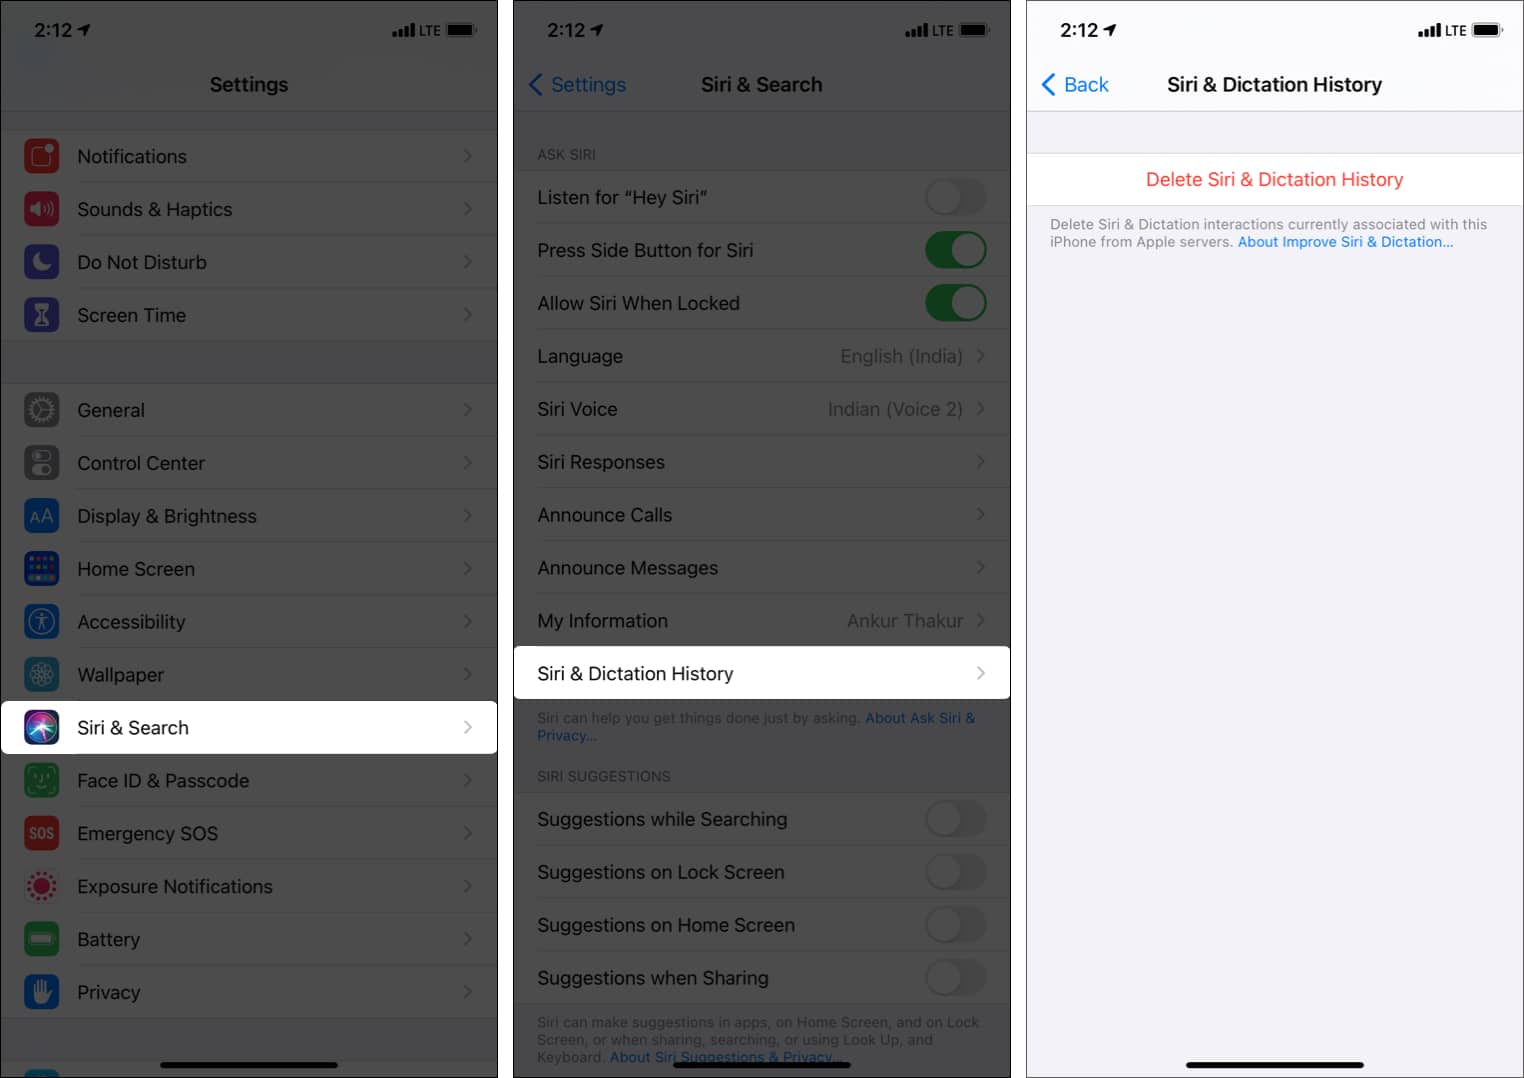
After following the above steps, your Siri and Dictation requests associated with the random identifier are deleted.
How to stop Apple employees from reviewing your Siri data
Apple stores your Siri and Dictation interaction transcripts by default. And these may be reviewed by Apple employees to develop and improve Siri and Dictation.
Now, if an Apple employee hears me asking Siri about the weather, it is not a big deal. But what if I accidentally trigger Siri (it just needs a single button press), and I have some important conversation during this? This audio, too, will be sent to Apple servers, stored, and Apple employees might listen to it.
In short, I always turn off this feature. I do not want to participate in having my Siri audio listened to by anyone else for my privacy. If you too want the same, follow the steps below.
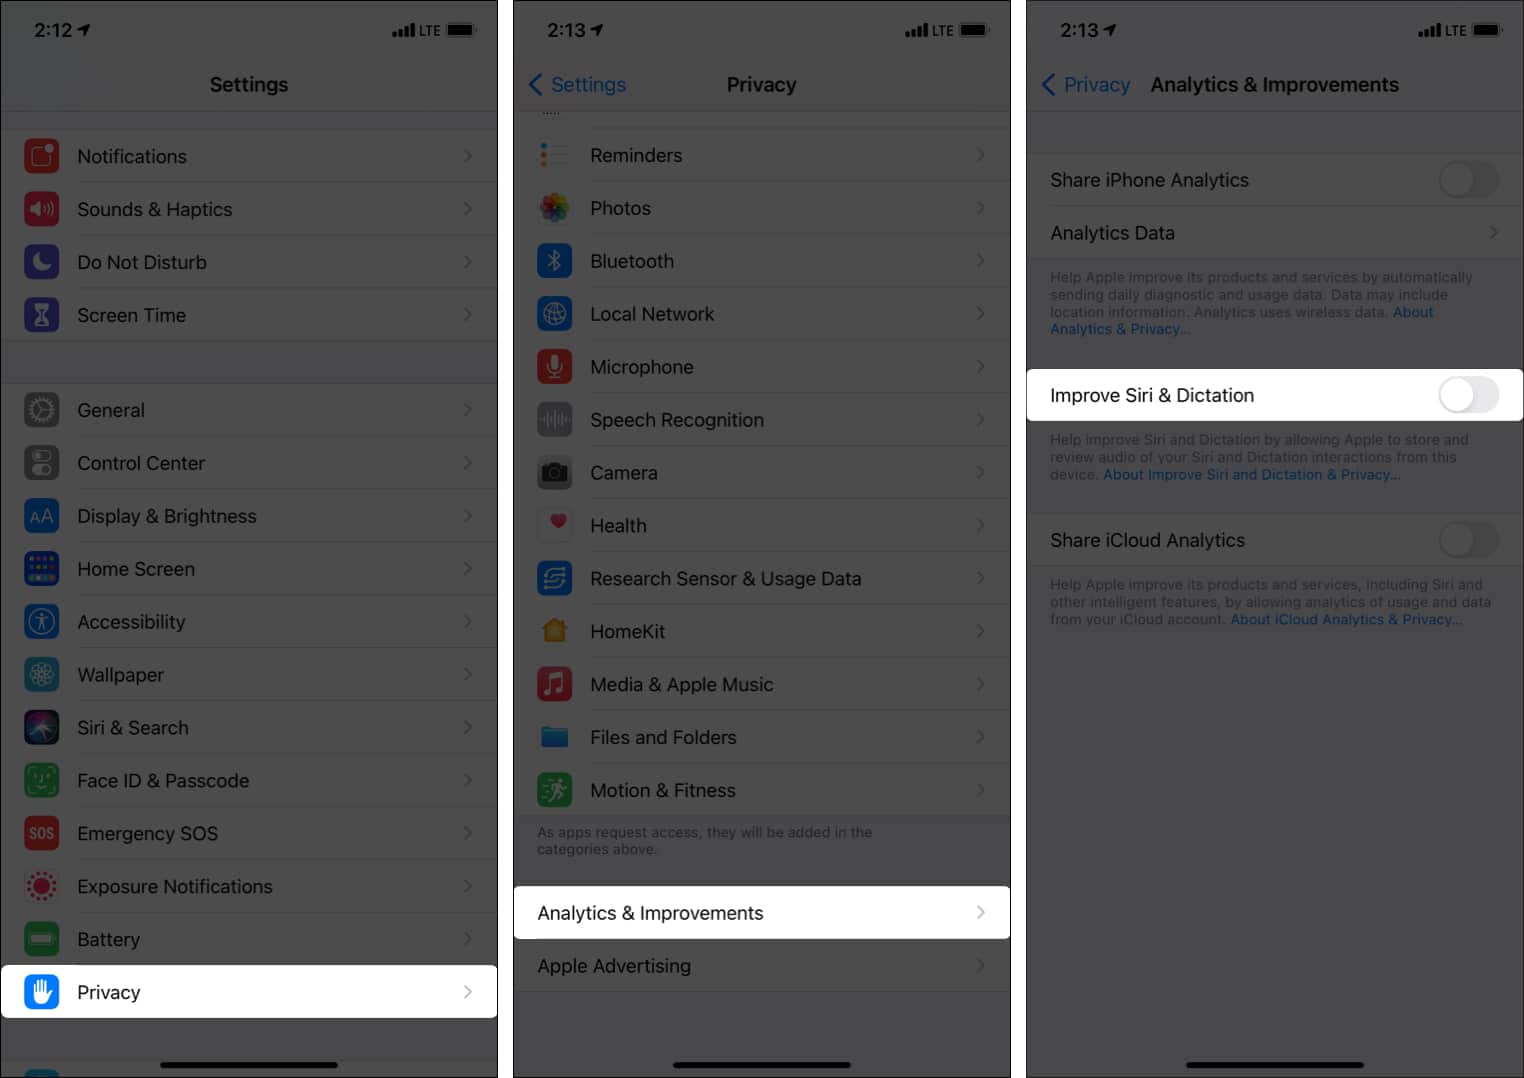
- Open iPhone Settings and tap Privacy.
- From the bottom, tap Analytics & Improvements.
- Toggle off Improve Siri & Dictation.
- Additionally: If you like, you may turn off all other toggles here.
Disable Siri for with third-party apps on iPhone and iPad
If an app developer wants, he/she can have the app work together with Siri. For example, Indian food delivery apps like Swiggy and Zomato. I just summon Siri and say, where is my order and Siri talks to the food delivery app and lets me know the status.
Similarly, ridesharing apps like Ola, messaging apps like WhatsApp, etc., have Siri support. You can call Siri and say, where is my cab? Or, send Mehak a WhatsApp message.
Now, when you allow Siri and third-party app integration, data from these apps may also be sent to Apple for Siri to process your command. Plus, a part of your request is also shared with the third-party app.
You can prevent this by disallowing the app to use with Siri. Want to learn how to do that? Here are the steps!
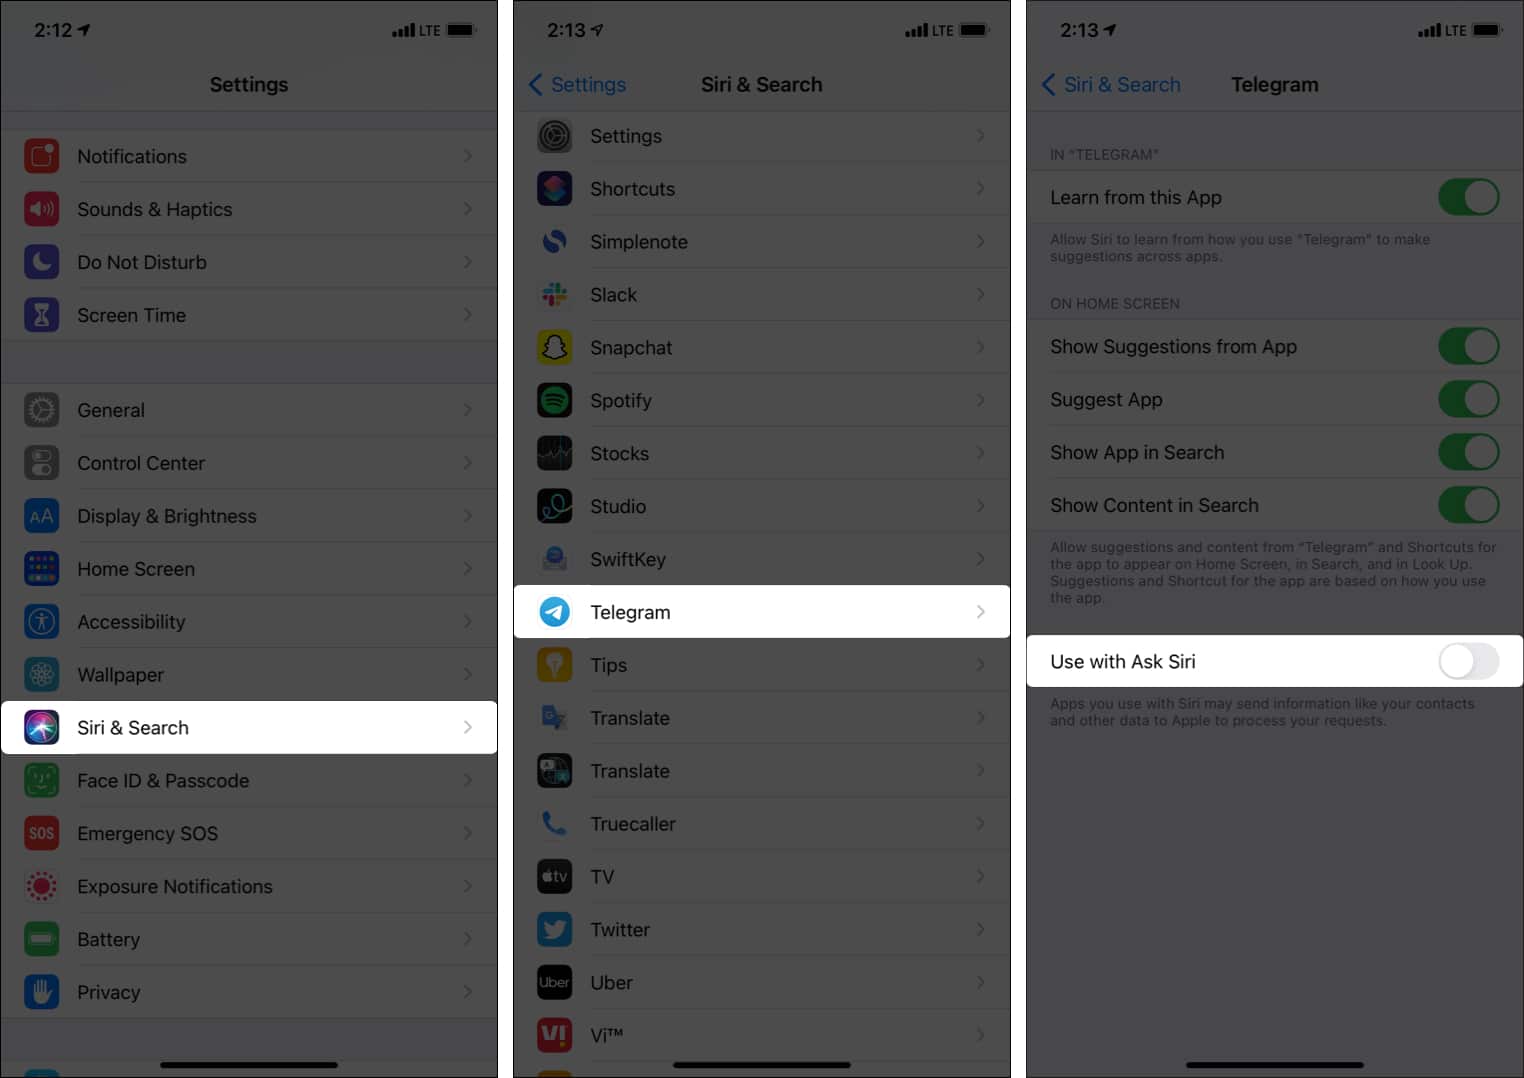
- Open iPhone Settings and tap Siri & Search.
- Tap the desired app name.
Sadly, there is no single place where you can see all apps that use Siri. - Toggle off Use with Ask Siri.
How to stop an app from using Siri for transcription
If you allowed an app to use Siri for transcription, it might send your voice data to Apple. You can limit this by preventing an app from using Siri for transcription.
Become an iGeeksBlog Premium member and access our content ad-free with additional perks.
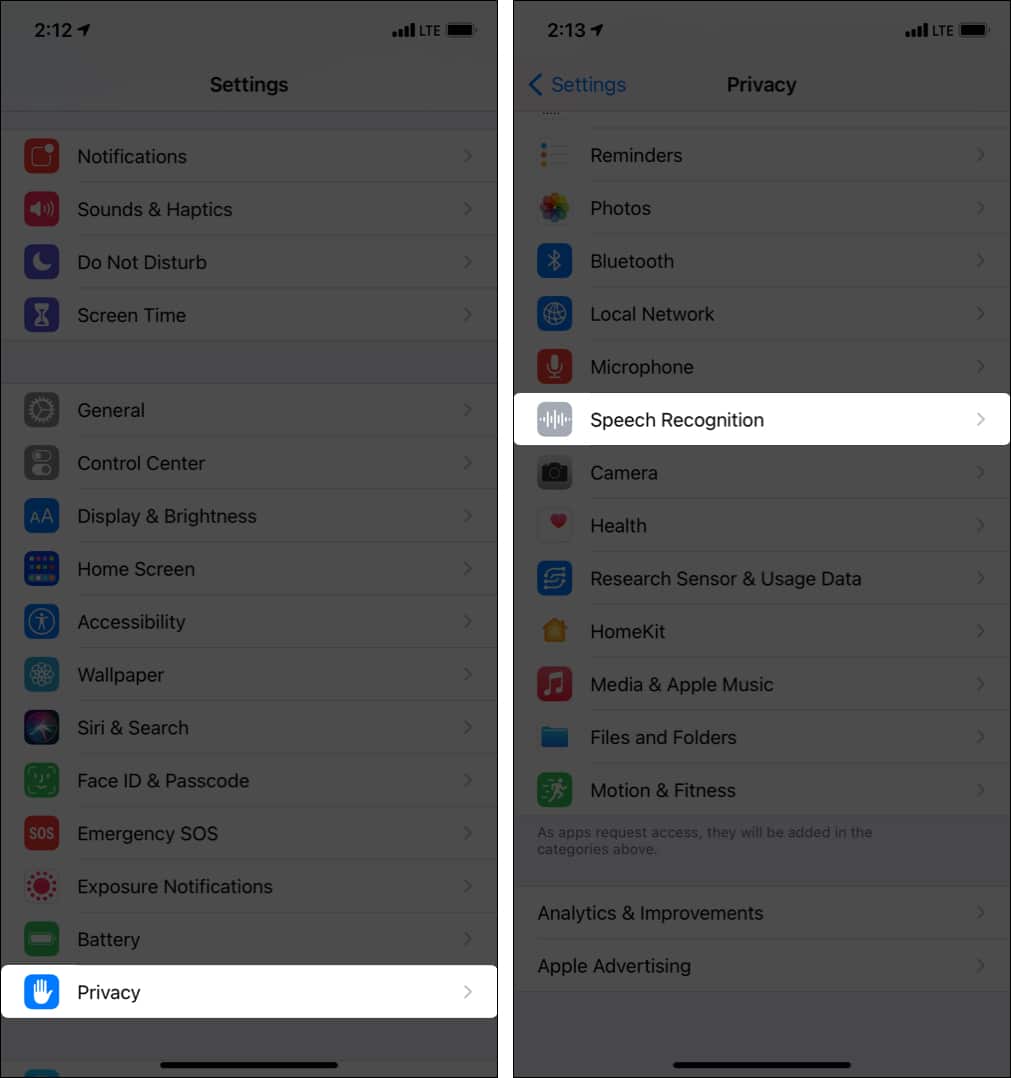
- Open iPhone Settings and tap Privacy.
- Tap Speech Recognition and turn it off for the allowed apps.
How to turn off location services for Siri on iPhone and iPad
Do you need more privacy and do not want your location sent to Apple when you make a Siri request? Follow the steps below.
Note: After turning off location access for Siri, it cannot respond to queries like ‘How is the weather today?‘ But it will respond if you are specific. Like, ‘How is the weather today in New Delhi, India?‘ Plus, specific commands that require location too won’t work.
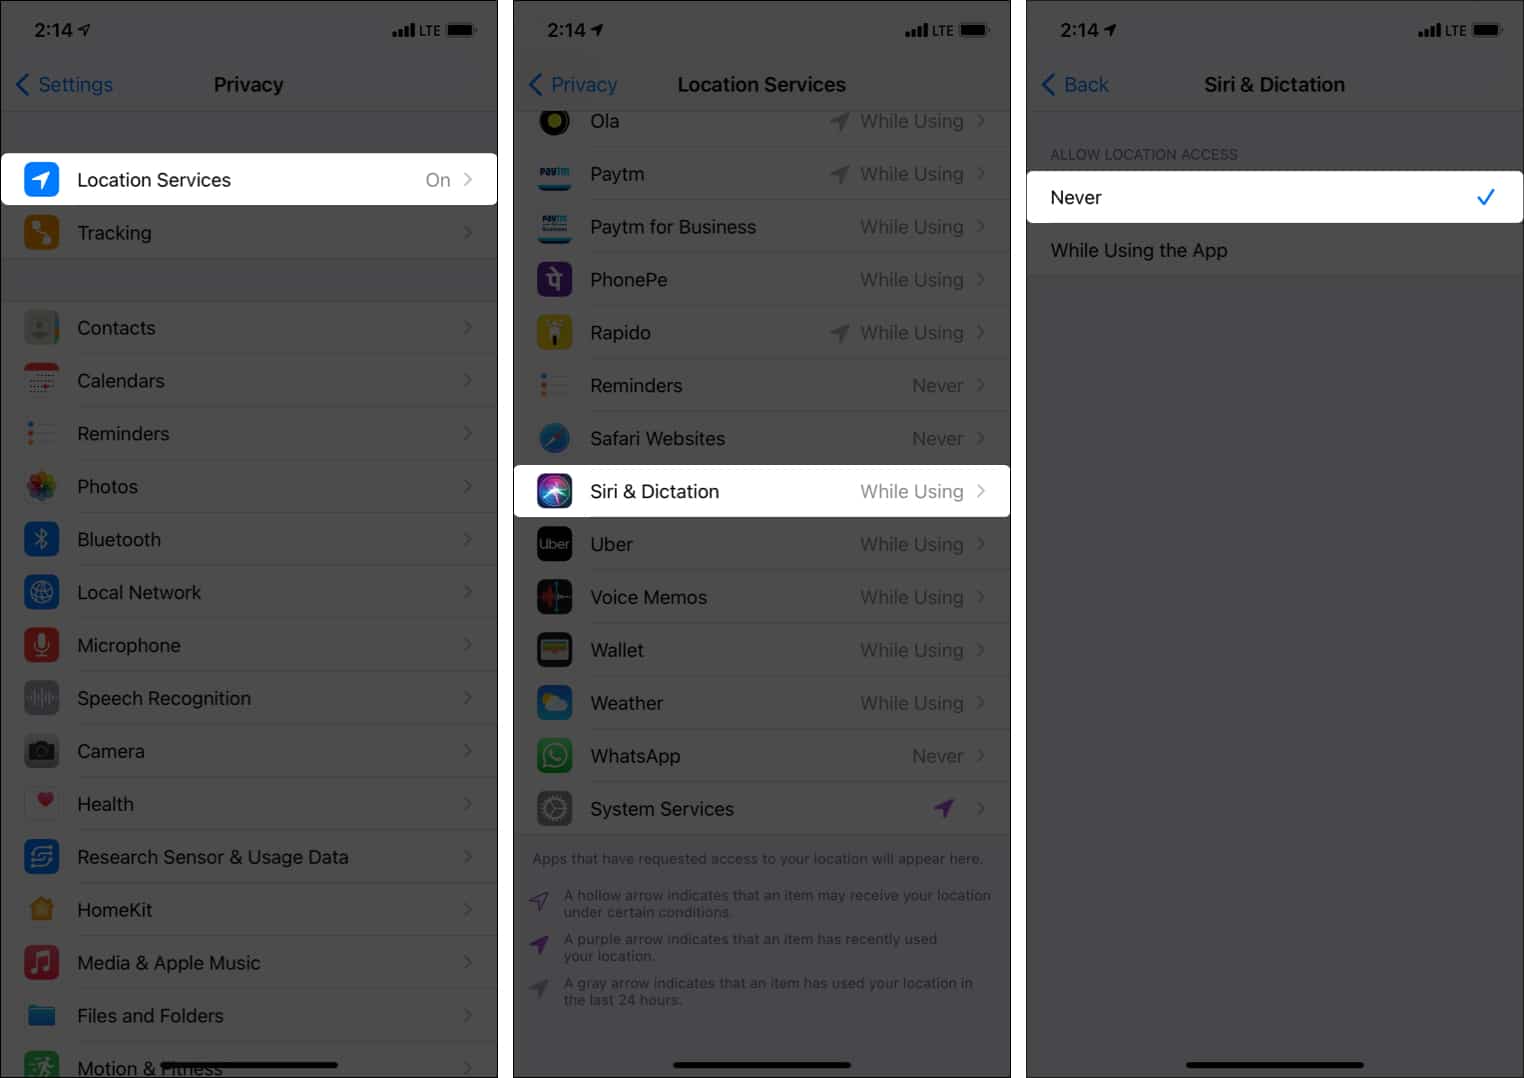
- Open iPhone Settings and tap Privacy.
- Tap Location Services.
- Scroll down and tap Siri & Dictation.
- Now, select Never.
Disable Siri personalization to sync across your Apple devices
Siri data can sync via iCloud, ensuring a similar personalized experience on all your Apple devices. However, if you would like to stop this, follow the steps below.
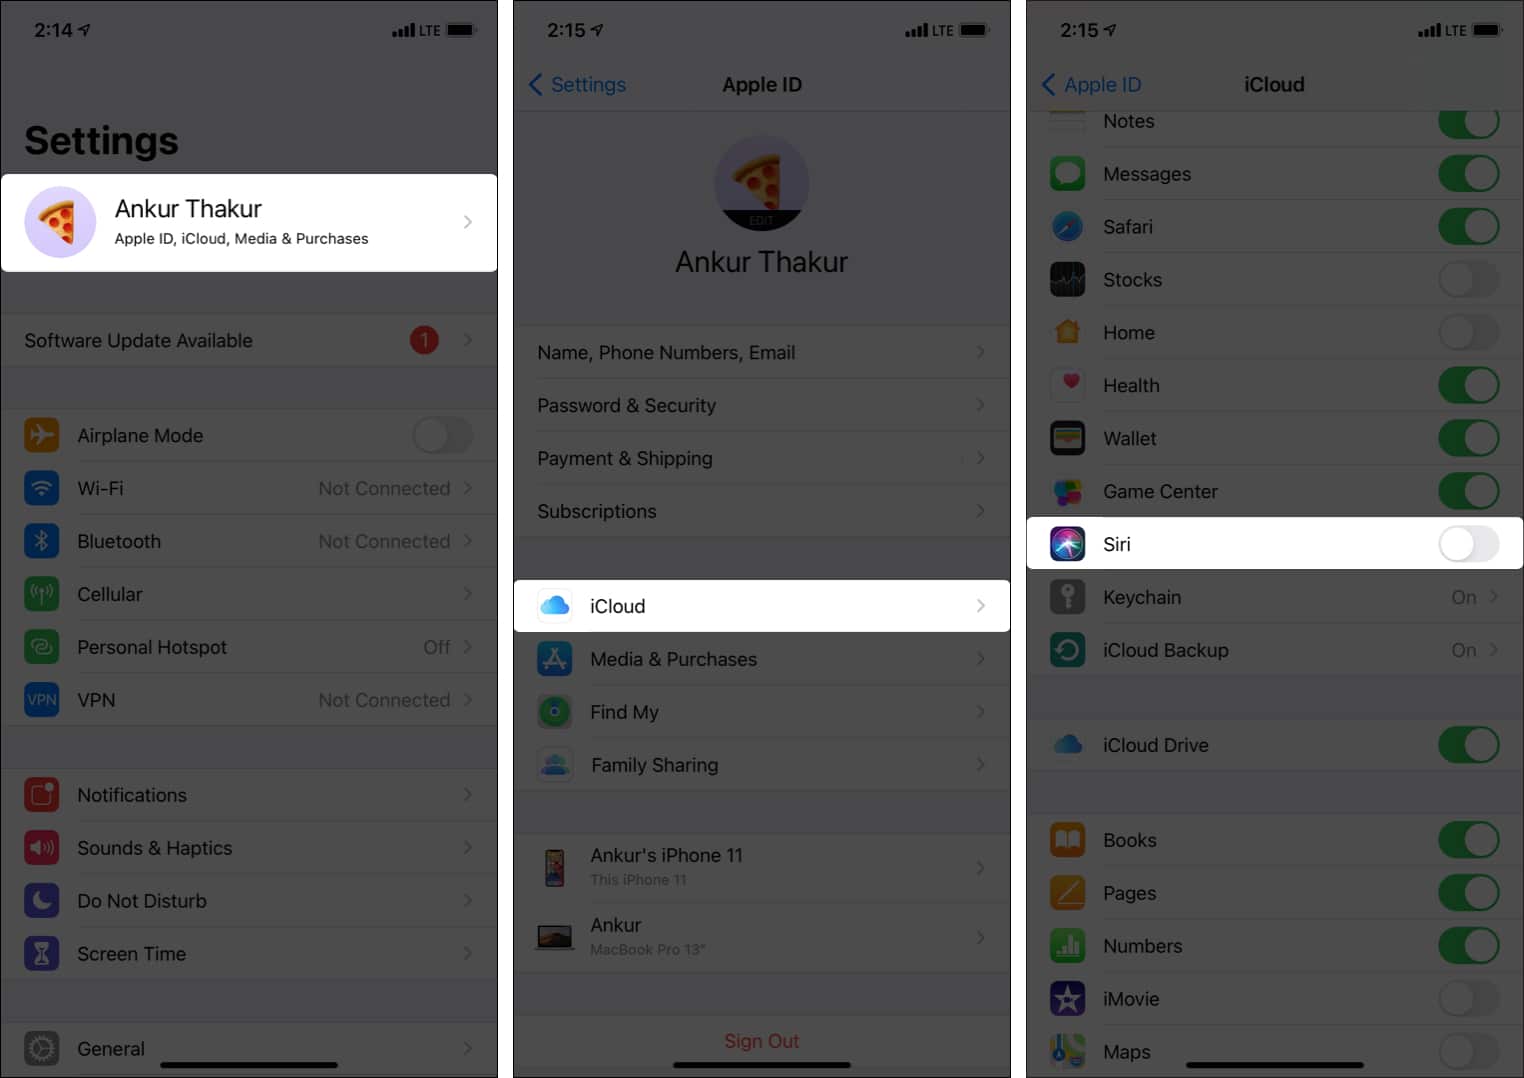
- Open iPhone Settings and tap your name at the top.
- Tap iCloud.
- Scroll down and toggle off Siri.
How to completely turn off Siri on your iPhone or iPad
Before we get to the steps to turn Siri off, there are some things to consider.
Siri is the default voice assistant on your iPhone. It is easy to launch and works reasonably well. You can use Google Assistant or Alexa on your iPhone, but they would be limited to their respective apps. You cannot summon them from the lockscreen or elsewhere. In short, they are not ideal Siri replacements for your Apple device.
That being said, if you want absolute privacy, do not care about Siri, or can live with other voice assistant apps, etc., you may follow the steps below to turn it off.
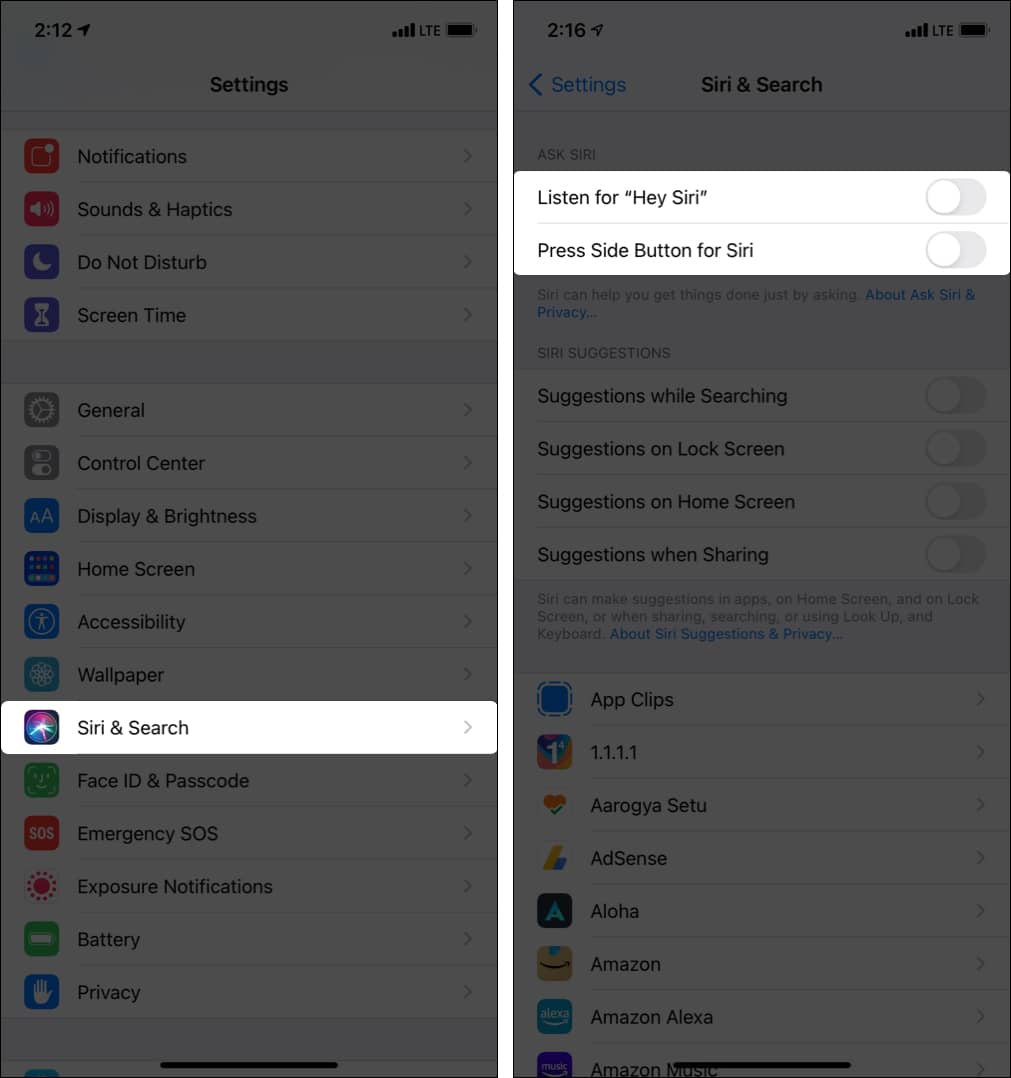
- Open iPhone Settings and tap Siri & Search.
- Toggle off Listen for “Hey Siri.”
- Toggle off Press Side Button/Home for Siri → Turn Off Siri.
How to restrict Siri & Dictation altogether on iPhone or iPad
You can also use Screen Time to restrict Siri on your or your kid’s iPhone or iPad. Here’s how.
- Open iPhone Settings and tap Screen Time.
- Once inside, tap Content & Privacy Restrictions.
- Tap Allowed Apps.
- Toggle off Siri & Dictation.
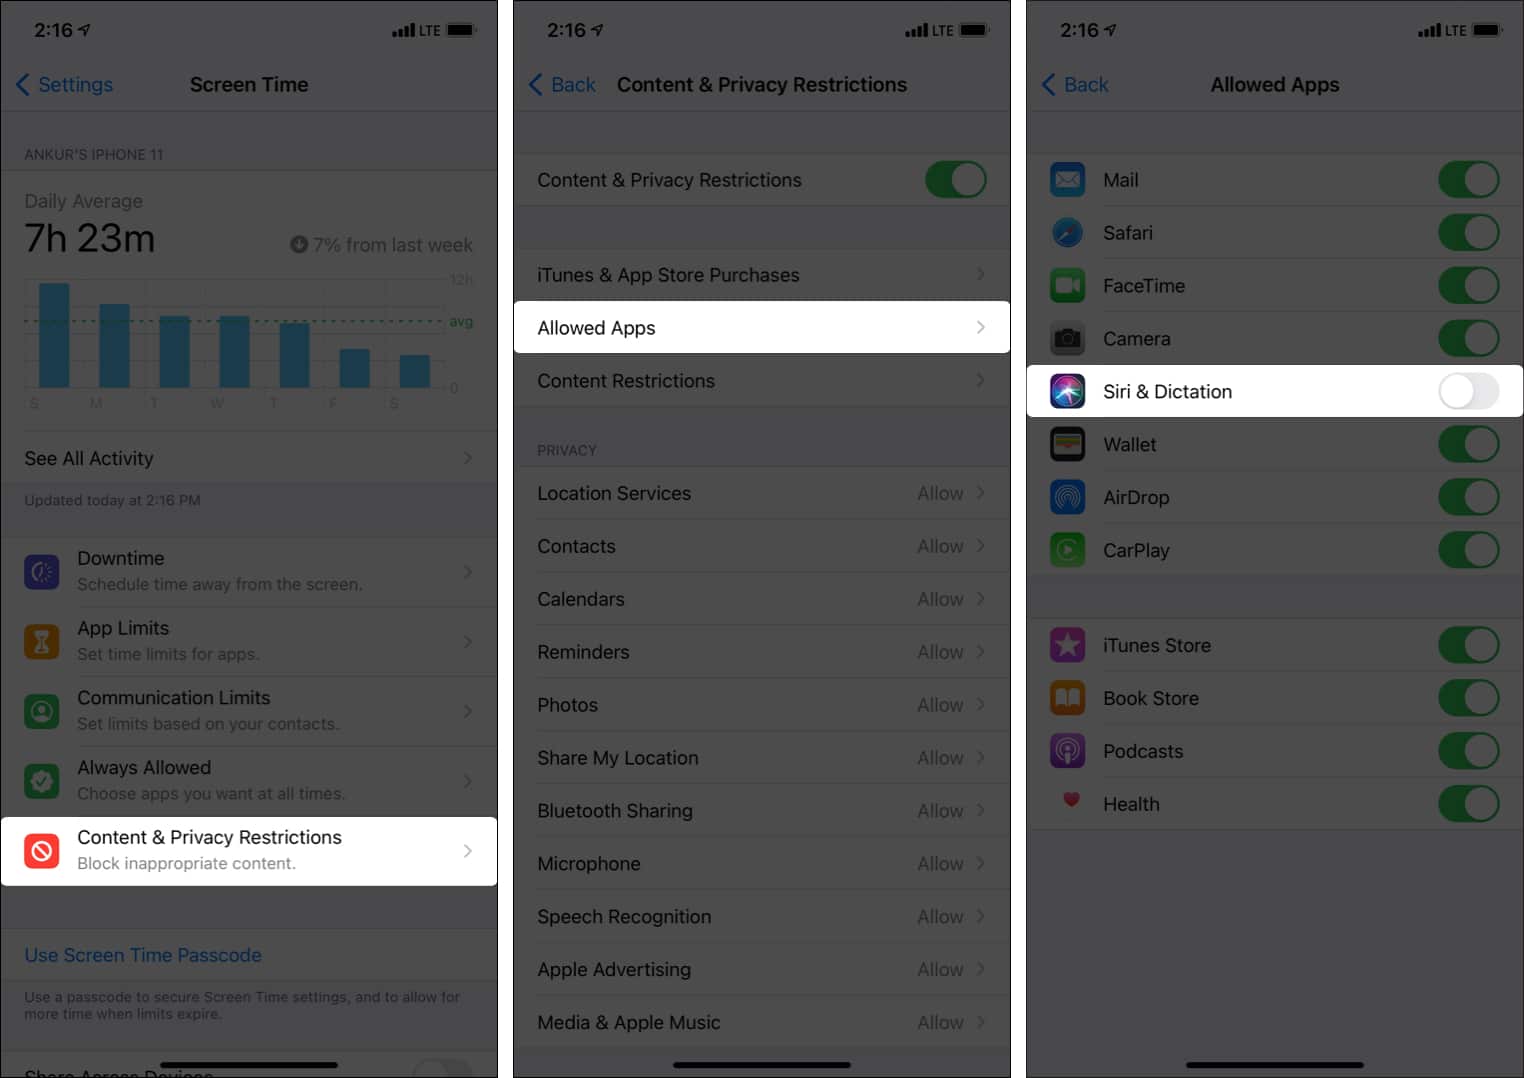
After this, you cannot use Siri & Dictation on this iPhone. Even the option for Siri & Search, normally visible in the Settings app, will be hidden. You will have to follow the same steps to un-restrict the voice assistant and dictation.
Turn off dictation on iPhone
I have been using Apple devices for years but have rarely used the dictation feature. It is cool. But if you prefer typing or want more privacy, you may turn it off. Here’s how.
- Open iPhone Settings and tap General.
- Tap Keyboard.
- Toggle off Enable Dictation.
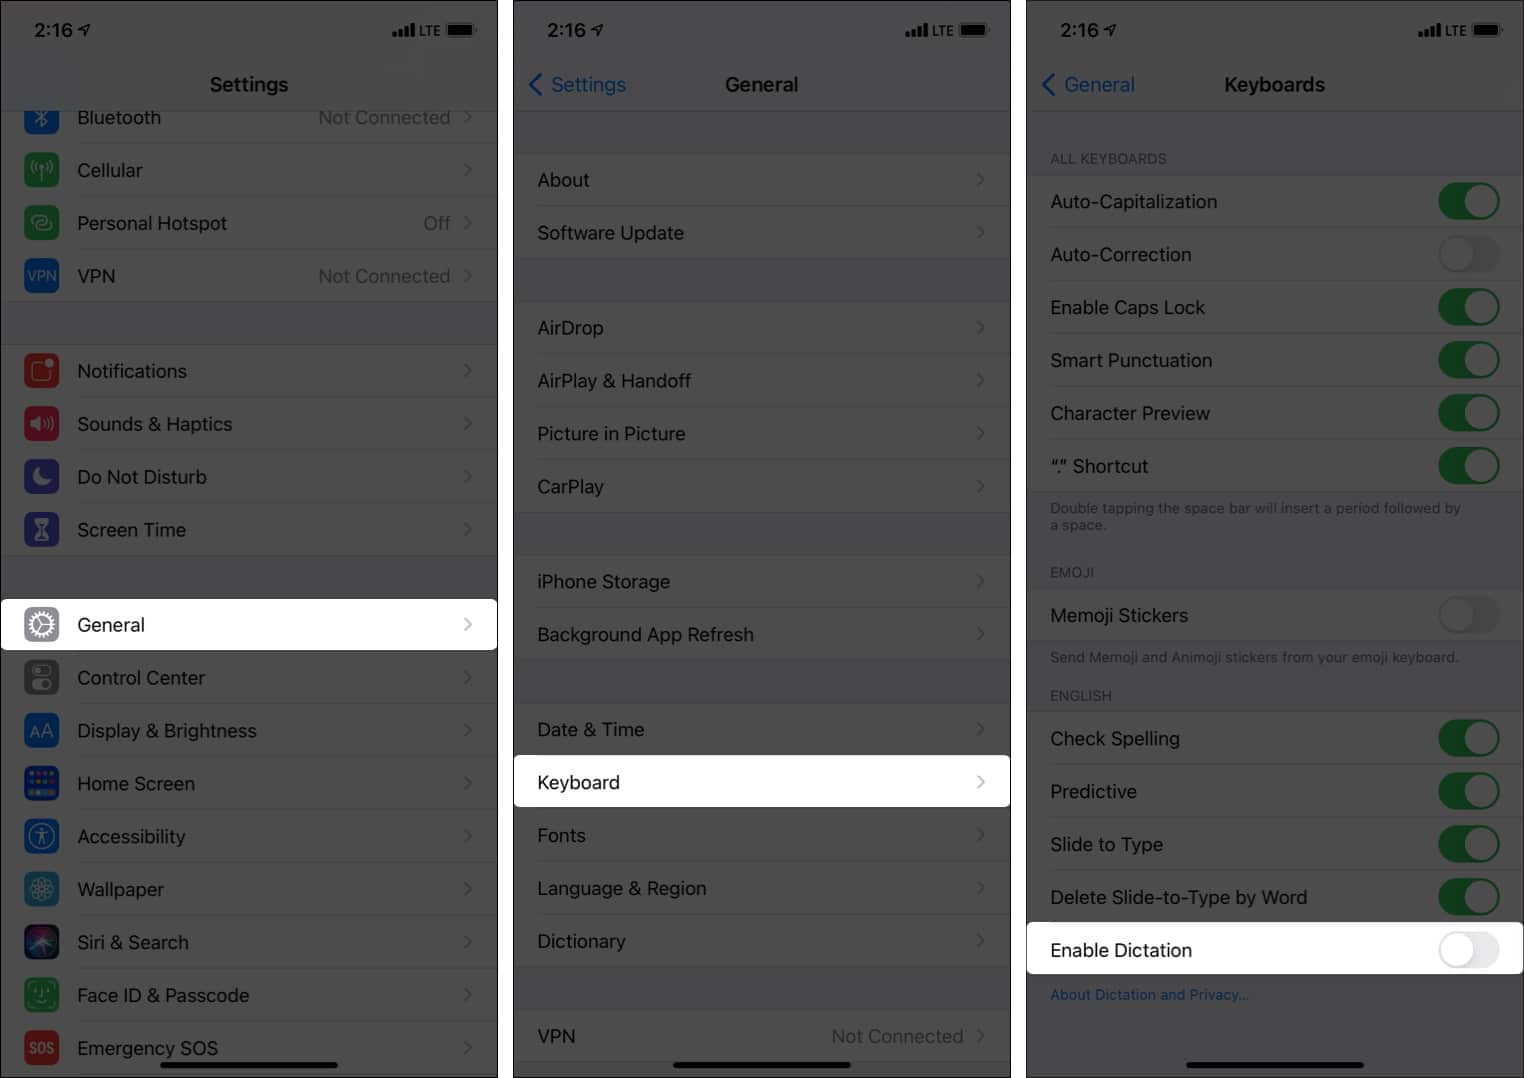
Note: If you use a third-party keyboard like SwiftKey as the primary and only iPhone keyboard, you will not see the Enable Dictation toggle in step 3. Plus, if you had restricted Siri & Dictation, then too, you won’t see this option.
Important: After turning off Siri and Dictation entirely on your iPhone (both steps above), Apple automatically deletes your Siri data associated with the random identifier. (What we did in the first step.)
This is how you can disable and delete Siri and dictation data from iCloud on iPhone and iPad. I hope this guide was helpful. Next, I suggest that you take a few minutes to go through this official Apple Support page.
Other helpful posts:

