Do you wish to test the beta version of apps on your iPhone or iPad? For that, you’ll generally need the UDID of your device. In this guide, I’ll walk you through three simple methods to find the UDID of your iPhone or iPad. Before that, let’s learn what it is and why you need it.
Table of Contents
What is a UDID used for?
UDID stands for Unique Device Identifier. It is a 40—or 25-character hex code unique to each iOS or iPadOS device. When you set up your Apple device for the first time, Apple registers its UDID. Later, it’s used to identify a device using Apple services.
UDID is mainly used by app developers who want to test their new apps. They need it to register devices for beta testing so that the app can be installed on designated devices.
You can also use UDID to activate Find My on that iPhone or other Apple device and ensure it’s not lost or stolen.
Please note that with TestFlight’s rising popularity, the need for UDIDs is on the decline. UDIDs allow the tracking down of specific devices for testing, causing privacy issues.
On the other hand, TestFlight directly integrates with the App Store. Testers don’t need to share their UDID. They just need to accept invitations from developers to use beta versions of apps, thereby reducing the privacy risks involved. For detailed instructions, check out our guide on how to use TestFlight on your iPhone or iPad.
With that clarification out of the way, if you are still adamant about using the traditional route to test apps, here’s how to get your iPhone or iPad’s UDID.
How to find the UDID of an iPhone or iPad in 3 ways
Here are three of the most common methods to get the sacred identification code.
1. How to find the UDID of the iPhone without a Mac
One of the easiest ways to find your iPhone’s UDID is to download the configuration profile using an API. Many tools, such as ShowMyUDID and UDID Tech, are available to accomplish this. However, you must do your due diligence and choose a reliable tool to avoid security issues.
Here, I will show you the steps using the UDID Tech tool:
- Launch Safari on your iPhone or iPad.
- Go to UDID tech.
- Tap the Get your UDID now button → Select Download.
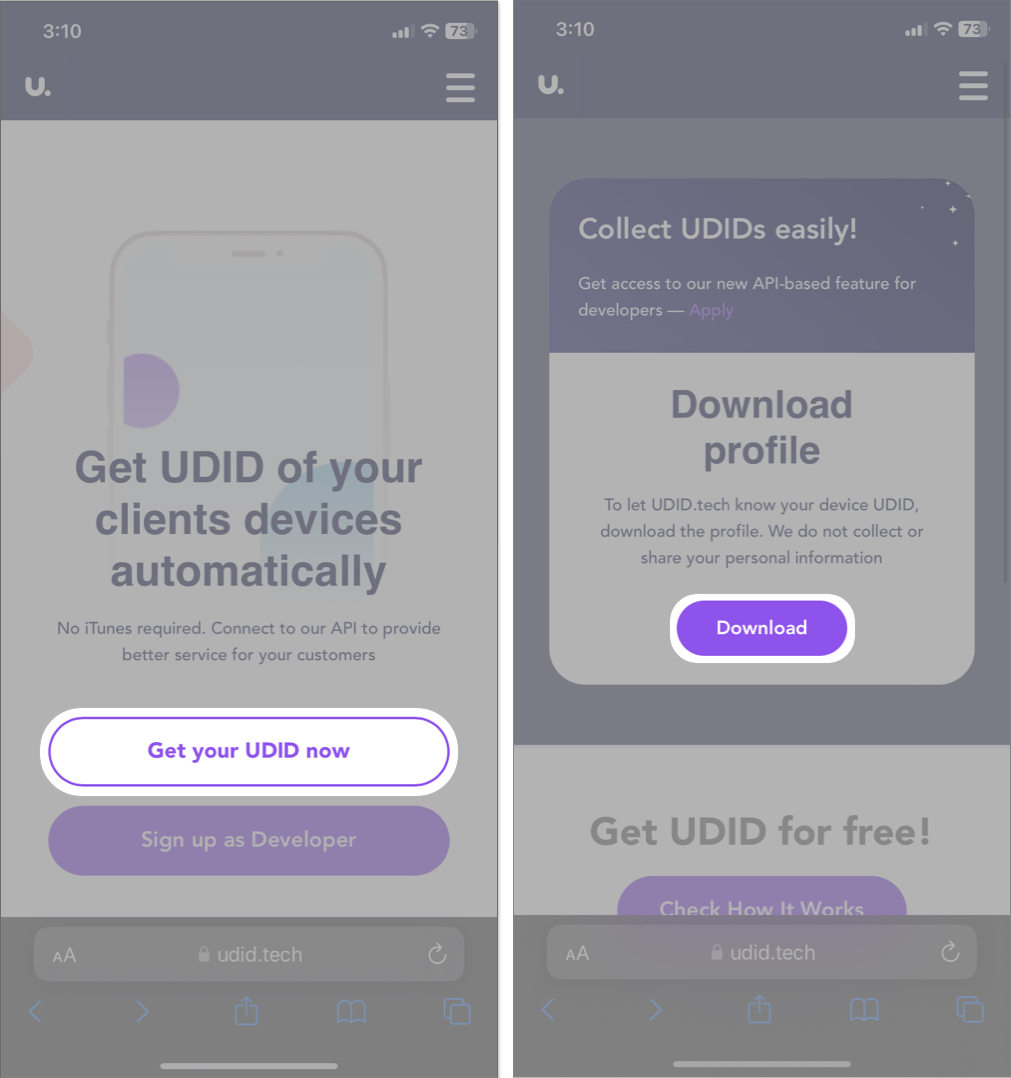
- Tap Allow to download the UDID profile on your iPhone.
- Your profile will be downloaded. Tap Close to proceed.
If you have enabled Stolen Device Protection, you will have to wait for one hour before going through the entire process again.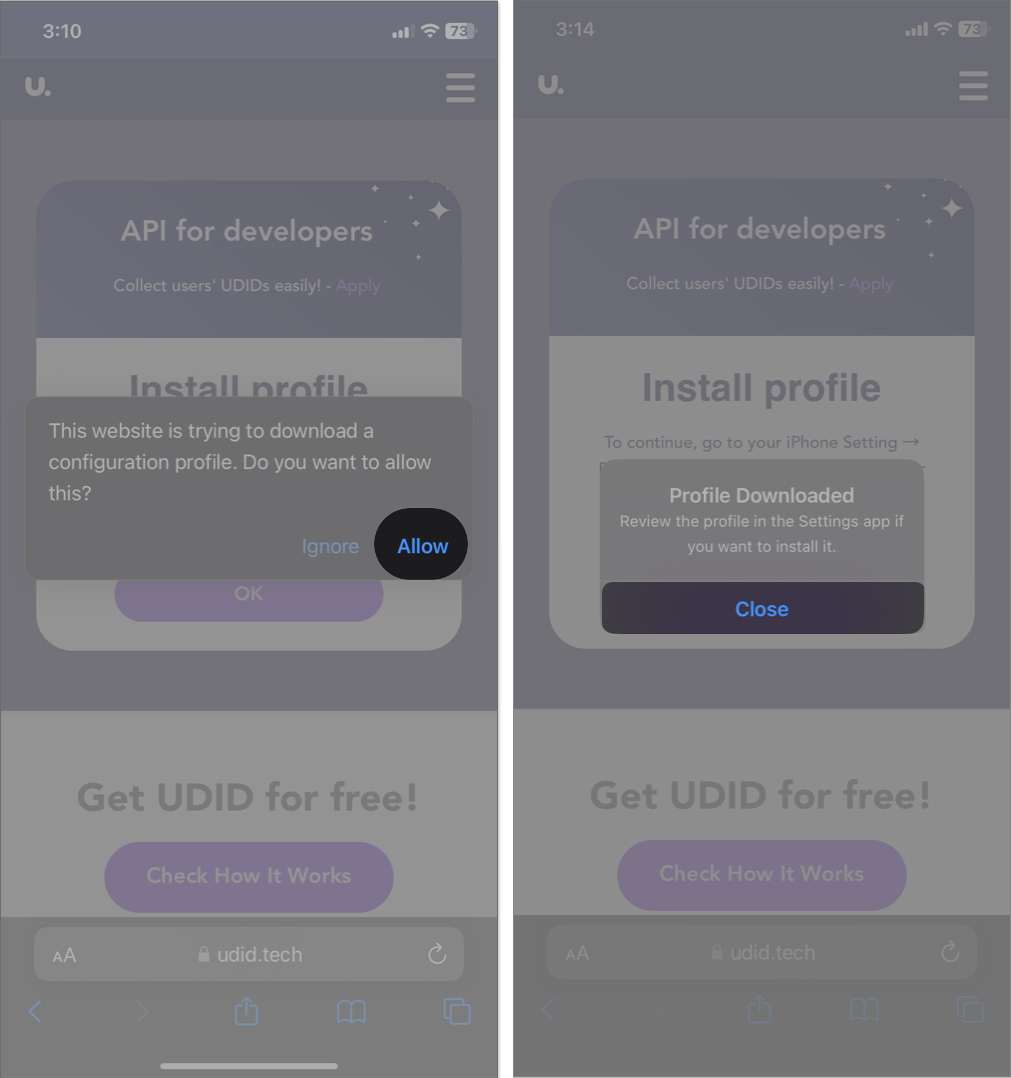
- Now go to Settings → Select Profile Downloaded.
- Tap Install → Enter your passcode → Select Install when prompted.
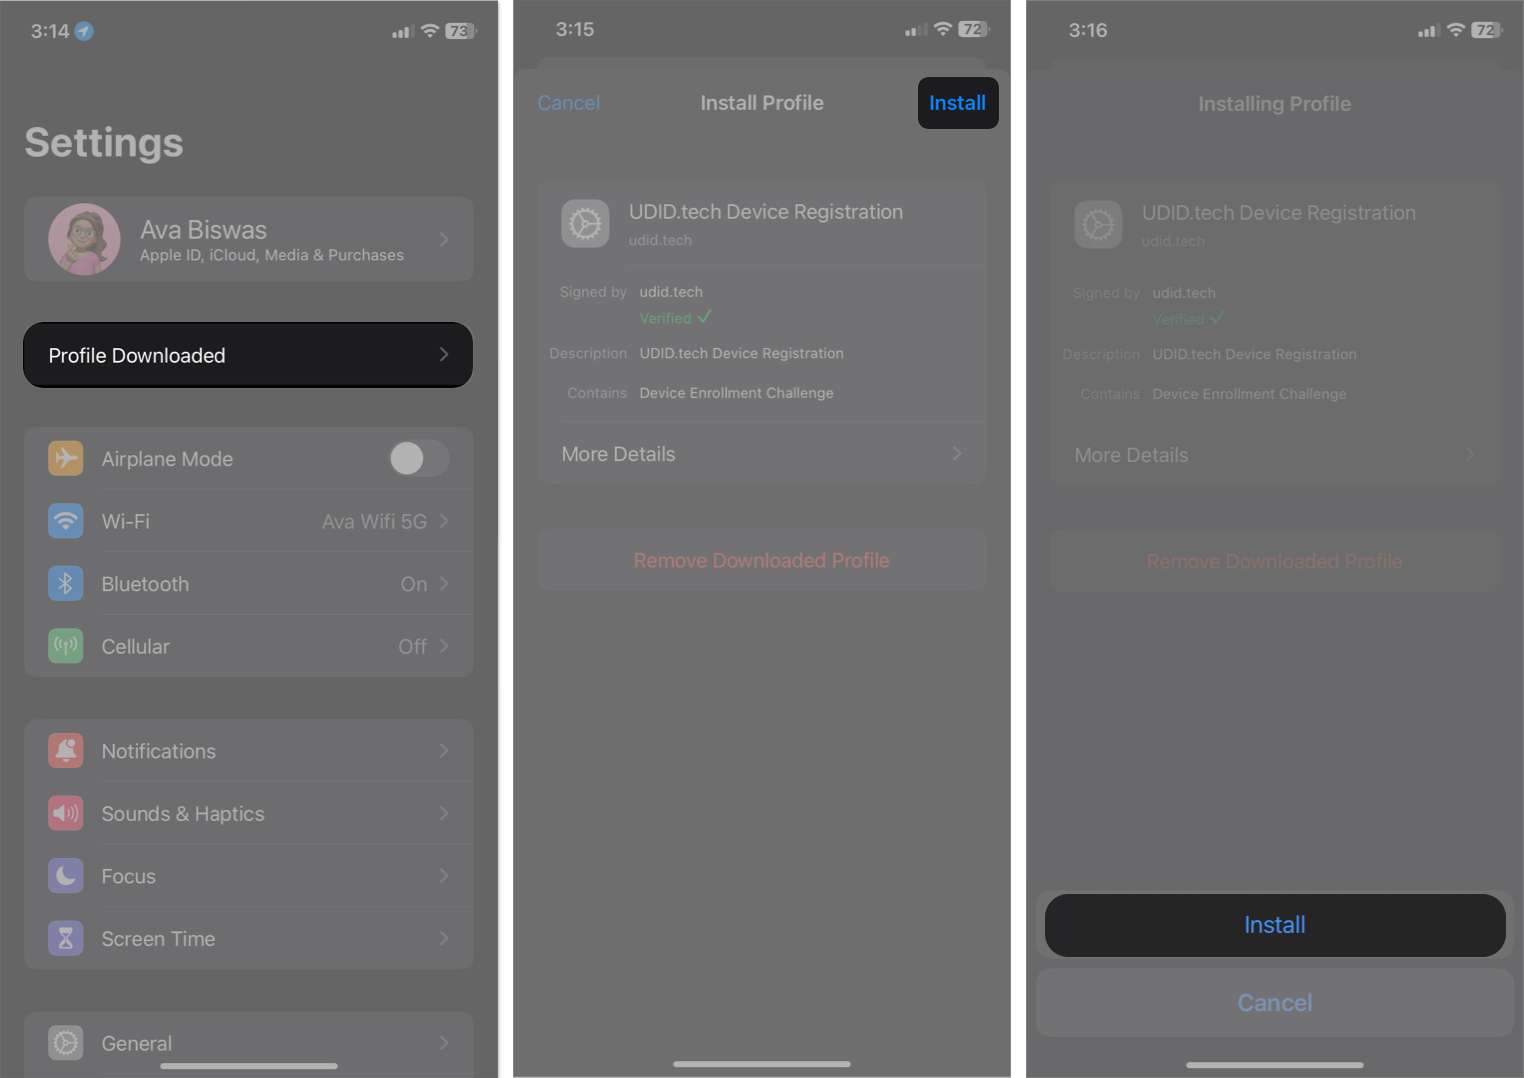
- It will redirect you to the webpage where you can check your iPhone’s UDID.
You may copy the UDID and save it at the desired location or share it with developers. It’ll also show other information like IMEI, serial number, etc. So, you must exercise caution to protect sensitive information about your device.
To avoid security risks, remove the profile after you have obtained the UDID. Just go back to Settings → Profile Downloaded → Tap Remove Downloaded Profile, and the profile will be deleted.
2. How to find iPhone’s UDID using Mac
You can find your iPhone’s UDID using Finder if you have a Mac. Here’s how:
- Connect your iPhone to your Mac using a USB cable.
- Open Finder and select your iPhone from the sidebar.
- Click Trust if connecting for the first time. Enter the passcode on your iPhone to authenticate.
- Click your iPhone model name under your name twice to get the UDID. Make sure your two clicks are slow, one after the other.
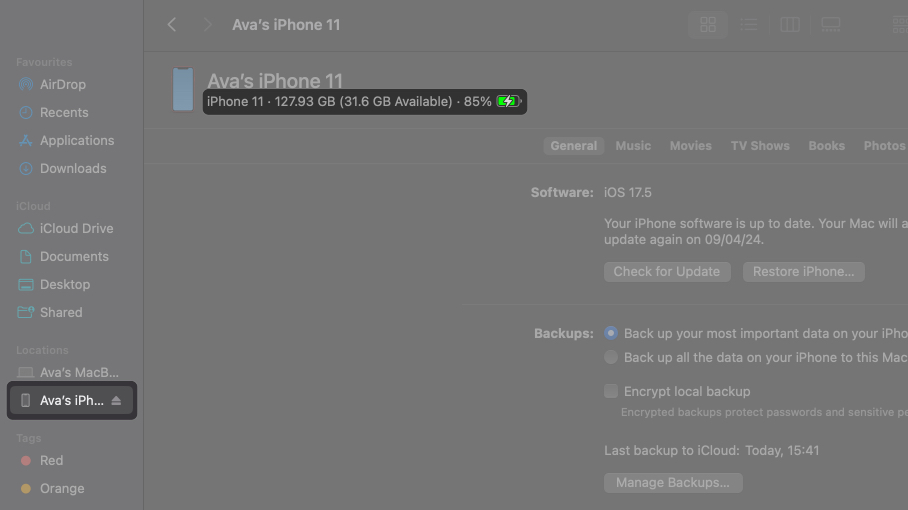
There’s another alternate way to get your iPhone’s UDID via Mac. Follow the steps below:
Become an iGeeksBlog Premium member and access our content ad-free with additional perks.
- Ensure your iPhone is still connected to your Mac via a USB cable.
- Go to Apple menu → System Settings → General → About.
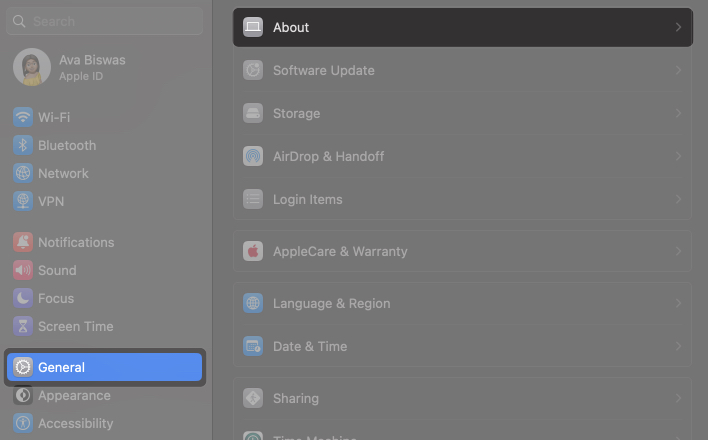
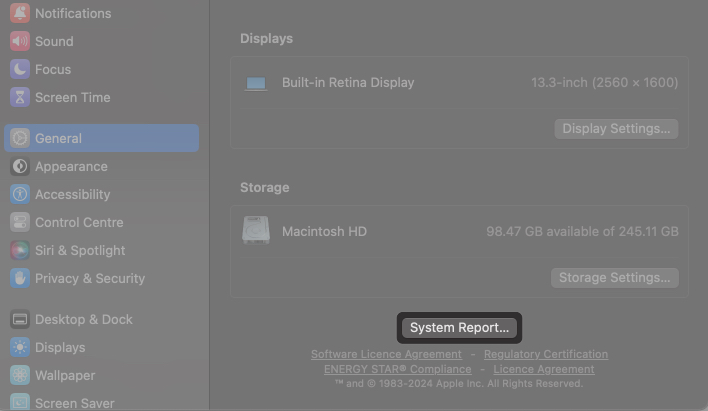
- Scroll down and click System Report.
- From the Hardware section, click USB.
- Click the connected iPhone.
- Check out the Serial Number label. Copy the number next to it and paste it into a note. Now, add a – (hyphen) after the 8th digit.
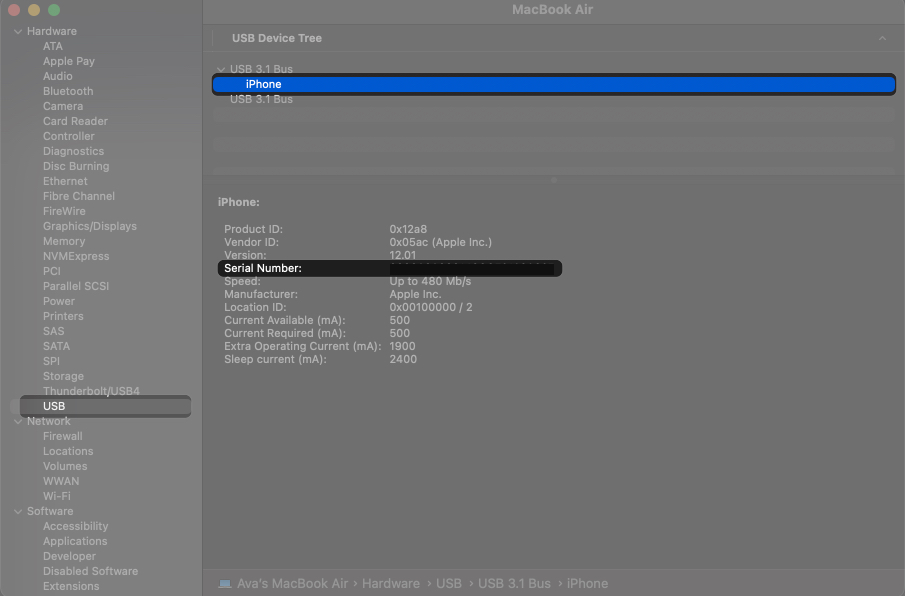
- Let’s say the serial number looks like 000011114567899. When you include the hyphen, it will be 00001111-4567899. It’s your iPhone’s UDID.
3. How to get UDID of iPhone using Xcode
For those familiar with Xcode, here’s how to use it to check the UDID of an iPhone or iPad.
- First off, download Xcode if you haven’t already. It’s free.
Note: Installing Xcode takes considerable time. At least you’ll have time to work on something else! - Now, connect your iPhone to the Mac using a USB cable.
- Next, open Xcode → Click Window in the menu bar and select Devices and Simulators.
Alternatively, use this shortcut:Command + Shift + 2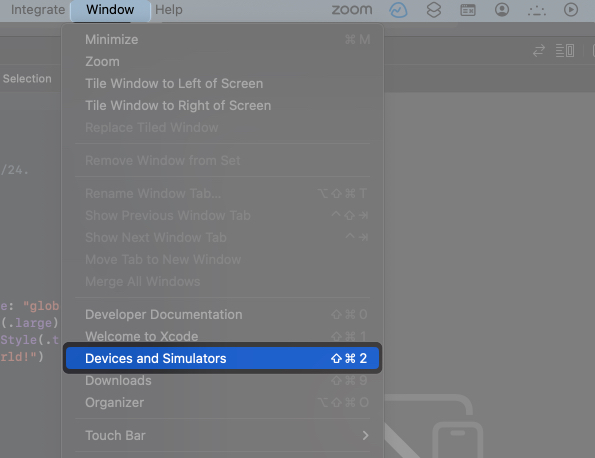
- Ensure that the Devices tab is selected in the sidebar.
- Check out your iPhone’s UDID next to Identifier.
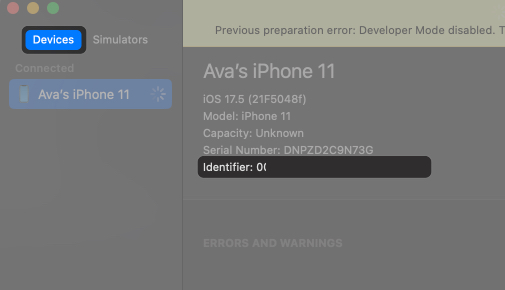
Now that you’ve got the ID copy it and use it wherever you want.
Watch our video to get the UDID number of your iPhone and iPad: 2 easy ways explained
Trace your iOS ID!
Finding your iPhone or iPad’s UDID is straightforward, and knowing how to do it can be useful, especially for app testing purposes. Whether you choose to use an online tool, your Mac’s Finder, or Xcode, you can easily locate your device’s UDID.
If you face any issues, please drop them in the comments below!
FAQs
Your device’s UDID is sensitive, as developers can register your device to test any unreleased apps, including malware, using it. So, you should share it if you want to join app beta testing from known developers only.
No, UDID and IMEI (International Mobile Equipment Identity) are different. UDID is specific to iOS devices and is used for app testing, while IMEI is a unique number assigned to mobile phones for identification purposes by carriers.
UDID is your Apple device’s unique 40- or 25-character hexadecimal identifier code. On the other hand, UUID stands for “Universally Unique Identifier,” which is on a per-app basis. It recognizes an app installed on your device and will stay on your iPhone until you delete it. If you delete the app from their iOS device and download it again, the ID will be different.
Read more:
