Apple AirTags are Bluetooth trackers that can be attached to your keys, wallet, backpack, or other belongings. The tags use the Find My network to help you track down your lost items. In this guide, I will provide a comprehensive explanation of what AirTags are and demonstrate how you can set up and use the same.
How to set up AirTag
The best part about an AirTag is that it takes care of things independently. There isn’t much you have to do to get started. However, before we begin, ensure you meet the following requirements to activate an AirTag without hassle.
- iPhone, iPad, or iPod running on iOS 14.5 or iPadOS 14.5 or later
- Turn on two-factor authentication
- Enable Find My and Bluetooth
- A strong cellular or Wi-Fi connection
- Turn on Location Services
There are multiple methods to activate your AirTag. Let’s discuss them!
Method 1: Via Home Page
- For new AirTags, remove the wraparound and pull out the tab to activate the battery.
- Wait till you hear a beep.
It signifies that AirTag is activated. - Close the lid by rotating it in a clockwise direction.
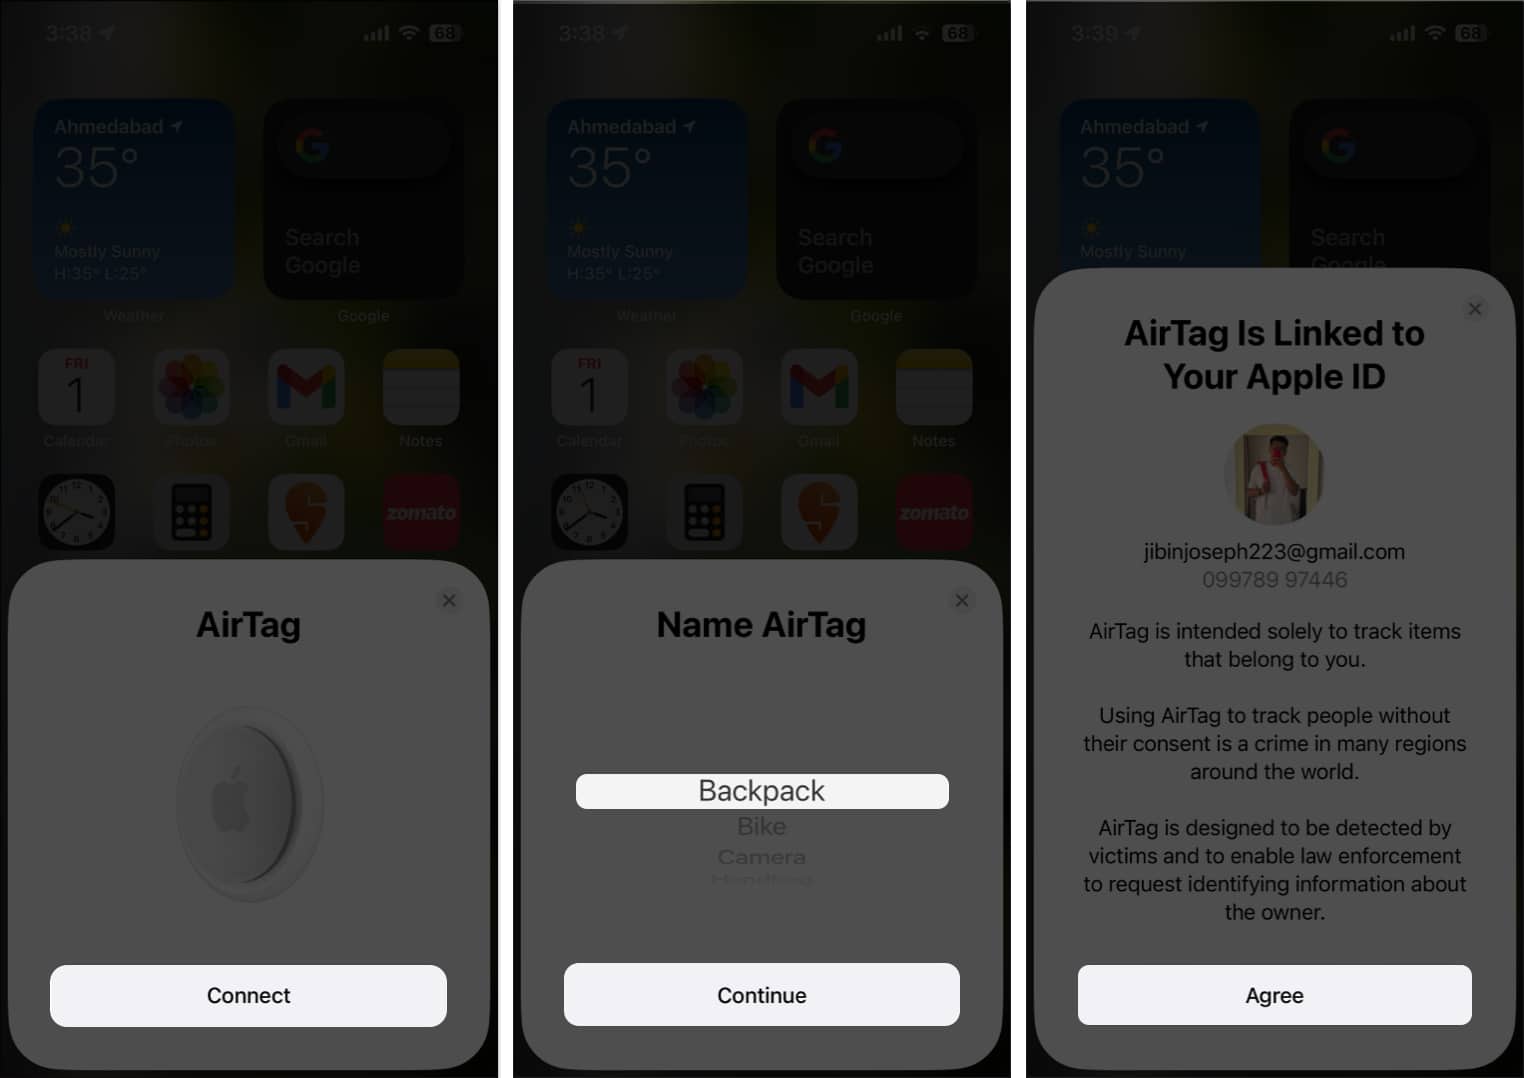
- Now, hold the AirTag close to your device and wait for the AirTag setup animation to appear on your home screen.
- Tap Connect → Choose a name and emoji for your AirTag.
- Hit Agree to link the AirTag with your Apple ID.
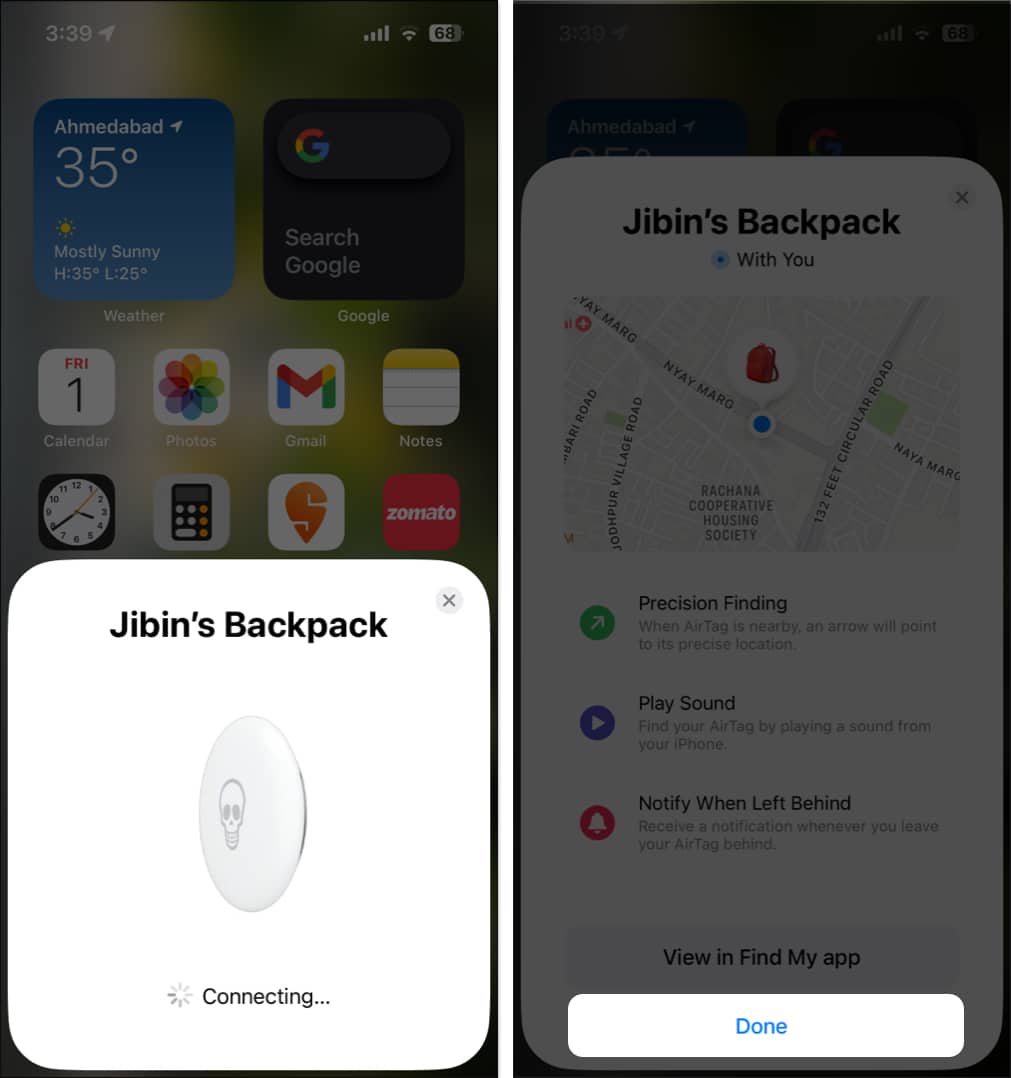
- Wait till the AirTag is paired to your device.
- Tap Done to conclude the process.
Method 2: Via Find My
- Follow the steps 1-4 discussed above.
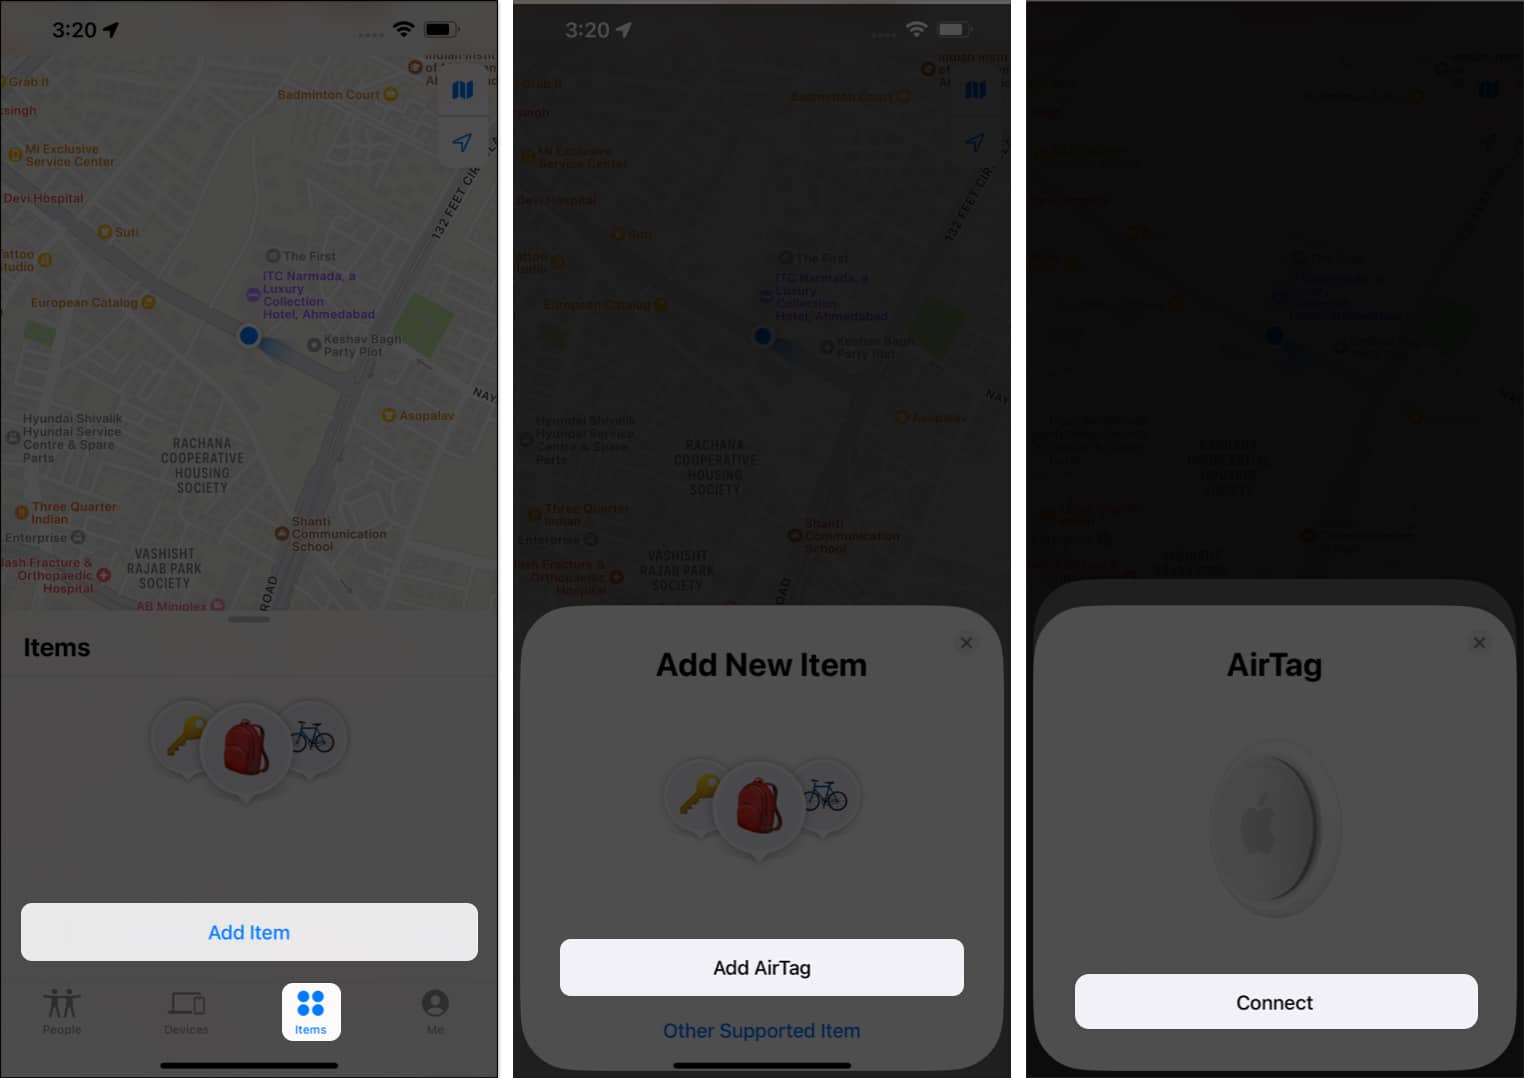
- Launch Find My on your iPhone or iPad.
- Navigate to Items → Tap Add Item.
- Hit Add AirTag → Connect to get started.
- Wait till the AirTag is paired successfully.
- Once connected, name the AirTag as you desire.
Here, you can choose from preset titles or create one. - If you curate a custom name, select an emoji.
- Hit Continue → Use This iPhone.
- Now, select Agree to pair the AirTag to your Apple ID.
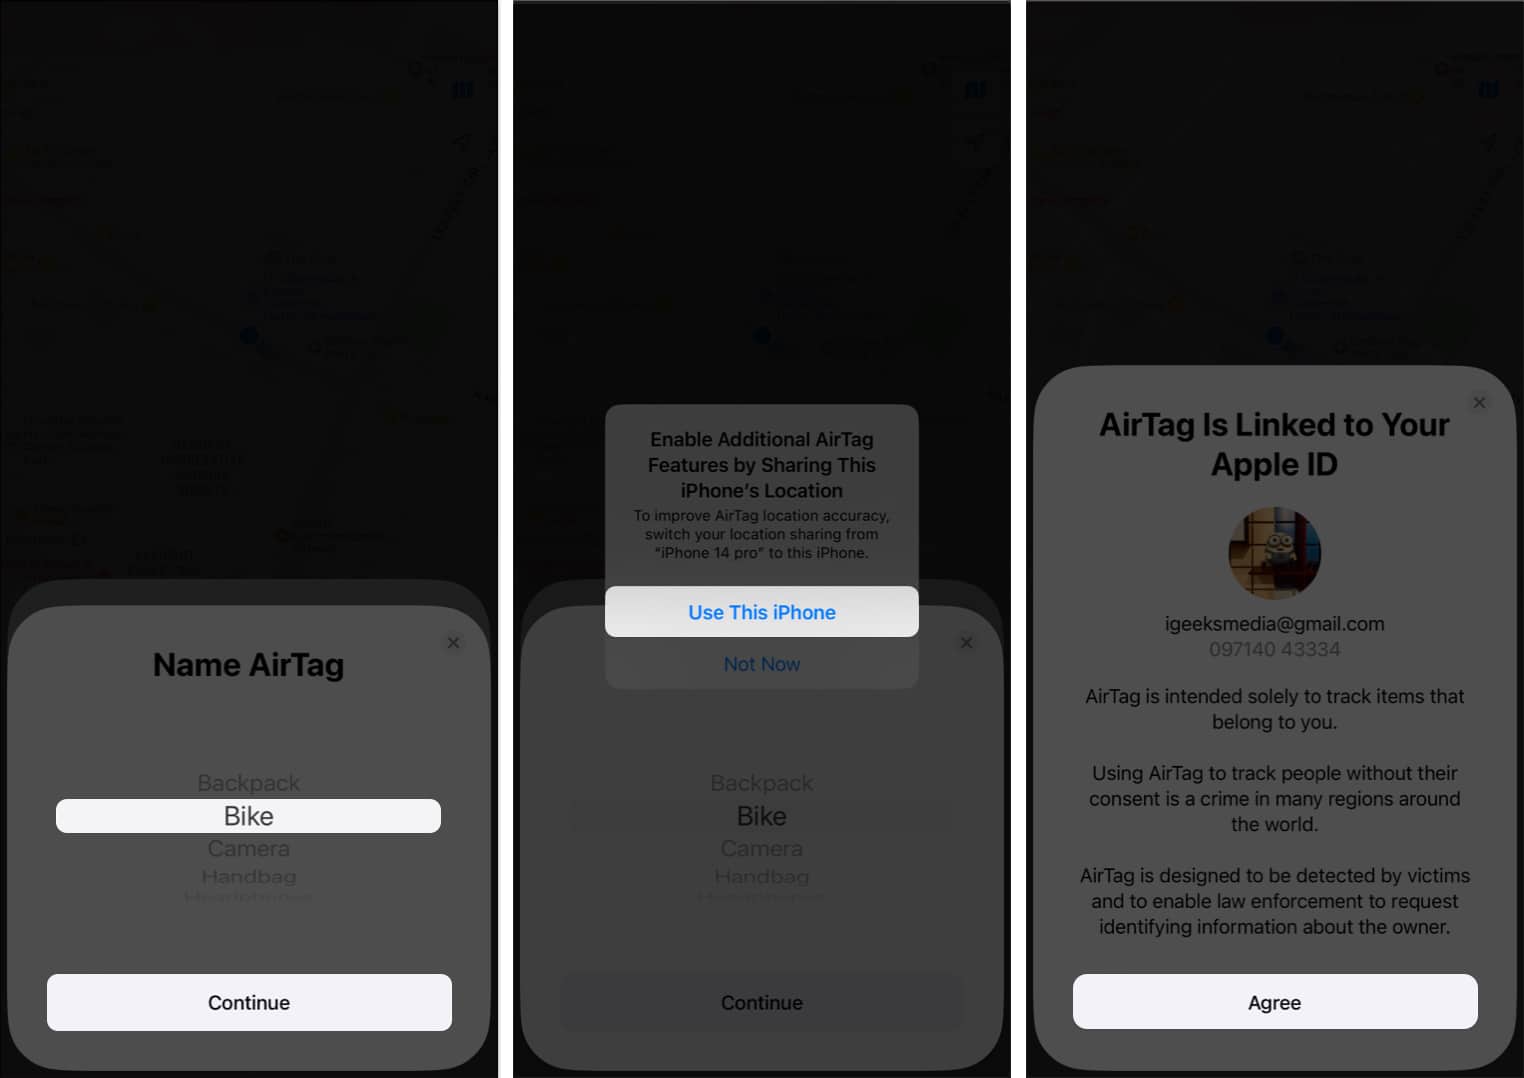
- Once paired, tap Done.
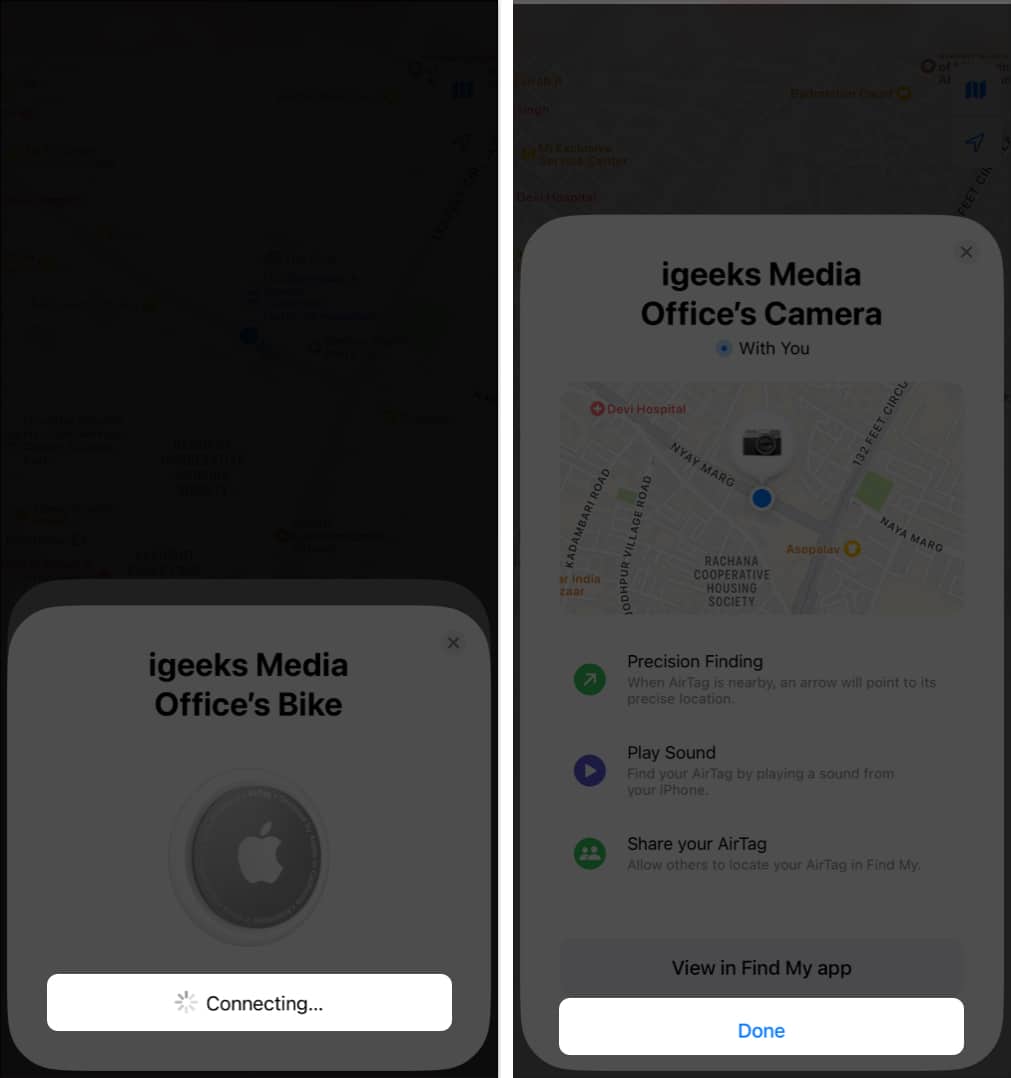
Note: If you’ve multiple AirTags nearby, ensure only the one you wish to set up is in the range of your iPhone, or it may cause interference later.
How to use AirTag
After successfully pairing your AirTag to your device, let’s explore how you can assign tasks. Regardless of how you’ve connected AirTag to your device, you can find them all listed in the Find My app.
- Access Find My app on your iPhone or iPad.
- Go to the Items menu → Select your AirTag.
- Now, you will see the live location indicating where the AirTag is located.
- Swipe up the bottom menu for controls.
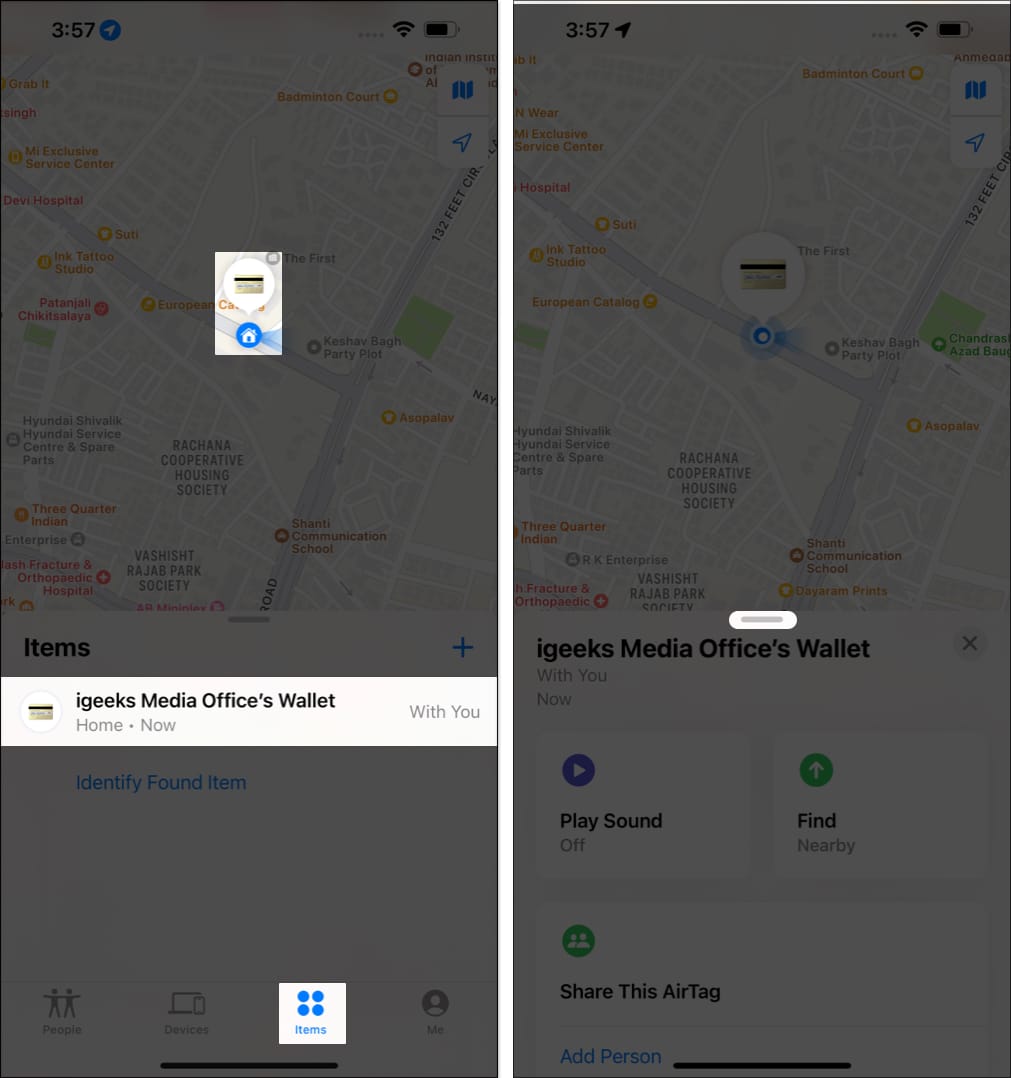
- Here, you can take on a series of actions like:
Play Sound
By tapping this option, your AirTag will play a chime. The sound emitted from the AirTag is loud enough to be heard even from a considerable distance. So you can quickly locate misplaced or lost items.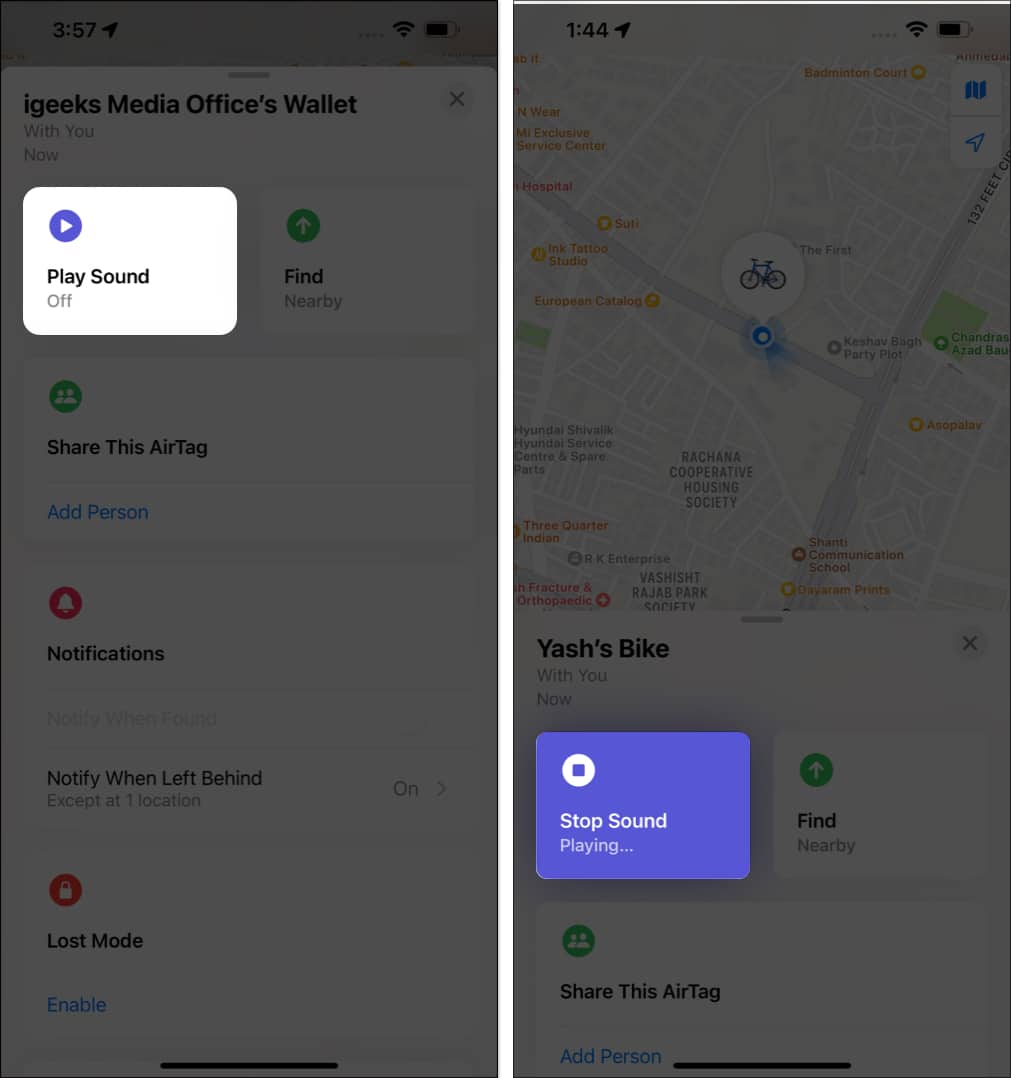
Note that playing a sound through an AirTag may require Bluetooth connectivity between the iPhone or iPad and the AirTag device. Thus, ensuring proper proximity between both devices enhances performance efficiency.
Track AirTag on iPhone
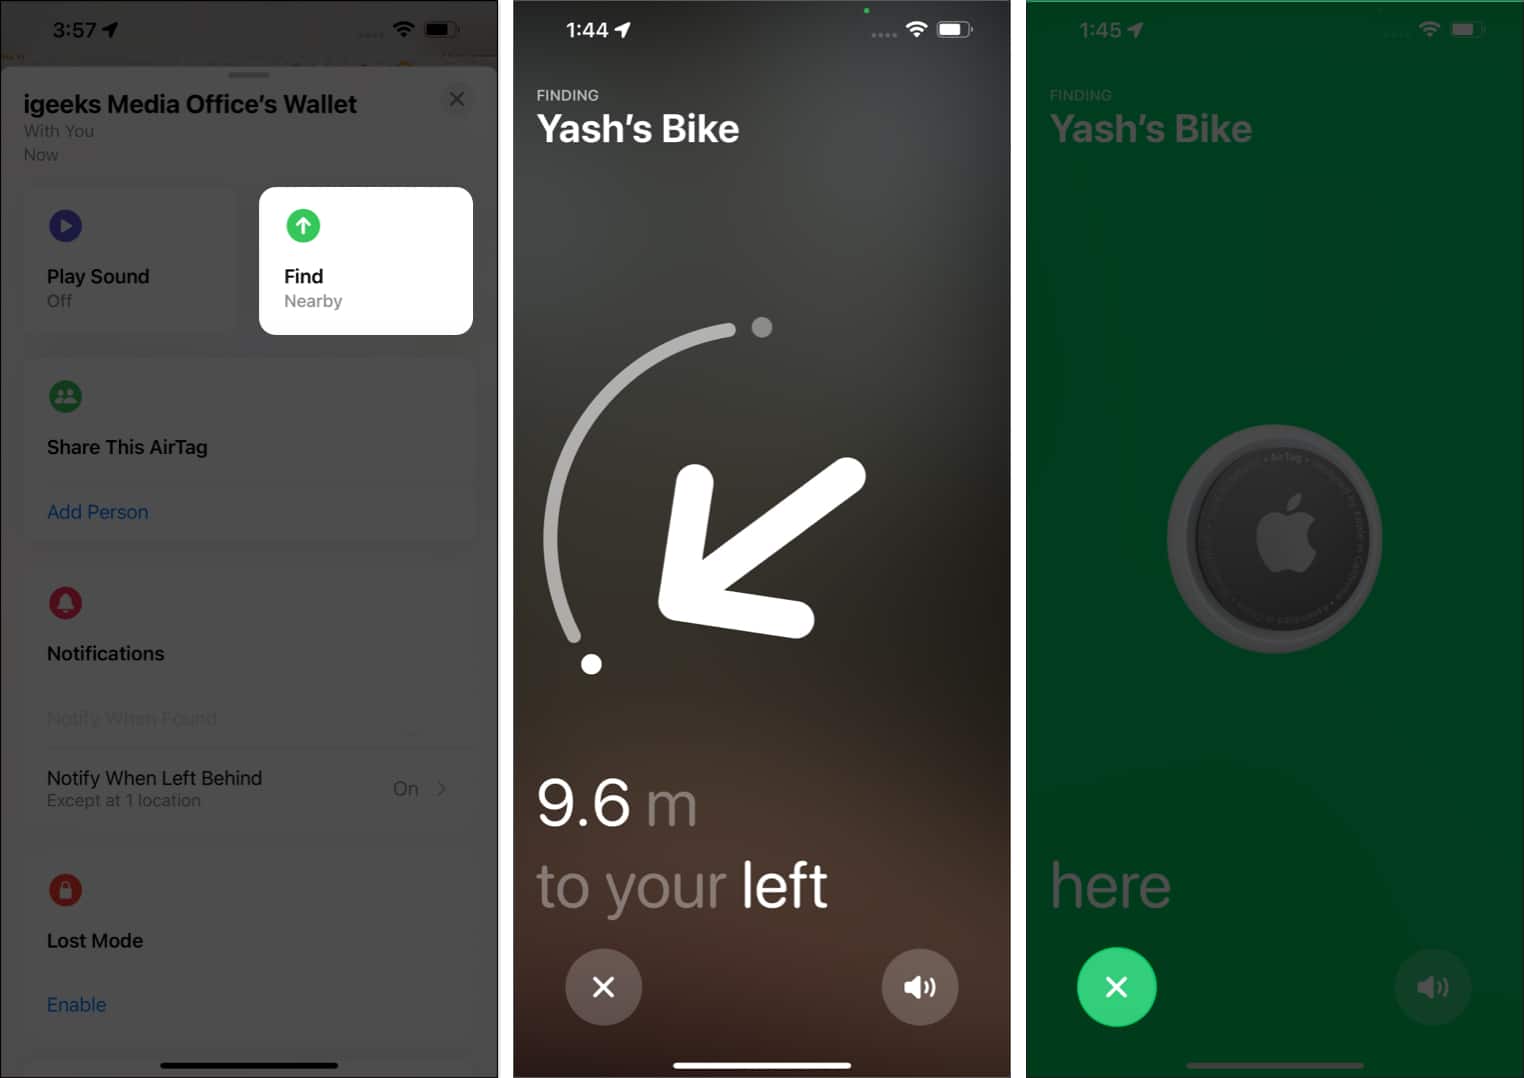
After you turn on AirTags, you can use the Find feature to quickly pinpoint their item’s specific location. This feature facilitates proximity tracking by providing detailed visual cues, live navigation updates, Tracking Notifications, and haptic feedback on your iPhone.
- Tap the Find option.
- Follow the on-screen direction arrow to know the AirTag location.
- Once found, tap the close icon to exit the menu.
For those who wish to add multiple participants to their AirTag can simply:
- Tap Add Person in the Share This AirTag menu.
- Hit Continue.
- Select a saved contact or manually enter their details and tap the (+) icon.
- Once added, choose Share.
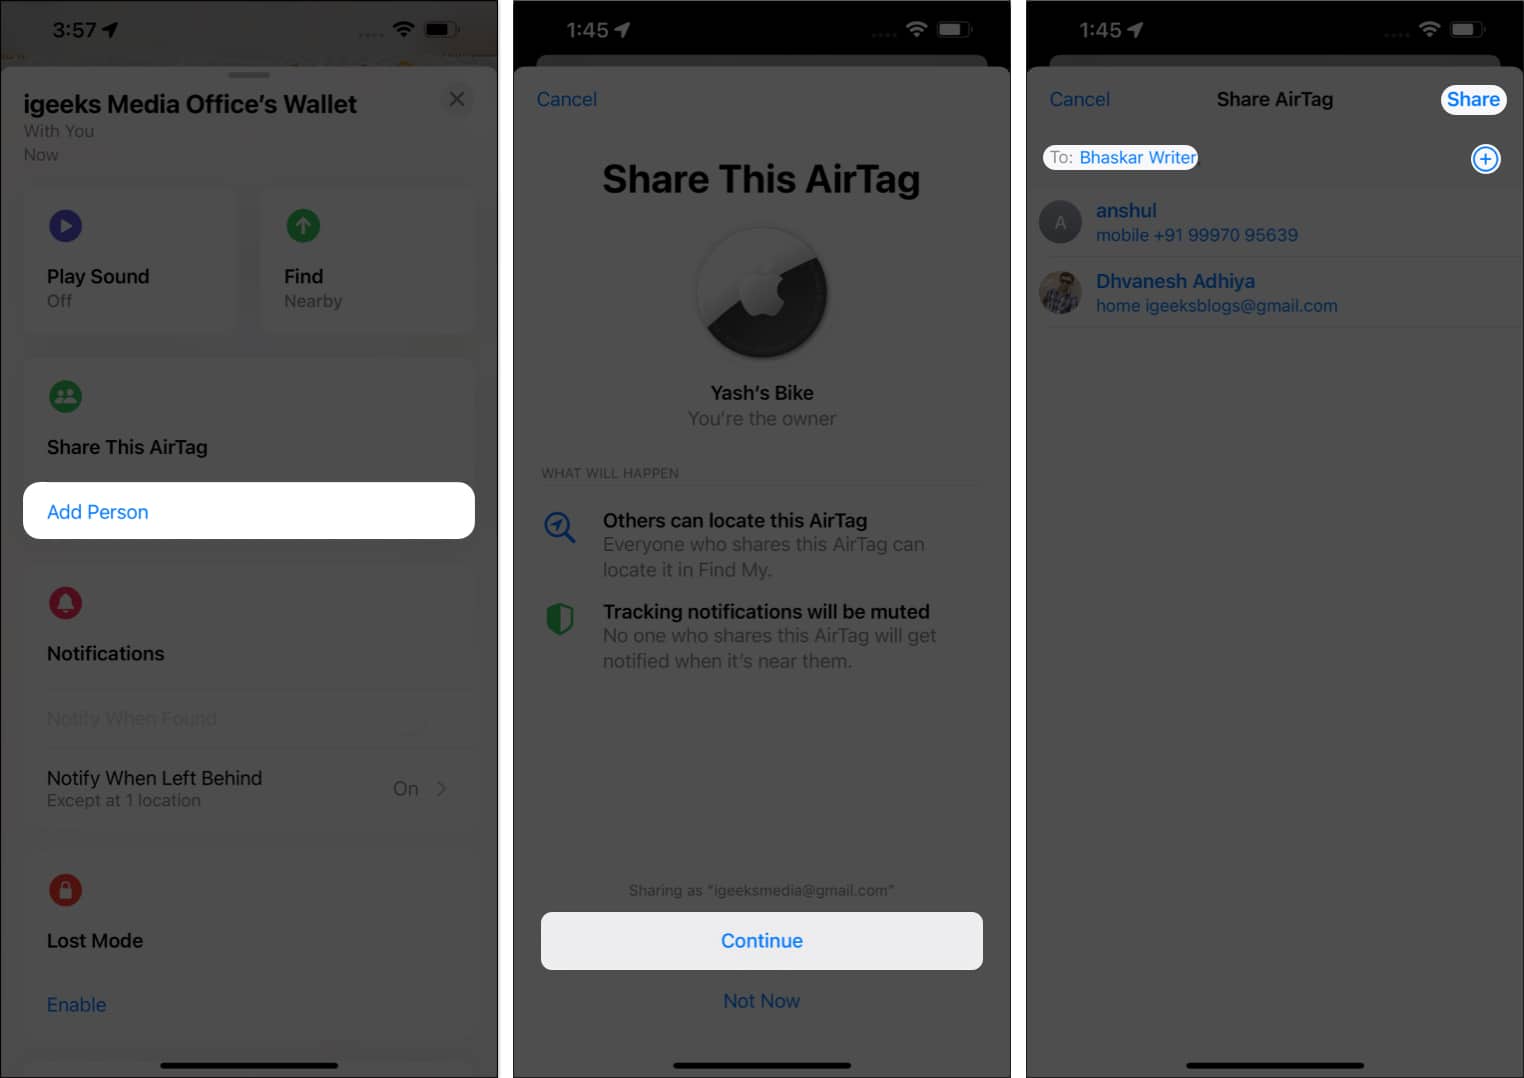
- Wait for a few seconds until the chosen user ID is paired.
- Now, the added individual must accept your request to access the Airtag.
Lost Mode
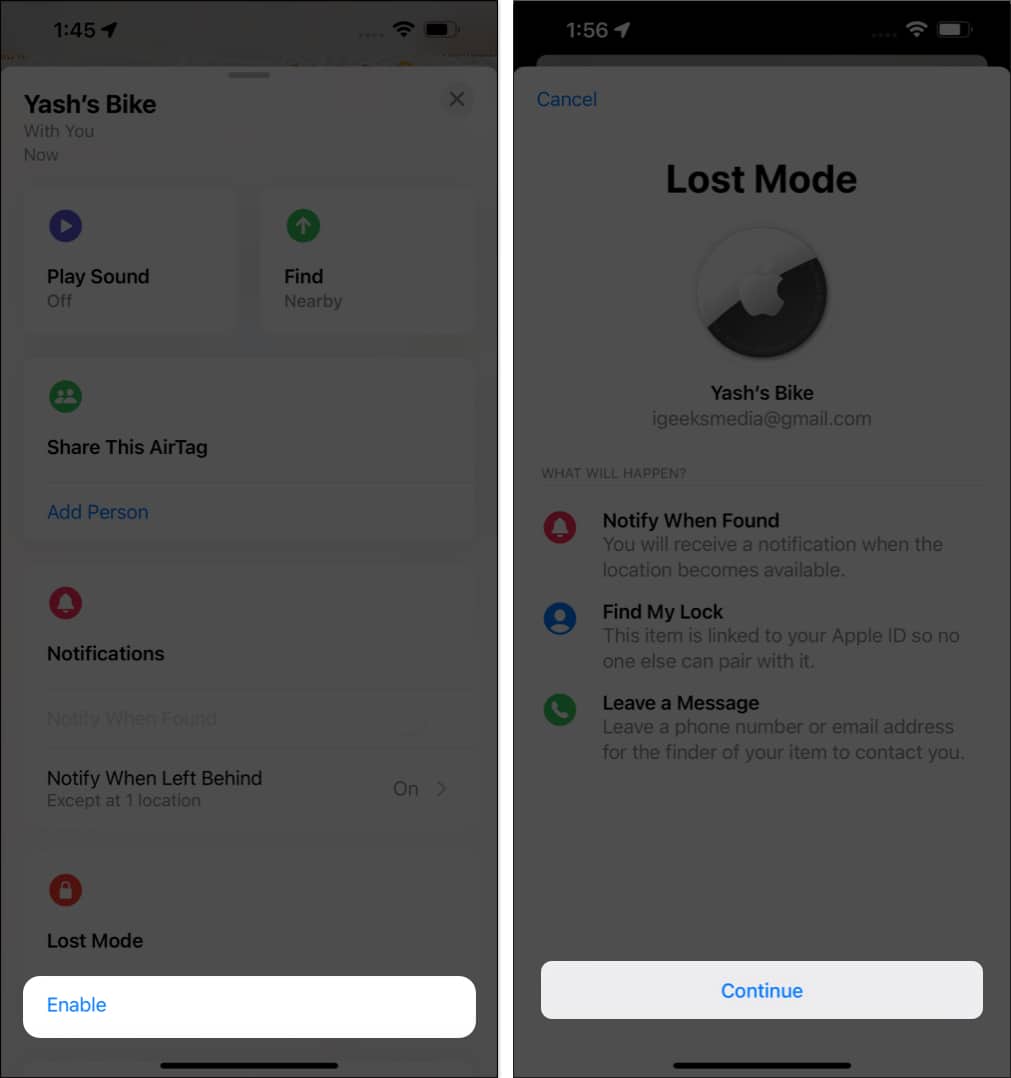
If you cannot locate your AirTag, mark it as lost in the Find My app. This will allow other iPhone users to view a message with your contact information when they come across your AirTag. To do so,
Become an iGeeksBlog Premium member and access our content ad-free with additional perks.
- Tap Enable under Lost Mode.
- Hit Continue when prompted.
- Enter your Email Address or Phone Number.
- Hit Next → Activate to conclude the process.
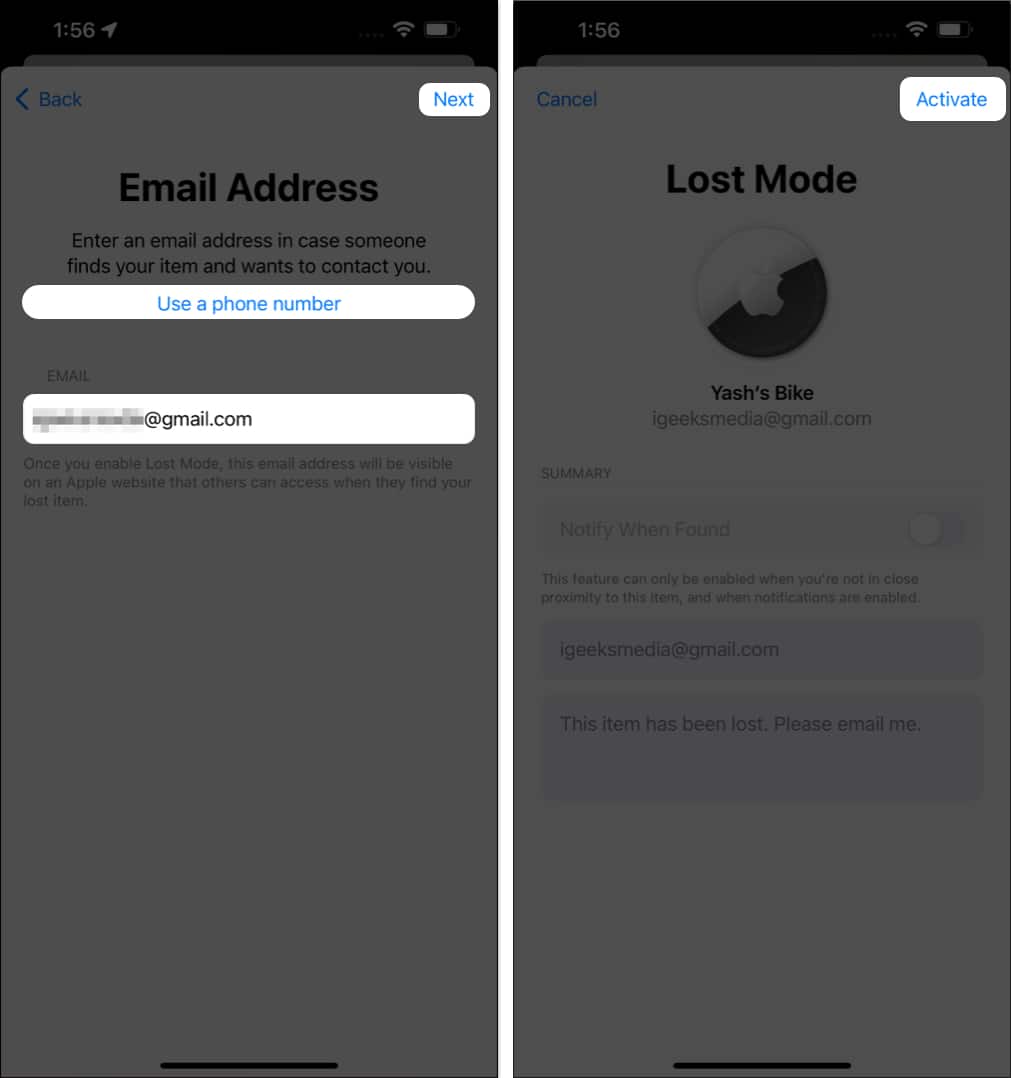
Doing so will alert every Apple user within the range of your AirTag with a lost tag. They can either report or contact you directly if found. Moreover, this practice is effective for Android users as well.
Rename Item
Finally, scroll down until you find the Rename section and tap it to rename your item.
- Select a new preset item name or compose one custom title.
- Tap the cross icon to erase the predefined name and type a new one.
- Choose an emoji describing the AirTag.
- Once altered, hit Done.
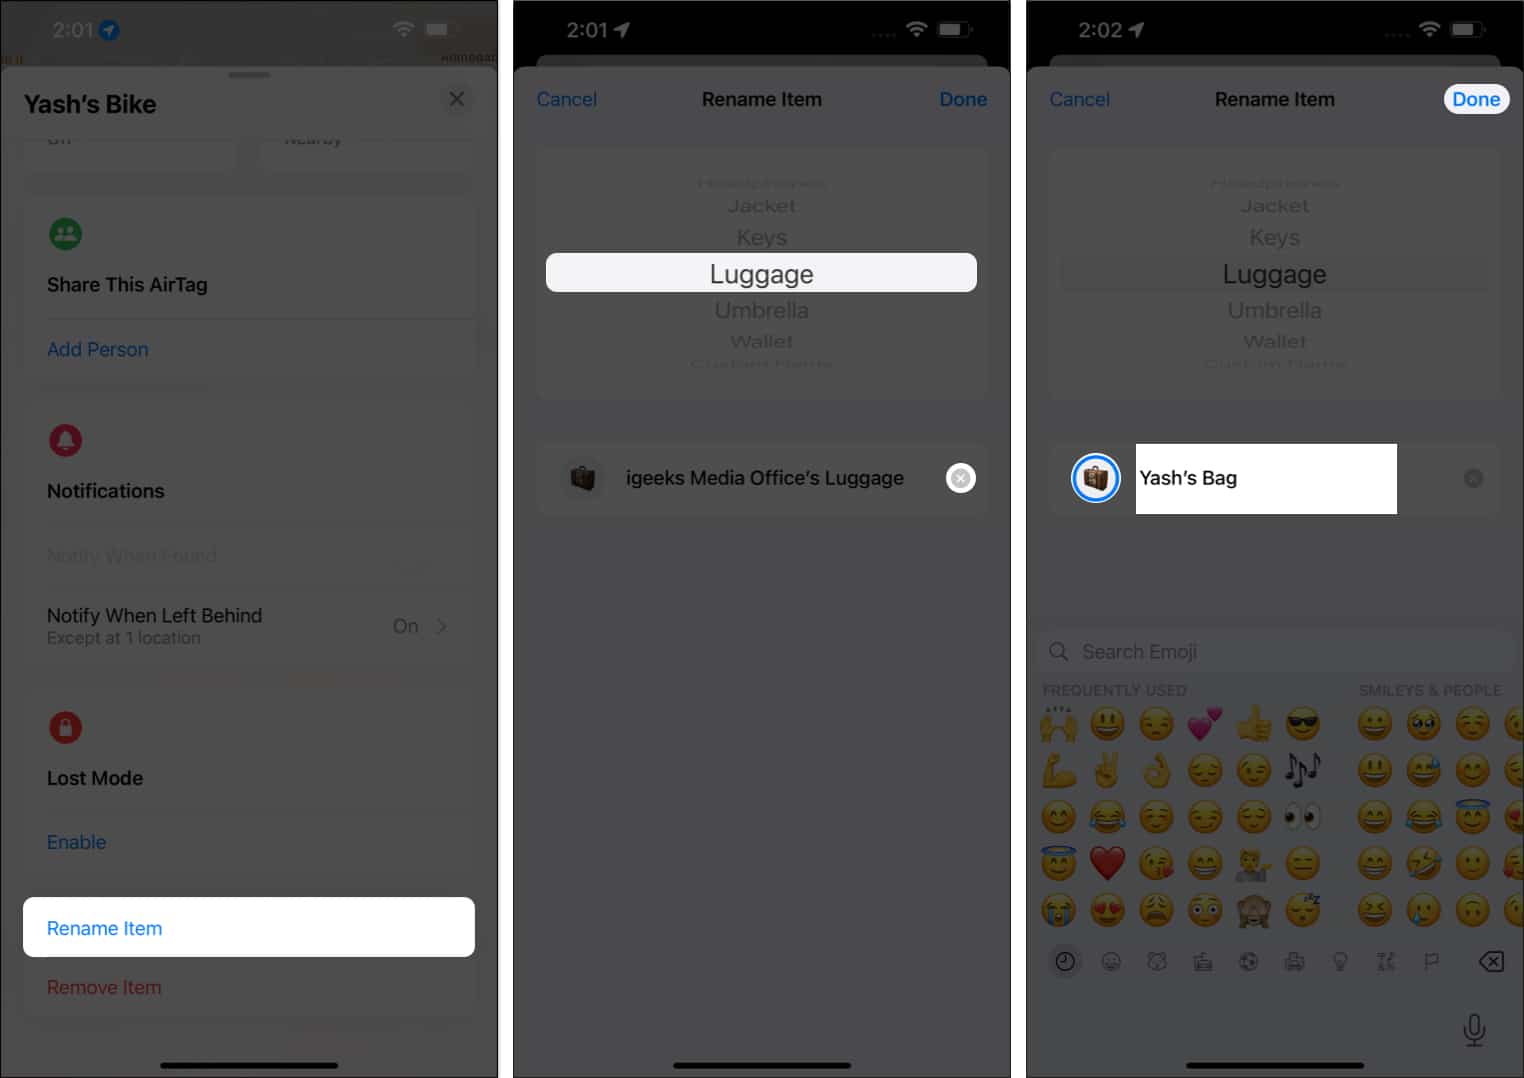
Your renamed item will be reflected across all linked devices associated with your Apple ID, ensuring convenient identification. Choosing a recognizable title that accurately identifies the object to which you have attached the AirTag is advised.
By following these steps above, users can professionally harness the full potential of their AirTags’ features.
How to unpair or reset AirTag
While AirTag offers abundant convenience and safety for one’s belongings, there is a high chance that your purpose of using an AirTag may change. For instance, you may want to pair the same AirTag with a different Apple ID. In such scenarios, resetting the tag seems the most viable option.
- Open the Find My app on your iPhone.
- Navigate to the Items menu and select the respective AirTag.
- Access the control menu → Tap Remove Item.
- Select Remove → Remove to unpair the AirTag from your current Apple ID.
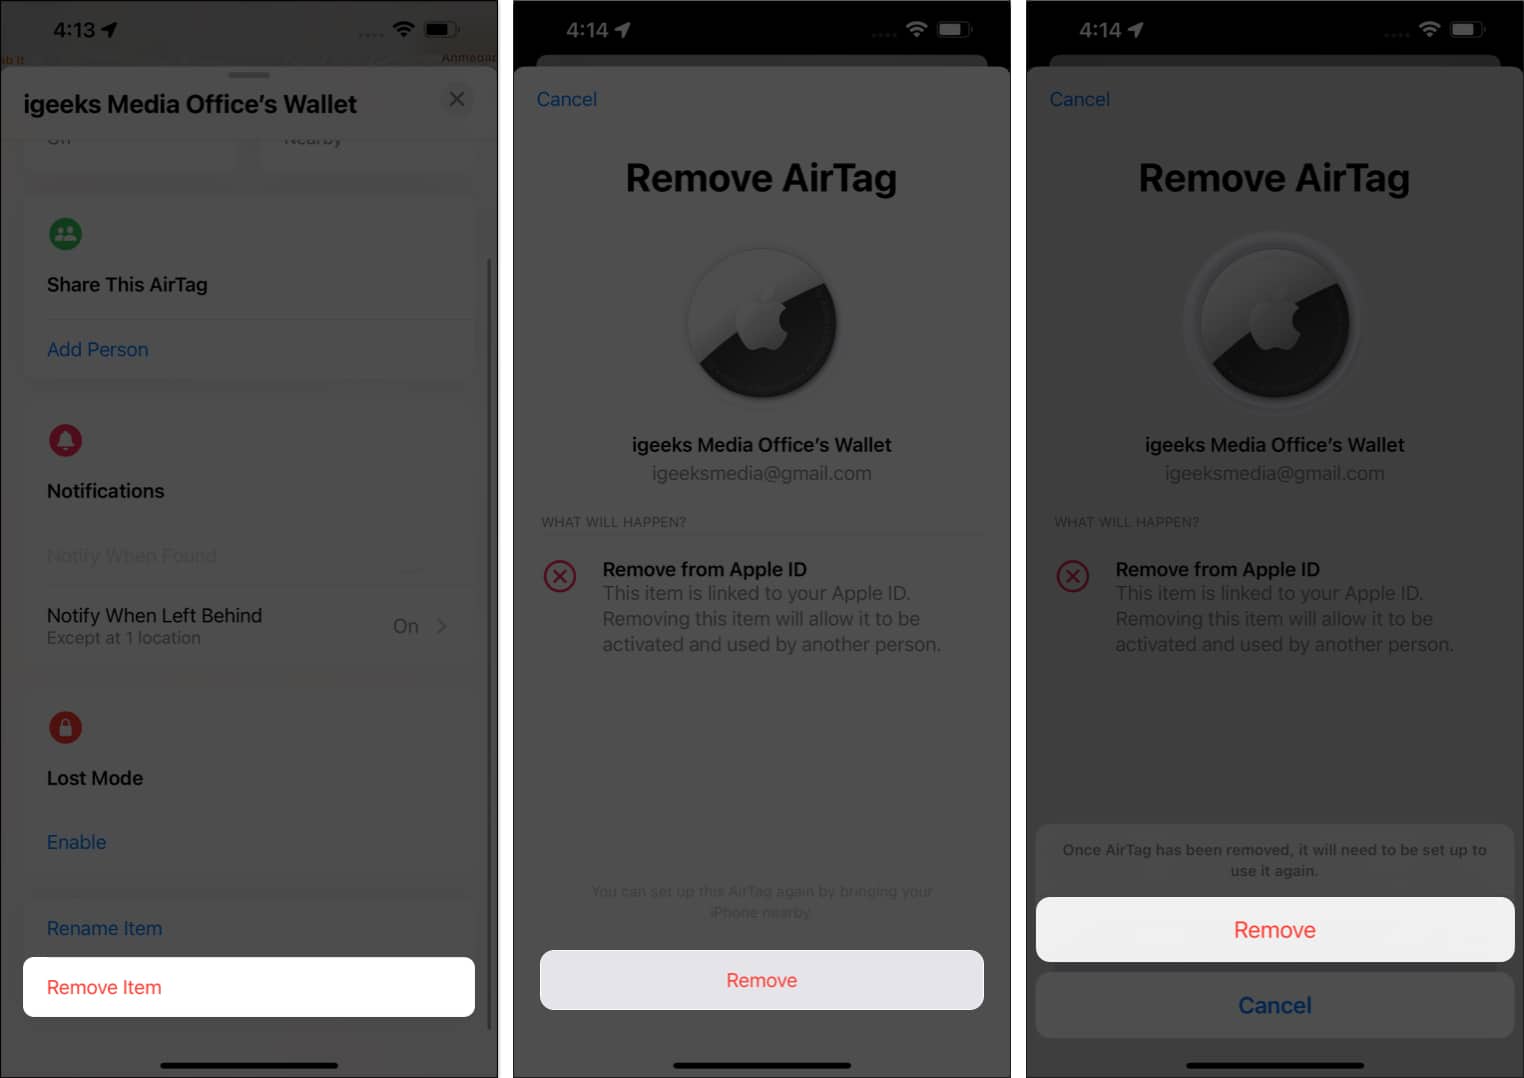
On completing this process, the AirTag will unlink the device from the Find My app, but it won’t completely reset itself. If you wish to do that, you can go through our detailed guide on how to restore the AirTag to its factory settings.
How to change battery of AirTag
Although the battery life of AirTag is bound to last for a long time, there’ll come a time to replace it. But fret not, as I have got you covered. Take a look through the steps outlined below.
- Simply rotate the back lid of AirTag in an anticlockwise direction.
- As the lid pops out, replace the battery of the AirTag.
- Press the battery until you hear a beep.
- Close the lid promptly, and your AirTag is as good as new.
Benefits of using AirTag
Now that I’ve filled your brain bucket with the necessary knowledge to enable and use AirTag on your iPhone and iPad let me enlighten you with possible use cases.
1. The basic stuff
The AirTag boasts many benefits, making it an invaluable tool in everyday life. For instance, its compact design allows for easy attachments to personal belongings such as keys, wallets, or bags. So they are never misplaced or lost again.
With the Find My app on iPhone and iPad, users can effortlessly track the location of their items and receive real-time notifications. Moreover, if you cannot locate the item visually, simply perform the Play Sound action to get an idea of its location. This feature is ideal for individuals with limited mobility or visual impairments.
2. Add a pet collar
One of the primary benefits of using an AirTag on a pet collar is the added security and peace of mind it provides to pet parents. With the ability to track your furry companion’s location in real-time through your iPhone, you can quickly locate them if they wander off or get lost.
This feature is particularly invaluable for those who live in urban areas or have dogs and cats who tend to run away. Furthermore, this device is enriched with durable construction and water resistance, ensuring it withstands daily wear and tear and unexpected weather conditions.
3. Vehicle marker
With the tracking capabilities of the AirTag, users can locate their vehicles in real-time, enabling efficient fleet management.
Additionally, its precise operations ensure accurate geolocation information, even in challenging environments. So, professionals can keep track of their vehicles’ movements and monitor usage patterns.
4. Tracking children
Finally, using an AirTag for tracking children offers several significant benefits. Firstly, it provides peace of mind for parents or guardians by enabling them to always keep a close eye on their child’s whereabouts. This can be particularly valuable in crowded public places, where a child’s separation risk is higher.
Chain your belongings to your device!
And there you have it, your ultimate guide to harnessing the power of AirTags. With these straightforward steps, the stress of lost keys and misplaced items is a thing of the past. Whether it’s your keys, wallet, or anything else you hold dear, AirTags is here to make your life simpler and more organized.
Thank you for reading. Please take a moment to leave your thoughts in the comment section below.
FAQs
Yes, AirTags uses Bluetooth technology to connect to nearby Apple devices.
Bluetooth connectivity range can vary depending on the environment and other factors, but Apple states that AirTags have a range of up to 800 feet in an open outdoor area.
Read more:
