Markup is a versatile tool available on many Apple apps that allows you to make quick edits to your photos, add signatures to documents, highlight important information, and much more. However, there’s a lot more Markup can do that many iPhone or iPad users are unaware of.

But fret not. Whether you’re a seasoned iPhone pro or a curious iPad newbie, this guide will equip you with all the knowledge you need to become a Markup master. Whether you want to edit a screenshot, sign a document on your iPhone, or add text to an image, we have you covered.
Which apps come with the Markup tool?
Several built-in Apple apps for iPhones and iPads have the Markup tool integrated into them. Here are all such apps and what you can do with the Markup tool on them:
- Photos: Edit your pictures and screenshots.
- Messages: Add doodles, text, or shapes to images and documents to your messages.
- Files: Annotate PDFs and other documents stored.
- Mail: Add your signature, highlight text, and more within email attachments.
- Notes: Make your notes more informative and visually appealing by adding drawings and annotations.
- Safari: Annotate and share web pages with Markup.
What can I do with the Markup tool on iPhone and iPad?
To get the most out of the Markup tool on your iPhone and iPad, you can explore the various tools available within it. Here are a few tools inside Markup that you can use:
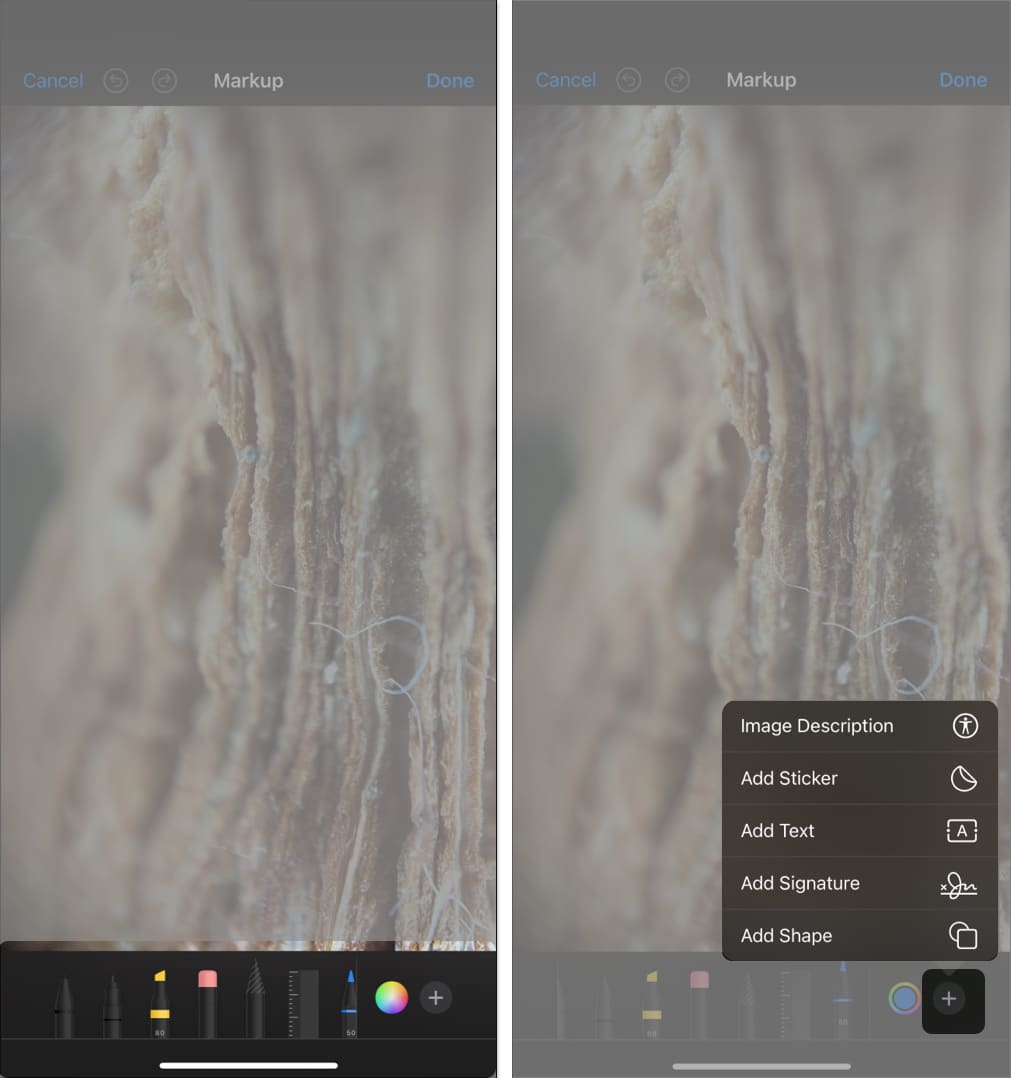
- Pen: Draw with a solid line for clear annotations.
- Pencil: Create sketches with a textured line for a more natural look.
- Highlighter: Highlight text or areas with a semi-transparent line.
- Eraser Tool: Remove unwanted marks with precision. You can also choose between an object eraser and a pixel eraser.
- Ruler Tool: Use the ruler for drawing straight lines. You can even rotate it to any angle for added precision.
- Color pallet: Helps to adjust the color of markup tools such as pen, marker, and pencil.
- Plus menu: This gives you access to additional features such as:
- Description: Add an alt text description to the image.
- Add Sticker: You can use this to add Stickers and emojis to your images or documents.
- Add Text: Add typed annotations to your images or documents. Customize the font, size, and color to suit your needs.
- Add Signature: You can create and save your signature for easy access, which can then be added to documents seamlessly to sign them.
- Shape Tool: Insert pre-defined shapes like squares, circles, arrows, and speech bubbles to highlight or add structure to your markups.
How to use the Markup tool on an iPhone and iPad
The Markup tool offers a range of functionalities that make it powerful for editing and annotating images and documents on iPhones and iPads running iOS 18 and iPadOS 18. Let’s see how to use it in various applications.
How to use Markup in Photos on iPhone
By far, the most common use of the Markup tool is within the Photos app. Whether it’s to annotate a screenshot or a random image on your iPhone, using Markup is super simple. Here’s what you need to do:
- Go to the Photos app on your iPhone or iPad and open the photo you want to edit.
- Tap the Edit icon at the bottom.
- Inside the Edit menu, tap on the Markup icon at the top.
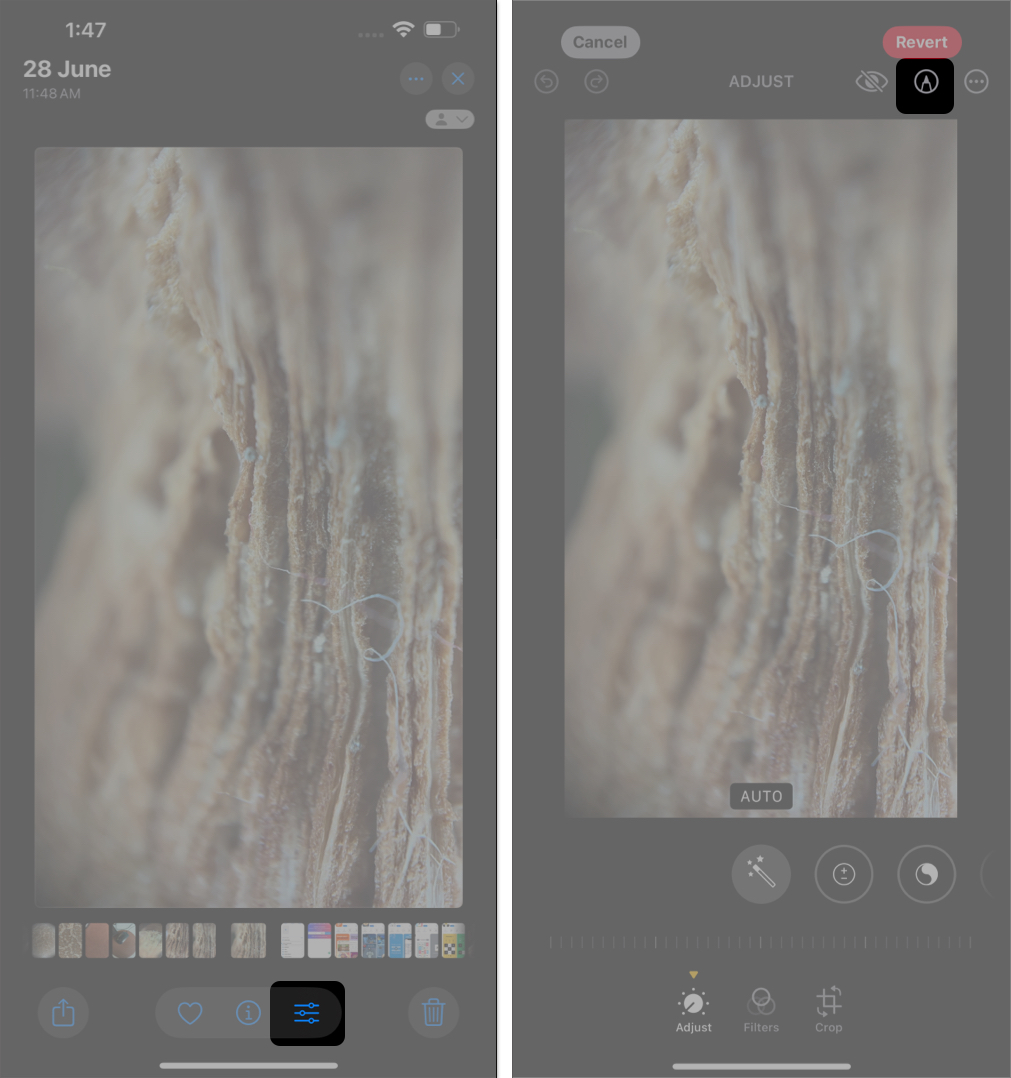
- You’ll now see a toolbar with various editing options, such as Pen, Pencil, Highlighter, Eraser, Ruler, and Color palate. Use the tool you wish to annotate and edit the image how you want.
- You also see a + plus icon; by tapping on that, you can add an Image Description, Sticker, Text, Signature, and Shape.
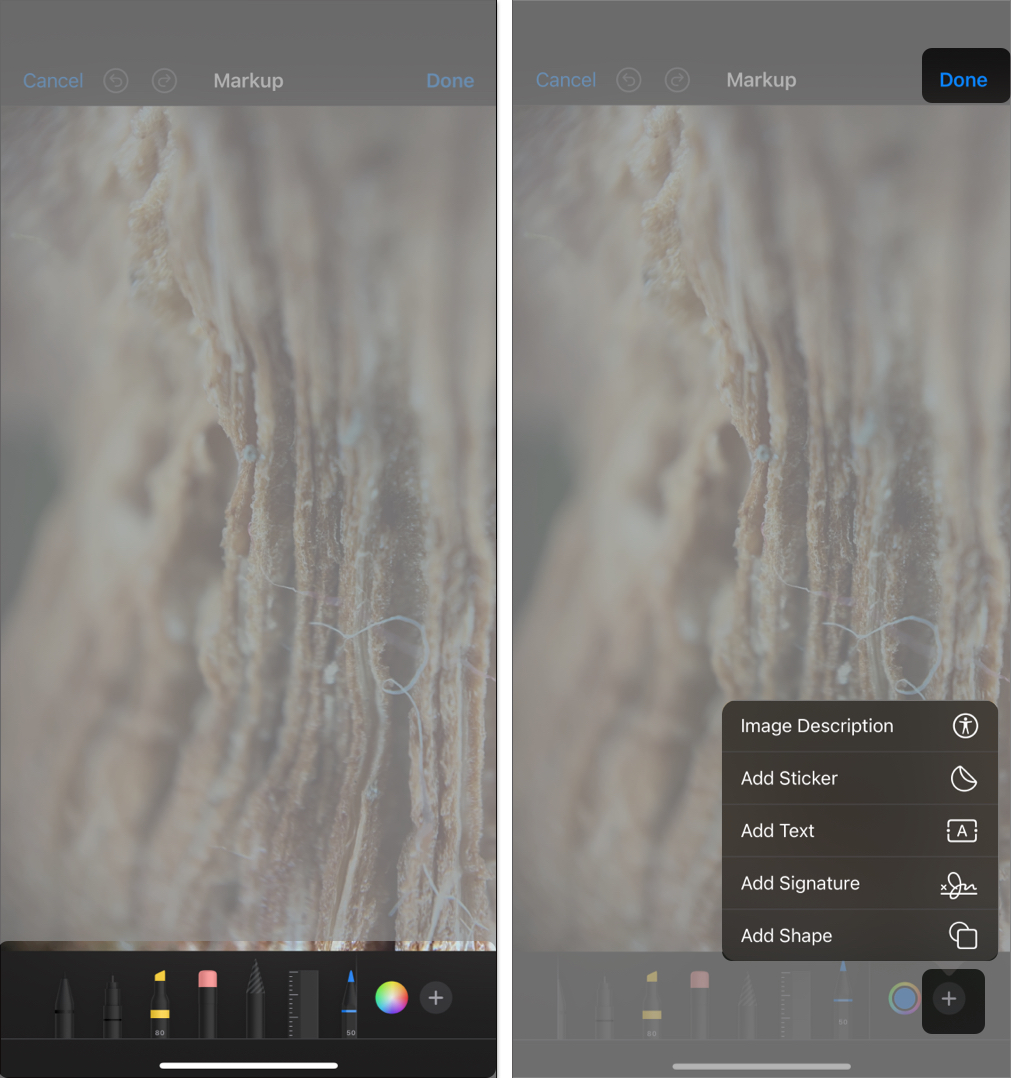
- Once you’re happy with your edits, tap Done in the top-right corner to save them.
How to use Markup in Messages on iPhone
If you’re trying to share a photo with a contact over iMessage, you can use the Markup tool to quickly annotate and edit it before sending it right inside the Messages app. Here’s how:
Become an iGeeksBlog Premium member and access our content ad-free with additional perks.
- Open the Messages app and start a new conversation or choose an existing one.
- Tap on the + icon, Tap Photos, and select the photo you wish to send as an attachment.
- Once the photo is added to the message, tap on it to reveal additional options.
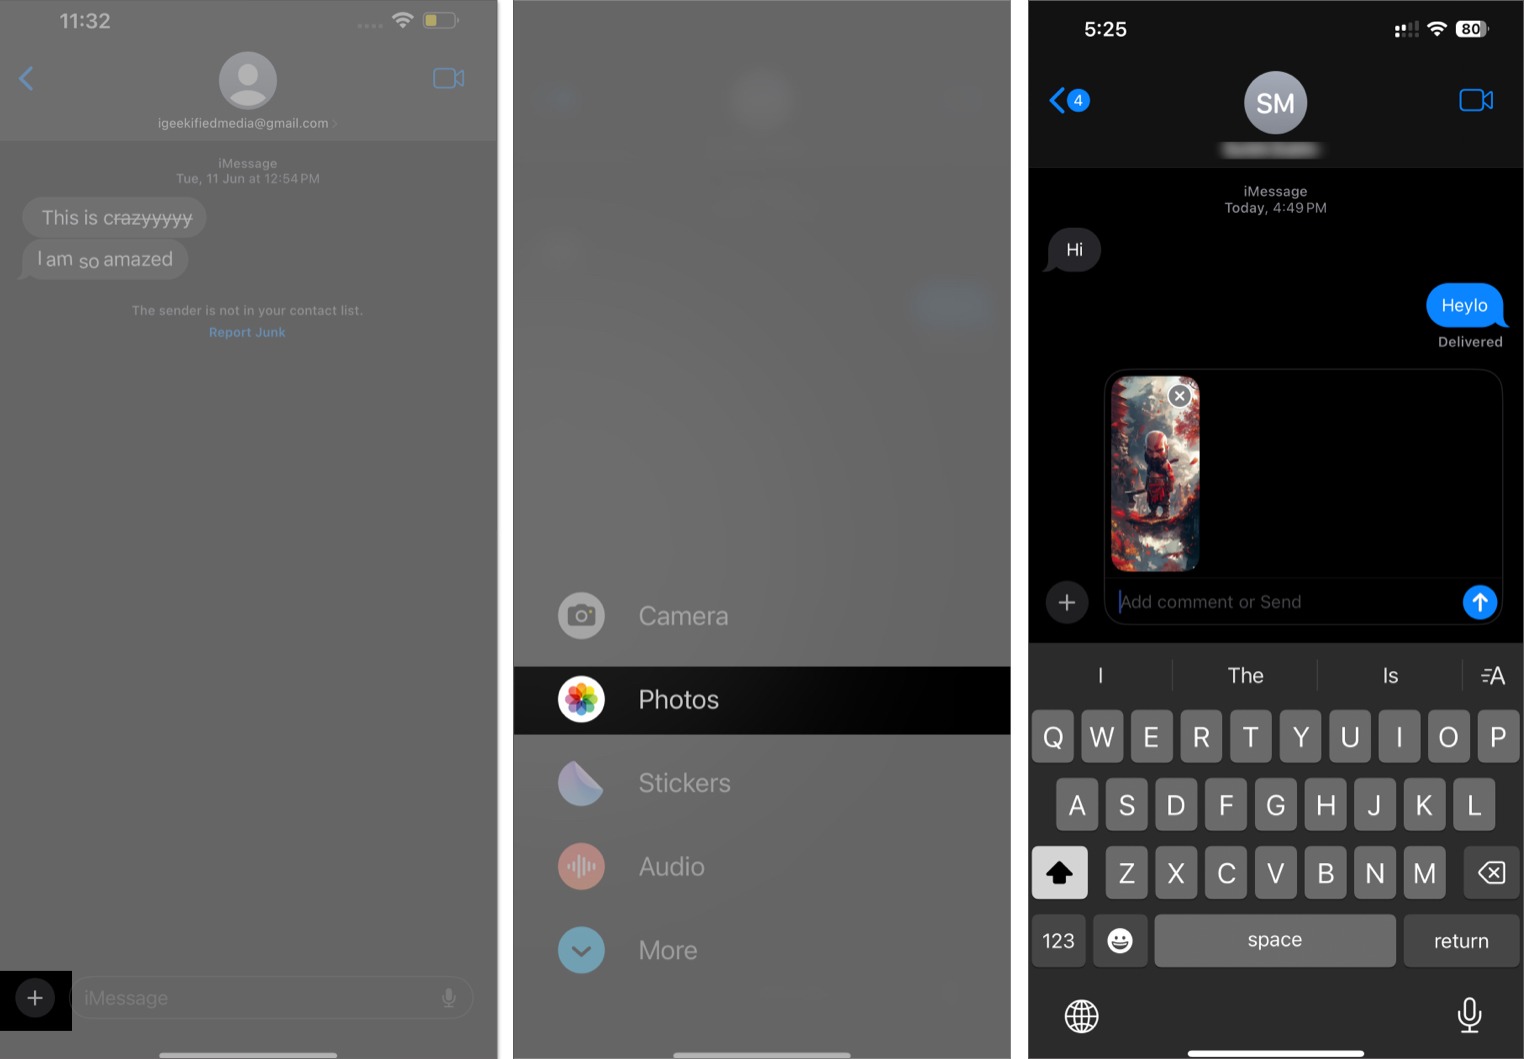
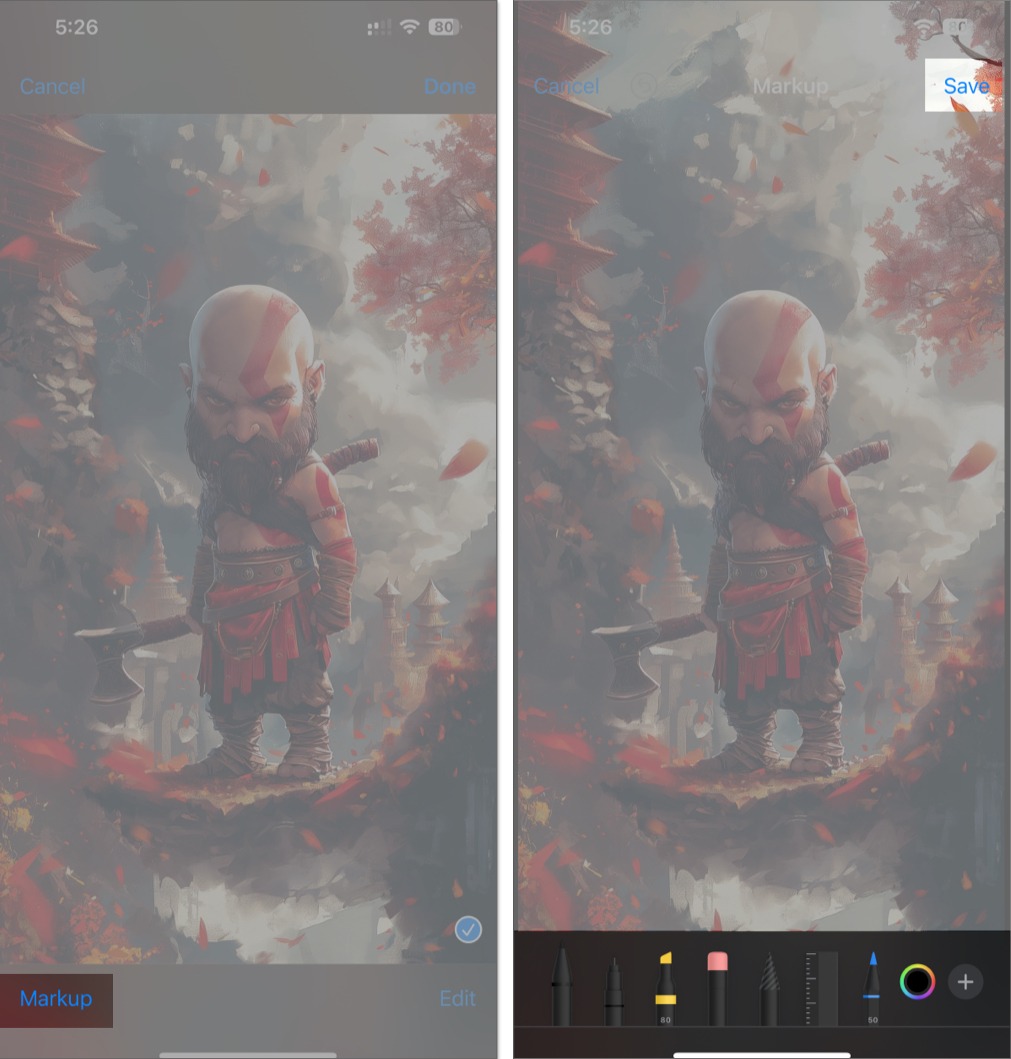
- Now, select Markup in the bottom-left corner.
- You can now edit the image as you wish using the Markup tool.
- Once done, tap Save to save the edits. You can then send the message with the edited image as an attachment.
How to markup documents in the Files app on iPhone
You can use the Markup tool inside the Files app with not just images but also different documents, including PDF files. Follow these steps to mark up such documents using the Markup tool:
- Go to the Files app and open the document you want to edit.
- Tap on the Markup icon at the bottom of the screen.
- Annotate the document as you want. You can also use the tools to draw, add text, or highlight. Additionally, you can even add a signature to your PDF files.
- Once done, tap Done to save your edits.

How to markup an email attachment in the Mails app on iPhone
You can also use the Markup tool inside the Mail app to quickly annotate documents before sharing them over email. Here’s how:
- Open the Mail app and compose a new email.
- Add a document or photo as an attachment.
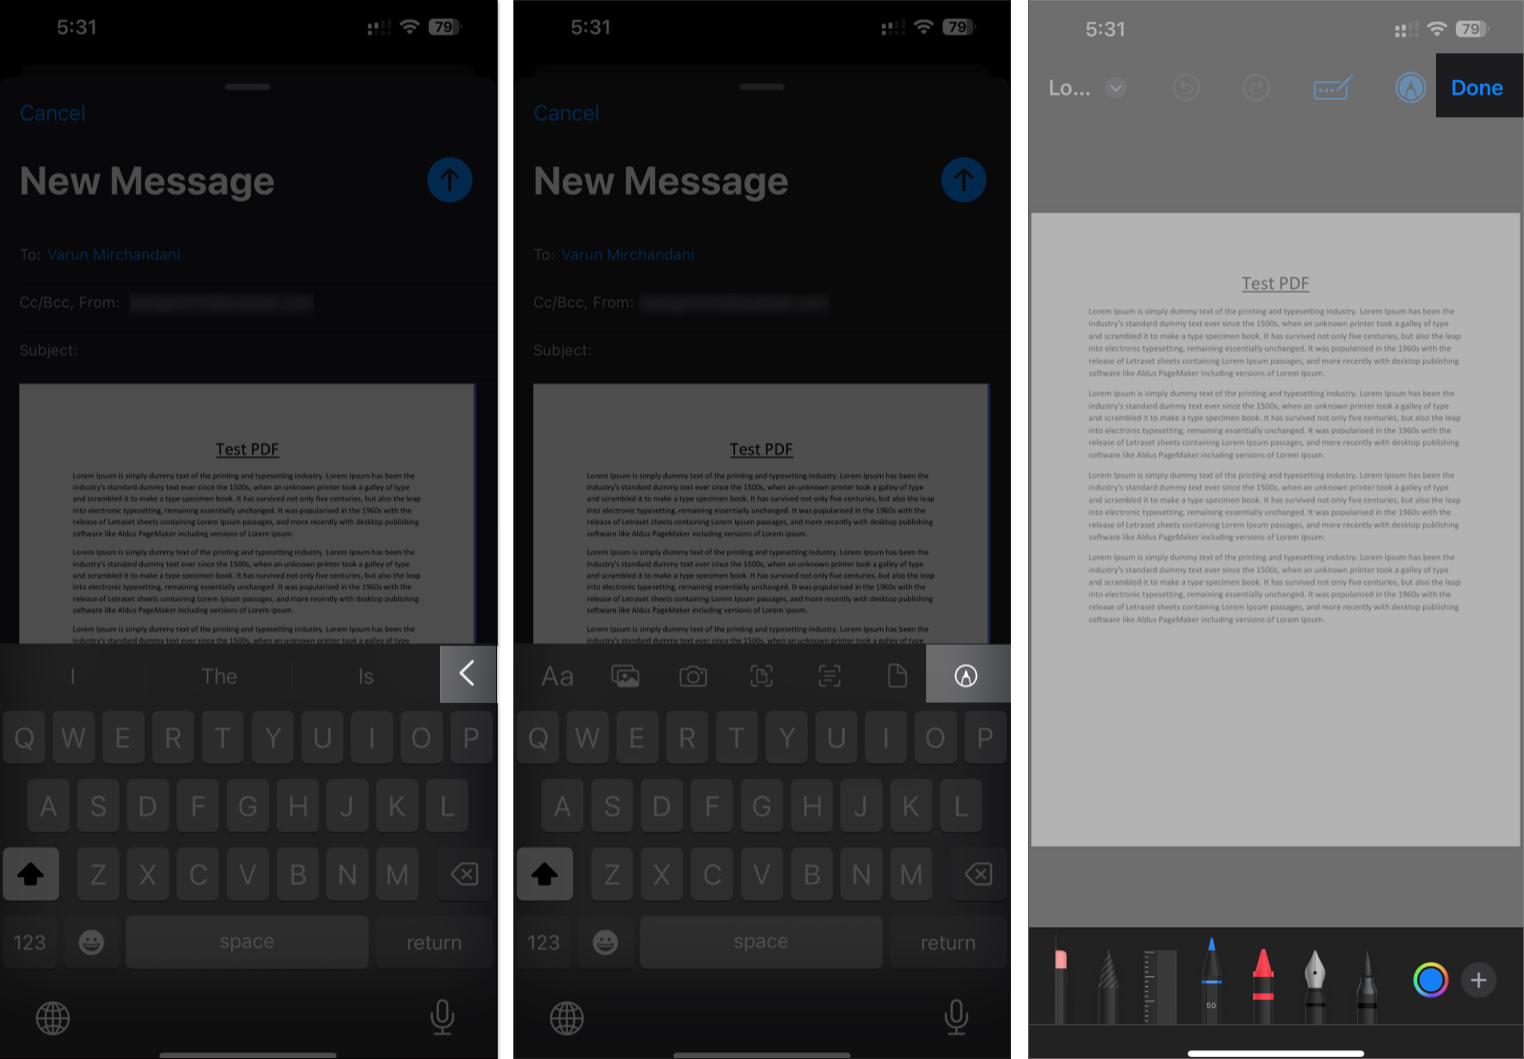
- Once it’s added, tap on it to place the cursor next to it.
- Now, tap on the arrow icon at the top of your keyboard.
- When this reveals a new row of options, tap the Markup icon.
- Edit the document as you want and tap Done to continue composing your email.
Regardless of which app you use the Markup tool on, saving or sharing your document or image is straightforward.
After you’ve made your edits to the image or document you want to mark up, tap Done to save them. Then, depending on the app, you can save the edited item to Photos, Files, or directly share via email, messages, or any social media app.
Signing off…
Markup is a versatile and powerful tool for editing screenshots and adding signatures to annotating documents and photos. The best part is that it’s built right into your device, so you don’t need to install an app to mark up your images or documents.
Personally, I love how intuitive and easy the Markup tool is to use. Whether I need to quickly highlight certain elements in a screenshot or add a signature to a document, Markup saves the day.
What about you? How do you intend to use the Markup tool on your iPhone or iPad? Also, if you have any questions or suggestions, feel free to share them in the comment section below.
FAQs
Saved markup edits are automatically saved within the app you used them in. This includes Photos, Files, etc. However, if you used the Markup tool on a document at the time of attaching it, such as in Messages or Mail, the edited file will only be sent as an attachment, and there will not be a downloaded/saved copy of the same.
No, an Apple Pencil isn’t necessary to use the Markup tool on an iPad. You can easily use your finger for editing with the Markup tool. That said, the Apple Pencil, or any other stylus for that matter, does offer a more precise markup experience.
If the Markup tool isn’t working, try restarting your iPhone or iPad, ensuring iOS or iPadOS is up to date, and checking that the app you’re using supports Markup.
At the time of writing, no; Markup is currently limited to Apple’s built-in apps. However, some third-party apps may offer their own built-in editing tools. For instance, both WhatsApp and Telegram offer native editing tools for their users.
Read more:
