Key Takeaways

- To set up Optic ID on Apple Vision Pro, go to Settings > Optic ID & Passcode > Set up Optic ID > Complete the scan > Enter the device passcode.
- You can also enable the Nearby iPhone Enables Optic ID option to unlock your Vision Pro using your iPhone.
- You can use Optic ID to unlock your Vision Pro, autofill passwords in Safari, to purchases from the App Store, and sign in to supported apps.
Similar to Face ID on your iPhone, Vision Pro uses Optic ID for device unlocking and purchase authentication. During the initial setup, if you skipped Optic ID and chose to go with a passcode, don’t worry; you can still enable it.
In this article, you’ll learn how to set up Optic ID on your Apple Vision Pro so you can use it to unlock your headset, autofill usernames and passwords in Safari, and make purchases from the App Store. Without further ado, let’s get started.
What is Optic ID on the Vision Pro?
Optic ID is Vision Pro’s biometric authentication system that uses your iris to verify your identity.
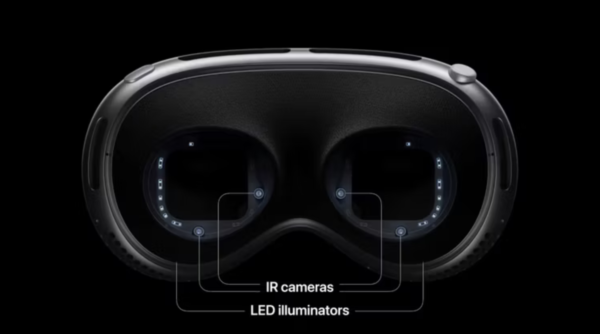
To capture iris images, the Apple Vision Pro utilizes its native infrared cameras and illuminators. These images are then securely enrolled into your headset’s Secure Enclave. After that, whenever you try to unlock the device, it compares the current visual data with the data already in its system to confirm your identity.

That was a simple way to put it. I’d highly recommend Apple’s detailed article if you’d like to know more about the advanced technology behind Optic ID.
Before proceeding, I’d like to remind you that if you are wearing glasses, pairing your Apple Vision Pro with ZEISS Optical Inserts is key to tailoring the Optic ID experience for day-to-day use. After that, just follow the steps below to set up your optic ID.
How to set up Optic ID on Vision Pro
- Launch the Settings app on your Vision Pro.
- Go to the Optic ID & Passcode option.
- Select Set up Optic ID to proceed.
- Now, you choose to proceed with or without ZEISS Optic Inserts. You can pair Optical Inserts later from the Settings as well.
- Follow the on-screen commands and let the system scan your iris.
- Once the scan is complete, enter the passcode of your Apple Vision Pro.
Note: In Apple Vision Pro, you can set up Optic ID for up to two pairs of ZEISS Optical Inserts.
Turn on Nearby iPhone Enables Optic ID
If your iPhone is running iOS 17.1 and is logged in with the same Apple ID, you can use it to unlock or restart your Vision Pro. This feature only works if your iPhone is nearby and was unlocked in the past hour.
- Go to Apple Vision Pro Settings → Select Optic ID & Passcode settings.
- Toggle on the Nearby iPhone Enables Optic ID option.
Choose where you want to use Optic ID
Once enabled, you can also choose what services, apps, or features can use Optic ID. To customize these settings, navigate to Settings → Optic ID & Passcode, then toggle on/off the switch next to:
- Apple Vision Pro Unlock
- Wallet & Apple Pay
- Persona
- iTunes & App Store
- Password Autofill
- Other Apps
Situations where Optic ID won’t work
Optic ID is not working in certain situations, similar to Face ID on iPhone in so many ways. Remember, when you’ve just restarted your iPhone, you cannot use Face ID right away. You must first enter the device passcode.
Similarly, you must enter the passcode of Vision Pro to authenticate yourself in these instances:
- Turn on or restart your Apple Vision Pro. This is a requirement only if you haven’t set up your Optic ID to be turned on by iPhone.
- You have not unlocked your Apple Vision Pro for more than 48 hours.
- You haven’t unlocked Apple Vision Pro with a passcode in the last 6.5 days or with Optic ID in the last 4 hours.
- You failed to unlock your Vision Pro with Optic ID five times in a row.
Once you’ve successfully verified the passcode on your Apple Vision Pro, you can naturally use Optic ID again.
Become an iGeeksBlog Premium member and access our content ad-free with additional perks.
How to use Optic ID on Vision Pro
The first use case of Optic ID is, of course, unlocking the Apple Vision Pro!
Unlock Apple Vision Pro with Optic ID
To unlock, simply put on the headset and direct your eyes toward the Optic ID dialog box. The device will authenticate the biometrics and grant access!
Now, let’s quickly go over some of the other things you can accomplish using Optic ID.
Use Optic ID to make purchases
In the Settings → Optic ID & Passcode menu, if you have enabled the Wallet & Apple Pay option, you can make one-tap purchases on your Apple Vision Pro. While making a purchase:
- Tap the Buy option.
- Select Apple Pay as the payment mode.
- Confirm your purchase.
- Double-tap the top button.
- Verify your purchase via Optic ID.
- Once verified, a checkmark highlighting Done will appear.
Note: You can follow the same method to make purchases in the iTunes store. Simply enable the iTunes & App Store option from Optic ID & Passcode settings, and you’re good to go.
Sign in to apps
Optic ID can also be used to sign into apps. However, to utilize this feature, you must have saved the app credentials in your iCloud.
- Select the app of your preference.
- Tap the Log In option.
- Here, you will be prompted to log in with the saved credentials.
- Select the pop-up highlight username and password.
- Finally, look at the Optic ID and verify yourself.
- Upon successful verification, you will be logged in to the app.
If you feel like having an overview of apps supporting Optic ID, go to Settings → Optic ID & Passcode → Other Apps.
Autofill passwords
Another seamless advantage of Optic ID is the ability to enter saved passwords instantly. Here’s what you’ve to do:
- Enable the Password AutoFill option from the Optic ID & Passcode menus.
- Launch the Safari app.
- Access a website of your choice.
- Tap Log In or Sign In.
- If your credentials are displayed on the keyboard, tap on it.
- Now, look at the Optic ID option, and the verification will take place accordingly.
How to reset Optic ID on Apple Vision Pro
- Navigate to Vision Pro Settings → Optic ID & Passcode.
- Enter the passcode of your Apple Vision Pro.
- Here, you can select any one of the following:
- Reset Optic ID for [your ZEISS Optical Inserts]
- Completely reset the Optic ID
- Reset the Optic ID for All Optical Inserts
Additional tips for setting up Optic ID
When setting up Optic ID on Apple Vision Pro, it is crucial to keep a few important factors in mind. Let’s quickly go through them all:
- Make sure that the Vision Pro is securely mounted at eye level for accurate iris detection and recognition.
- If there is a light leakage from outside, you may need to adjust your Light Seal Cushion. Adequate lighting is essential to obtain clear and reliable results. Try to avoid backlighting or overly bright light surroundings that can possibly impede your scans.
- While you’re at it, do not let your eyelashes brush with the lens. Adjust the Light Seal Cushion in such a way that there is at least a gap by an inch.
- Avoid wearing contact lenses while setting up Optic ID to ensure scan accuracy.
- Use only supported visual aids/accessories like ZEISS Optical Inserts.
- Keep your Apple Vision Pro displays and ZEISS optical inserts clean.
- Reset the ZEISS Optical Inserts and pair them up again.
- If nothing seems to work, reset the Optic ID to its factory settings and set it up from scratch.
Yes. Apple Vision Pro allows you to adjust settings to use one eye only. Access Settings → Accessibility → Eye Input. Here, you can select either the Both Eyes, Left Eye Only, or Right Eye Only options.
No, you can only set up one Optic ID on your Apple Vision Pro. Users with visual impairments can add up to two pairs of ZEISS Optical Inserts.
Level up the security!
In conclusion, setting up Optic ID on Apple Vision Pro is not a complicated process. By following the simple steps outlined in this guide, you can easily set up and use the feature to your advantage.
This innovative feature is sure to make your life easier. So, what are you waiting for? Try it out for yourself and share your thoughts in the comments below.
Read more:
