Voice Memos app is the default voice recorder on iPhone and iPad. You can use it to record a teacher’s lectures, a conversation with a loved one, or even record your kid’s voice and turn it into a ringtone! What’s more? You can edit, trim, duplicate, and so much more! In this article, I will show how you can use the Voice Memos app on your iPhone efficiently.
- How to record a voice memo on iPhone
- How to play the recorded voice memo
- Rename the voice recording on iPhone
- Share a voice memo from iPhone
- How to automatically save voice memos to iCloud
- Search for a recording in the Voice Memos app
- How to change voice recording audio quality
- How to duplicate a recording
- Edit a voice memo on iPhone
- How to organize your recordings
- How to delete voice memo folder and voice recording
How to record a voice memo
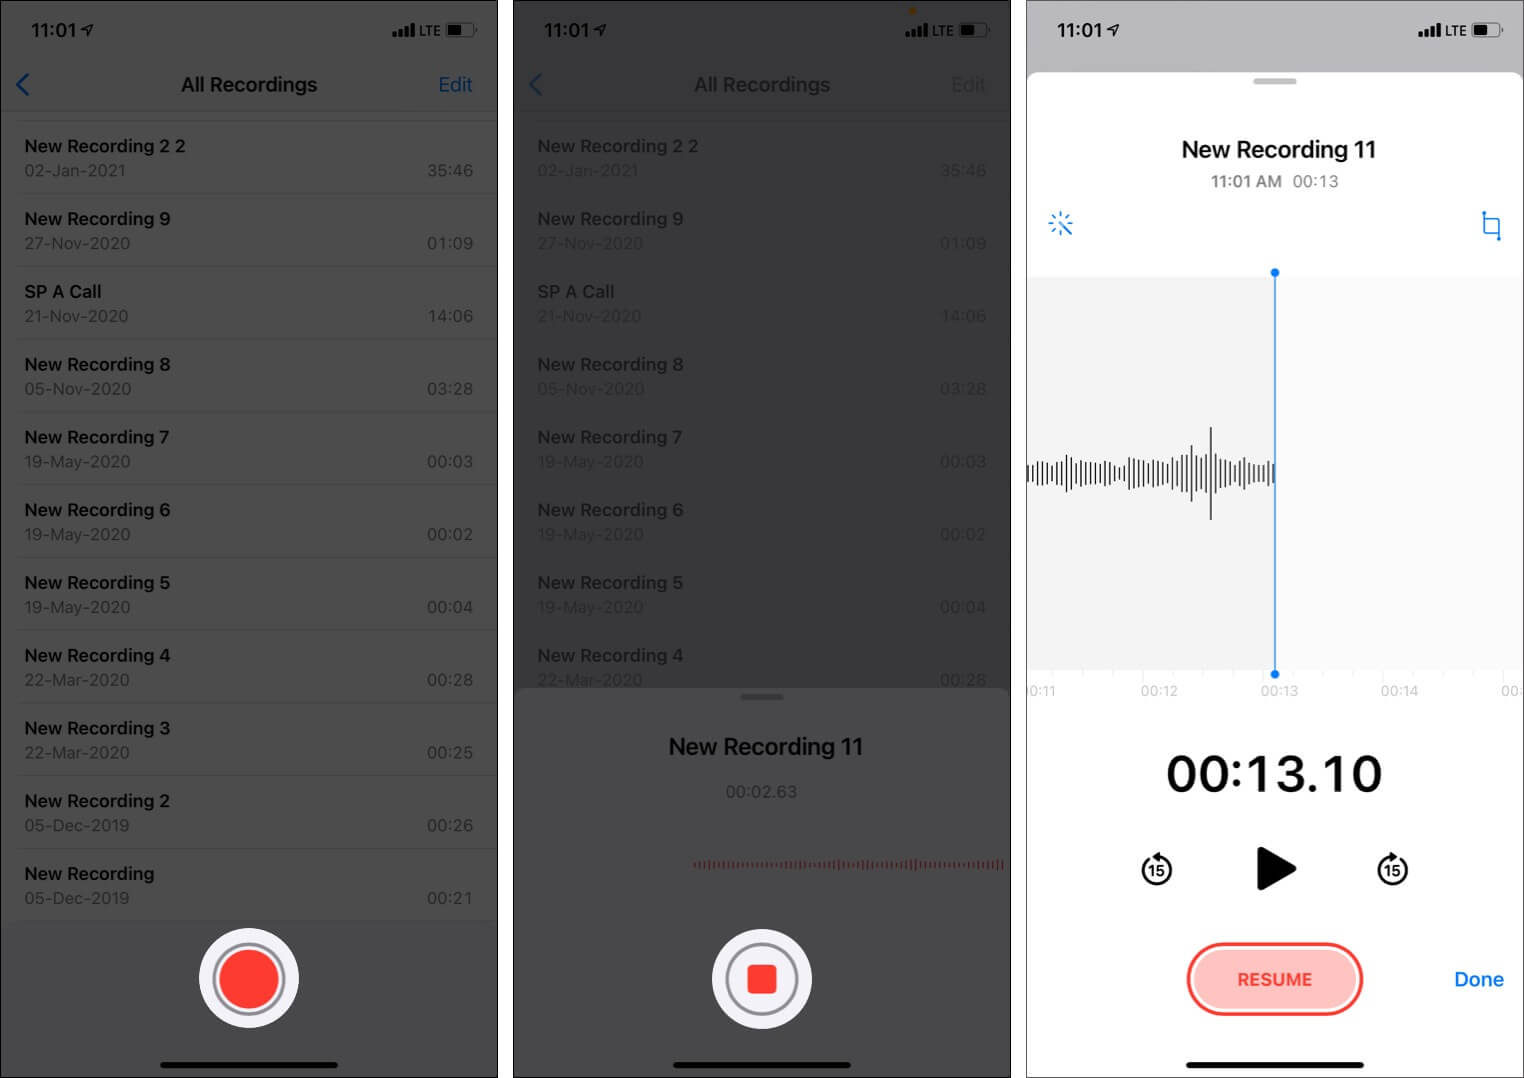
- Open the Voice Memos app. It may be inside a folder called Utilities.
If you can not find it, ask Siri to open it or swipe down the Home Screen and type the app name. - Next, tap the red record button. It will immediately start recording.
- When done, tap the red stop button.
- Want to pause the recording and resume? Touch the small tab (line) and drag it up.
- Tap the red pause button and hit RESUME when you wish to start recording again.
- Tap Done to save the voice memo.
How to play the recorded voice memo
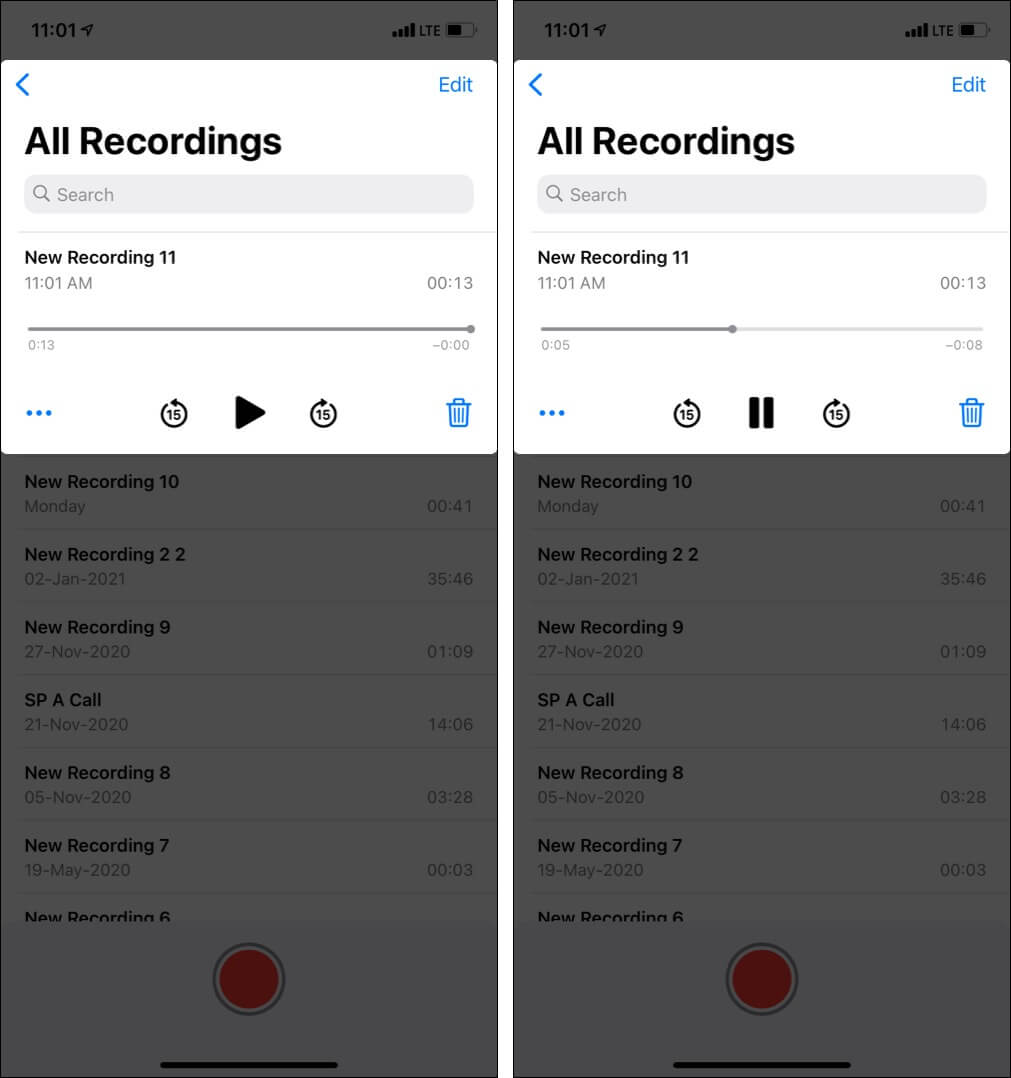
You will find the voice memos under ‘All Recordings.’ To play, tap one of the clips and hit the triangle play button.
Rename the voice recording on iPhone
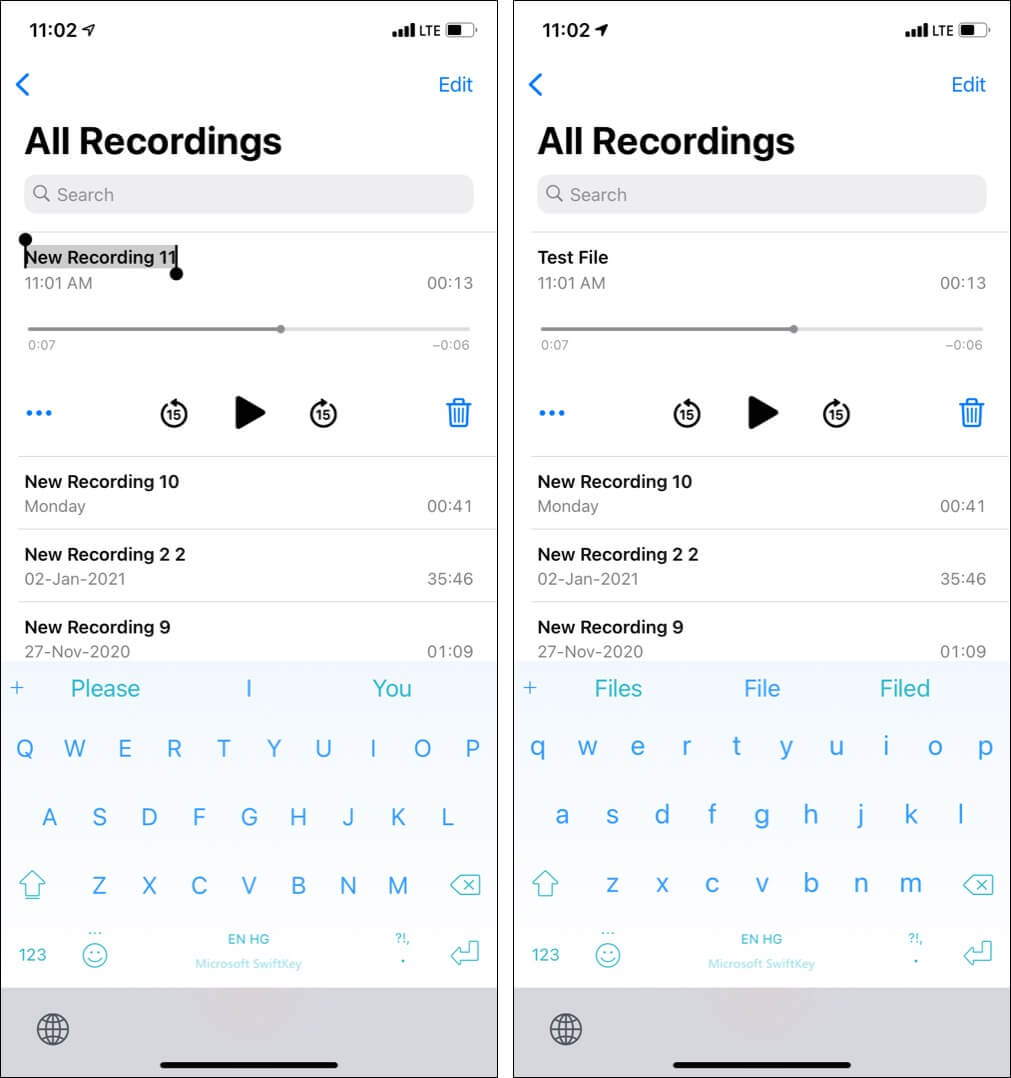
If the Voice Memos app has location access, the memos will have the name where they were recorded. If location permission were denied, the name would be New Recording 1, New Recording 2, and so on. You can easily rename the file to suit your liking and needs.
- Tap a clip under ‘All Recordings.’ It will expand.
- Tap the existing memo name.
- Use the keyboard to give it a new name.
- Tap ‘done‘ or anywhere on the screen to complete the renaming process.
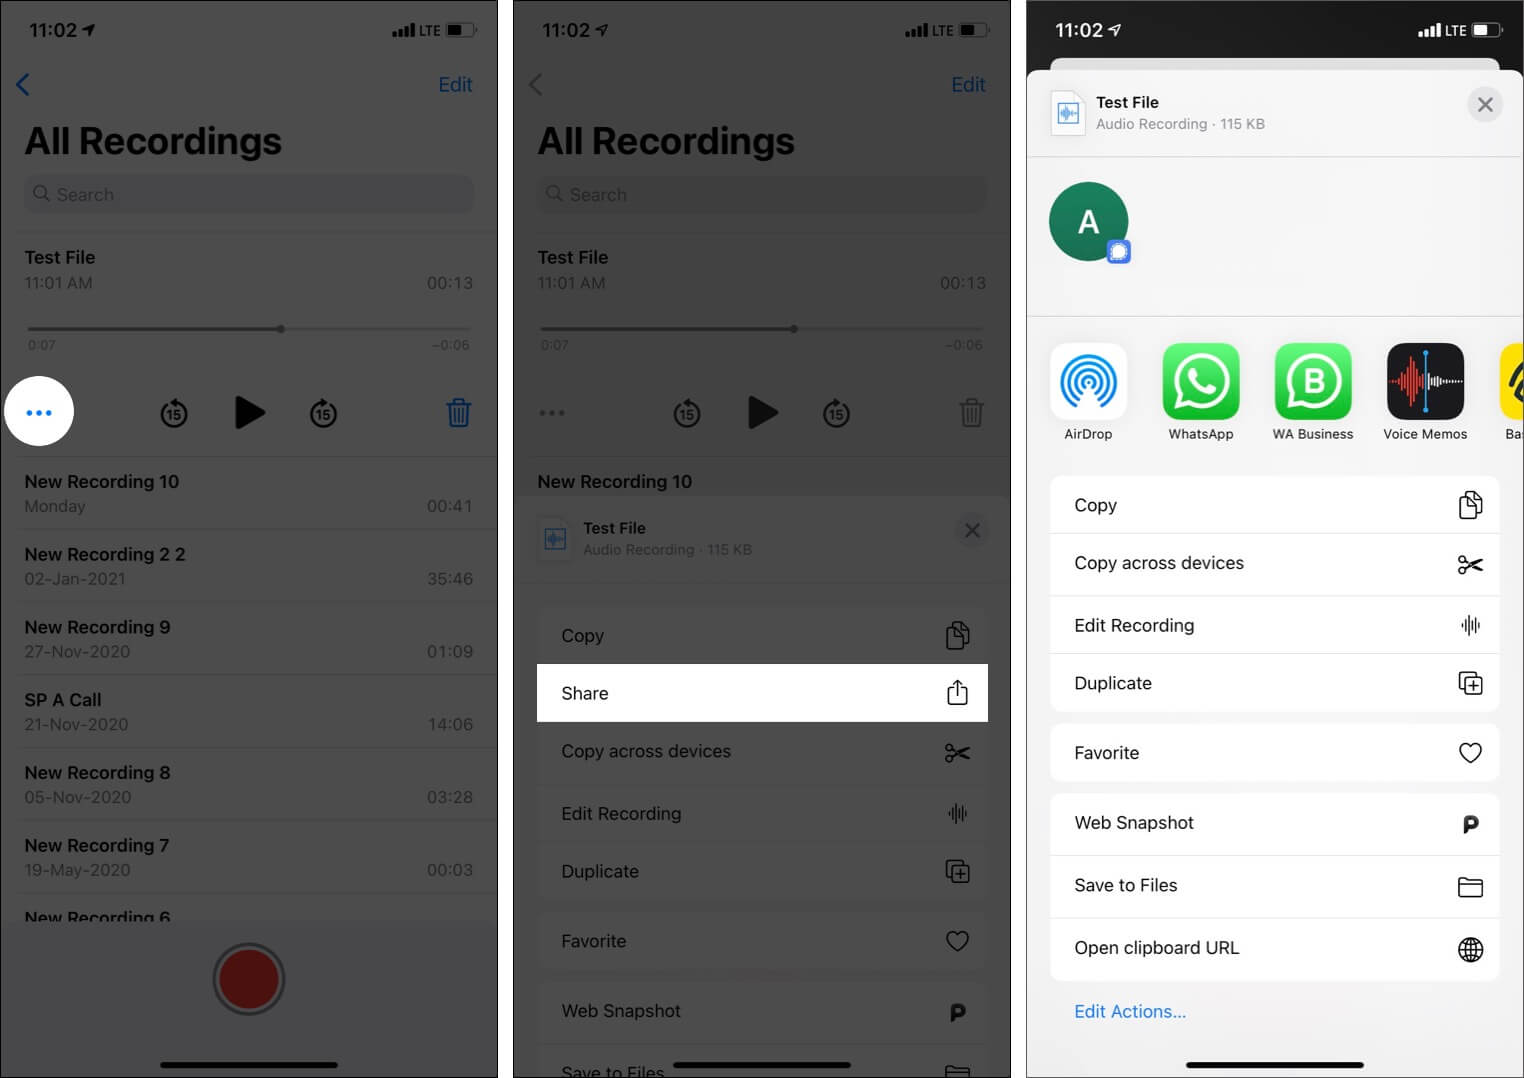
You can effortlessly share a voice memo with friends and family via other messaging apps or save it to third-party storage apps.
- Go to the Voice Memos app and tap a voice memo.
- Tap the three dots icon.
- Tap Share and choose the desired option from the Share Sheet.
How to automatically save voice memos to iCloud
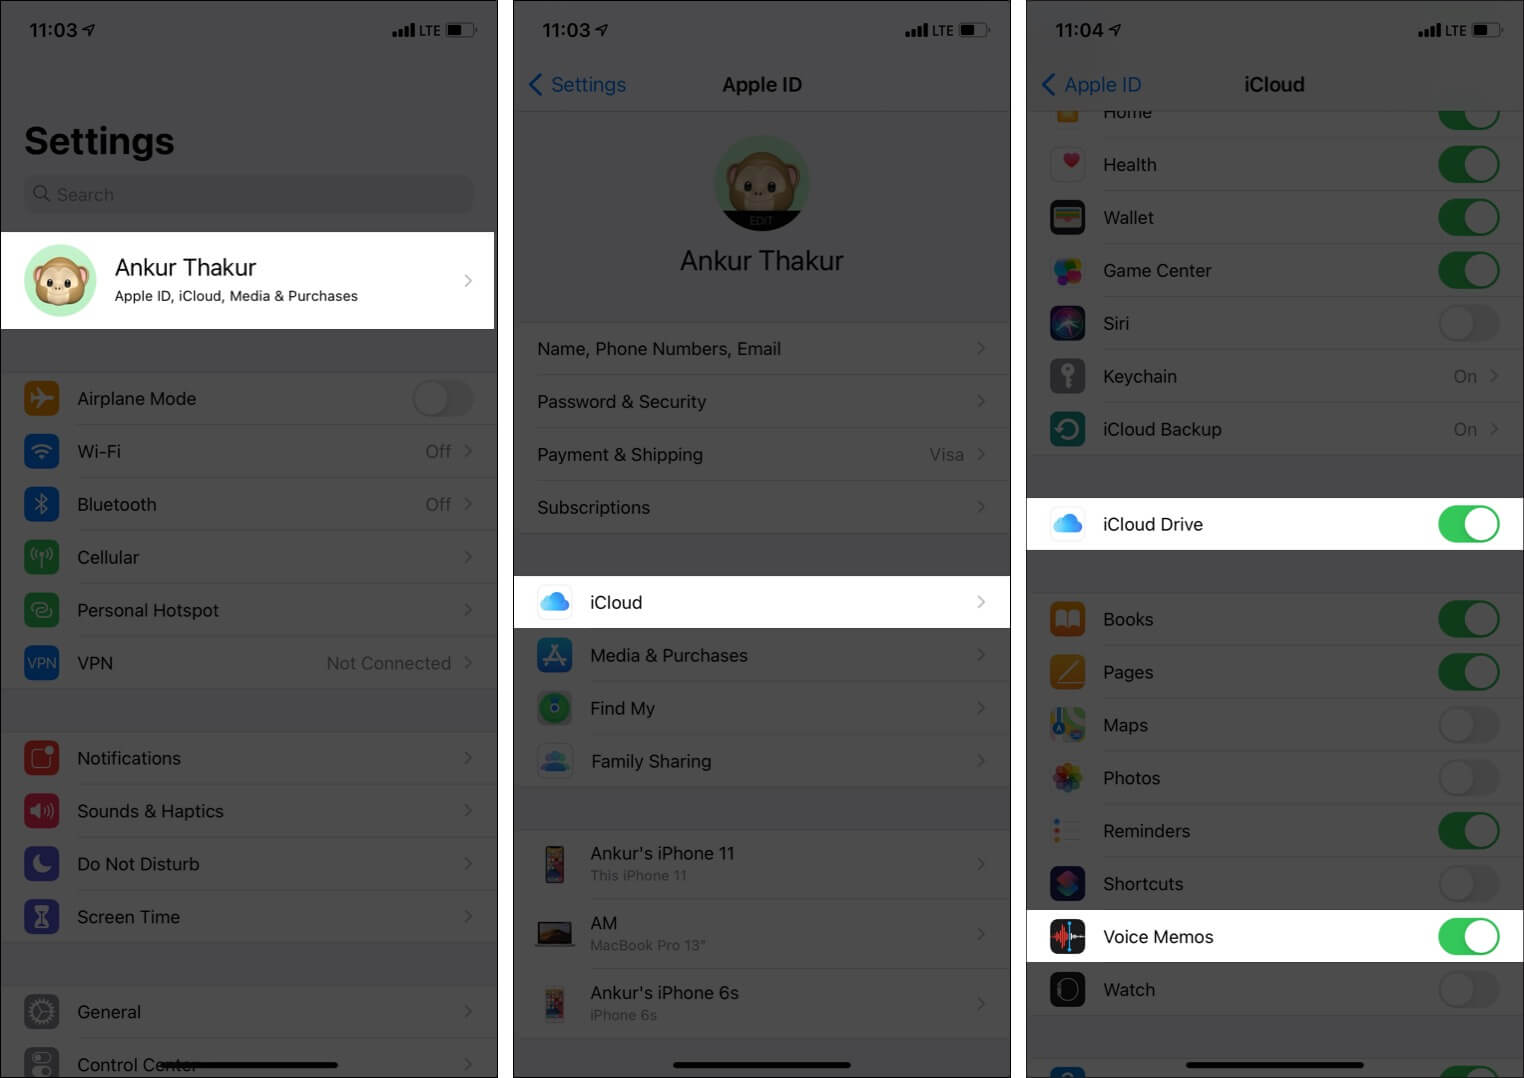
Your iPhone and iPad can automatically save voice memos to iCloud Drive and make them available on all your Apple devices. For this to work, you must enable iCloud Drive and make sure the Voice Memos app is permitted to write files to it.
- Open the Settings app and tap your name from the top.
- Tap iCloud.
- Scroll down and ensure the toggle for iCloud Drive is enabled.
- Next, make sure the toggle for Voice Memos is green.
- Repeat these steps on your other iPhone and iPad to ensure voice memos are available everywhere.
Search for a recording in the Voice Memos app
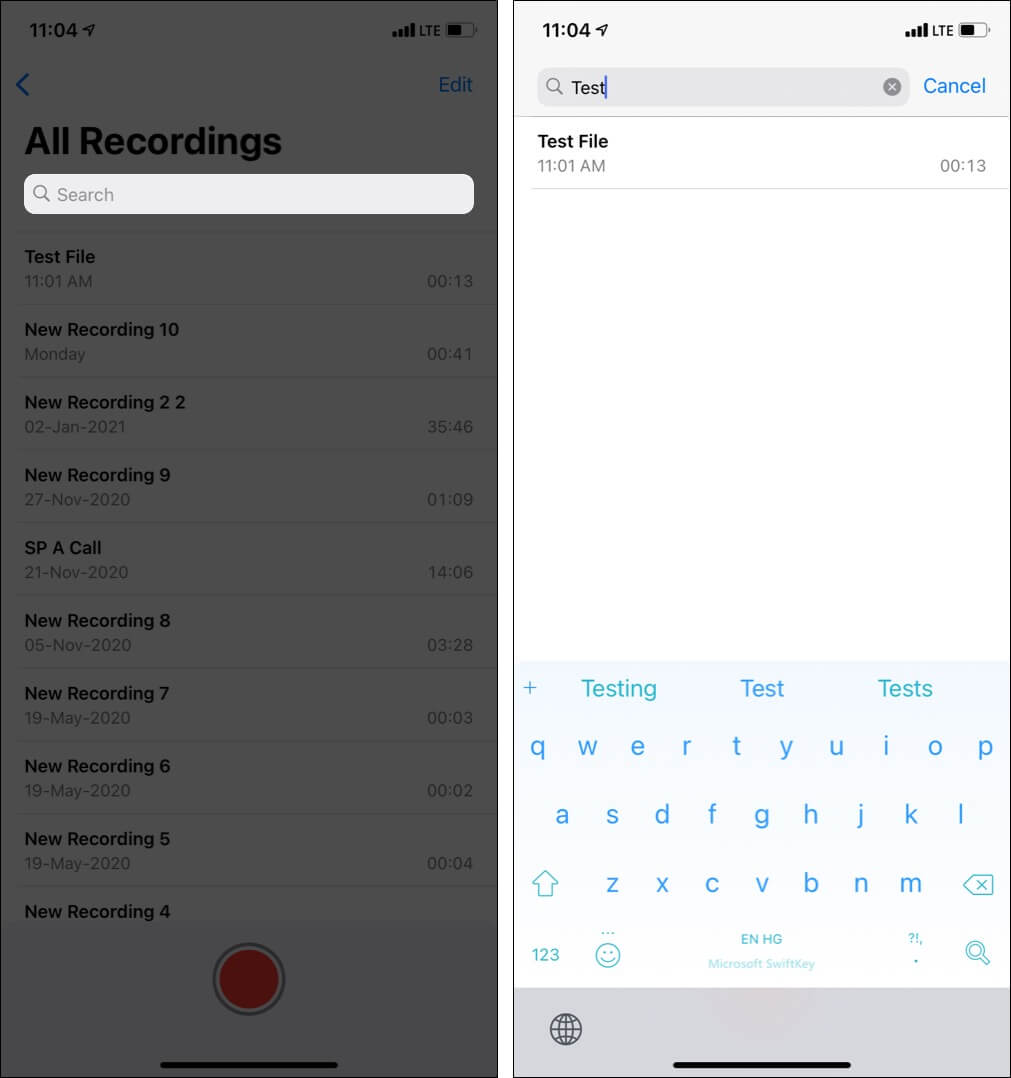
Have a long list of recordings and need to find a specific one quickly? Open the Voice Memos app and swipe down the All Recordings screen to reveal the search bar. Type the recording name to see the results.
How to change voice recording audio quality
Do you wish that your audio notes be saved in full quality? This trick will especially come in handy if you are recording for video projects, podcasts, or other professional work. Let me quickly show you how to change the audio recording quality.
- Go to Settings and tap Voice Memos.
- Tap Audio Quality and choose Lossless.
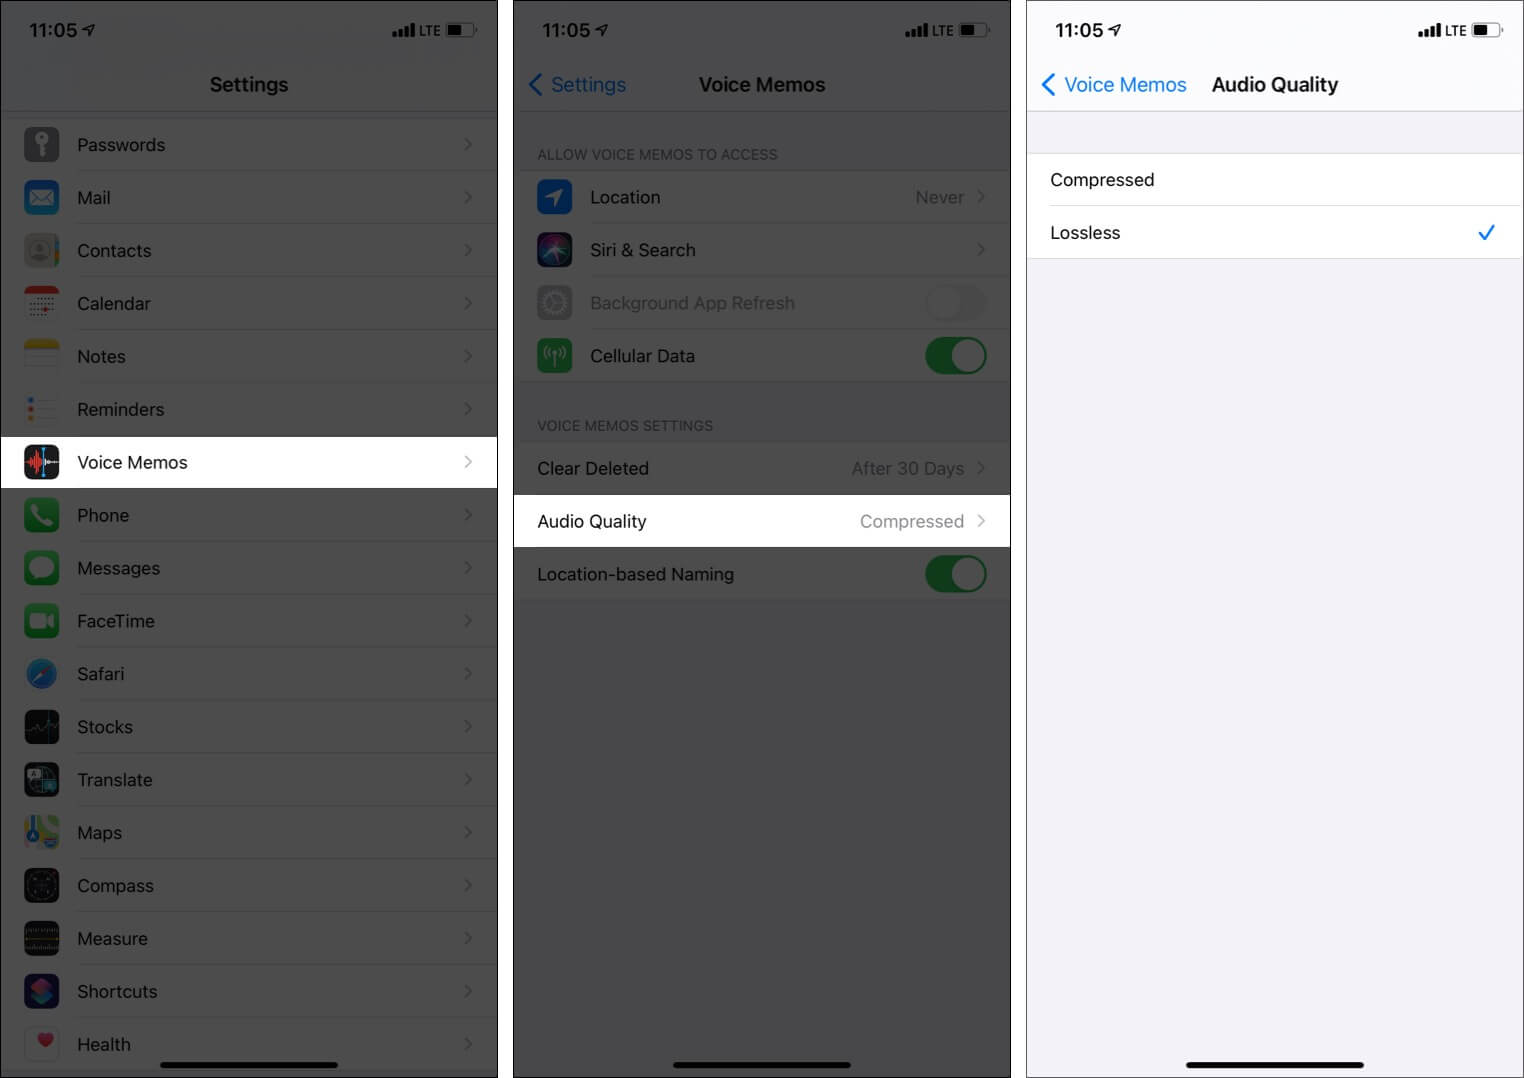
That’s it! Now, you can save your voice memos without compromising on the quality.
How to duplicate a recording
Before editing an image in Photos, I first create its duplicate. You can do the same with voice memos before editing them. This ensures that if you trim, replace, or delete a portion, the other duplicate file is still there as a backup.
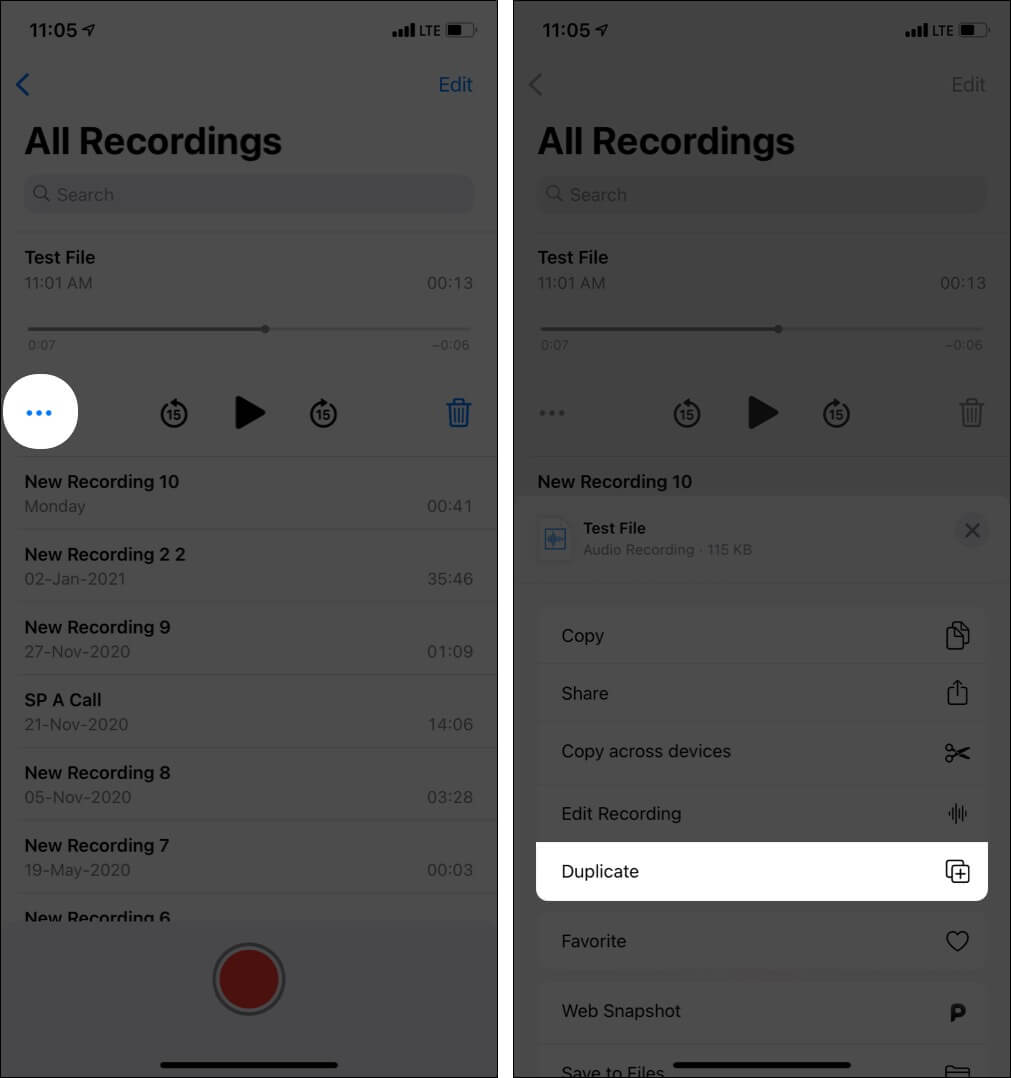
- Open the Voice Memos app and tap the recording name.
- Tap the three dots icon.
- Tap Duplicate.
- The new file will have the same name with ‘copy‘ at the end.
Edit a voice memo on your iPhone
Courtesy of the above headings, you now know how to record a voice memo and other basics. Now, let us get to the more creative and advanced part. This includes editing the voice memo to suit your needs and have it just the way you like.
Become an iGeeksBlog Premium member and access our content ad-free with additional perks.
Enhance a recording
Enhancing a recording will reduce background noise and echo, giving you better audio. Follow these quick steps.
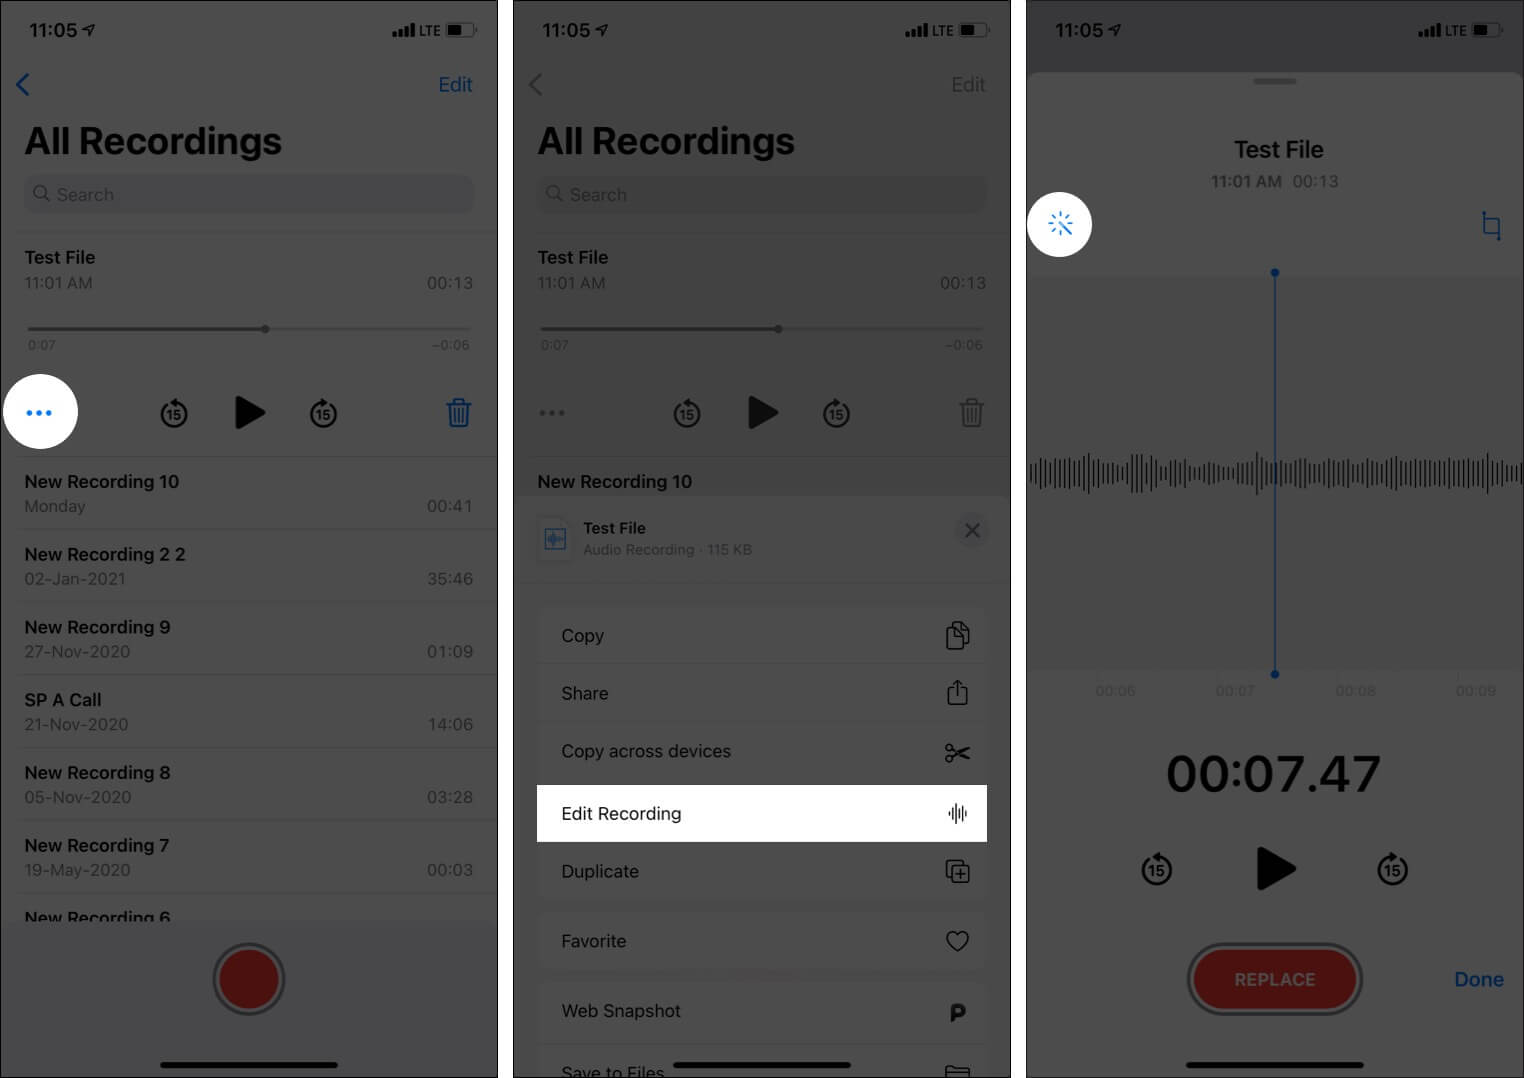
- Tap a voice recording followed by the three dots icon.
- Choose Edit Recording.
- Tap the magic wand icon at the top left.
- Finally, tap Done.
Replace part of the voice memo
You record a clip giving your best to find out later that a specific portion has some unwanted noise or mispronunciation. Relateable? Don’t worry! You can replace that part with a fresh take smoothly using the Voice Memo app. (Note: Duplicate the clip just in case.) Here’s how;
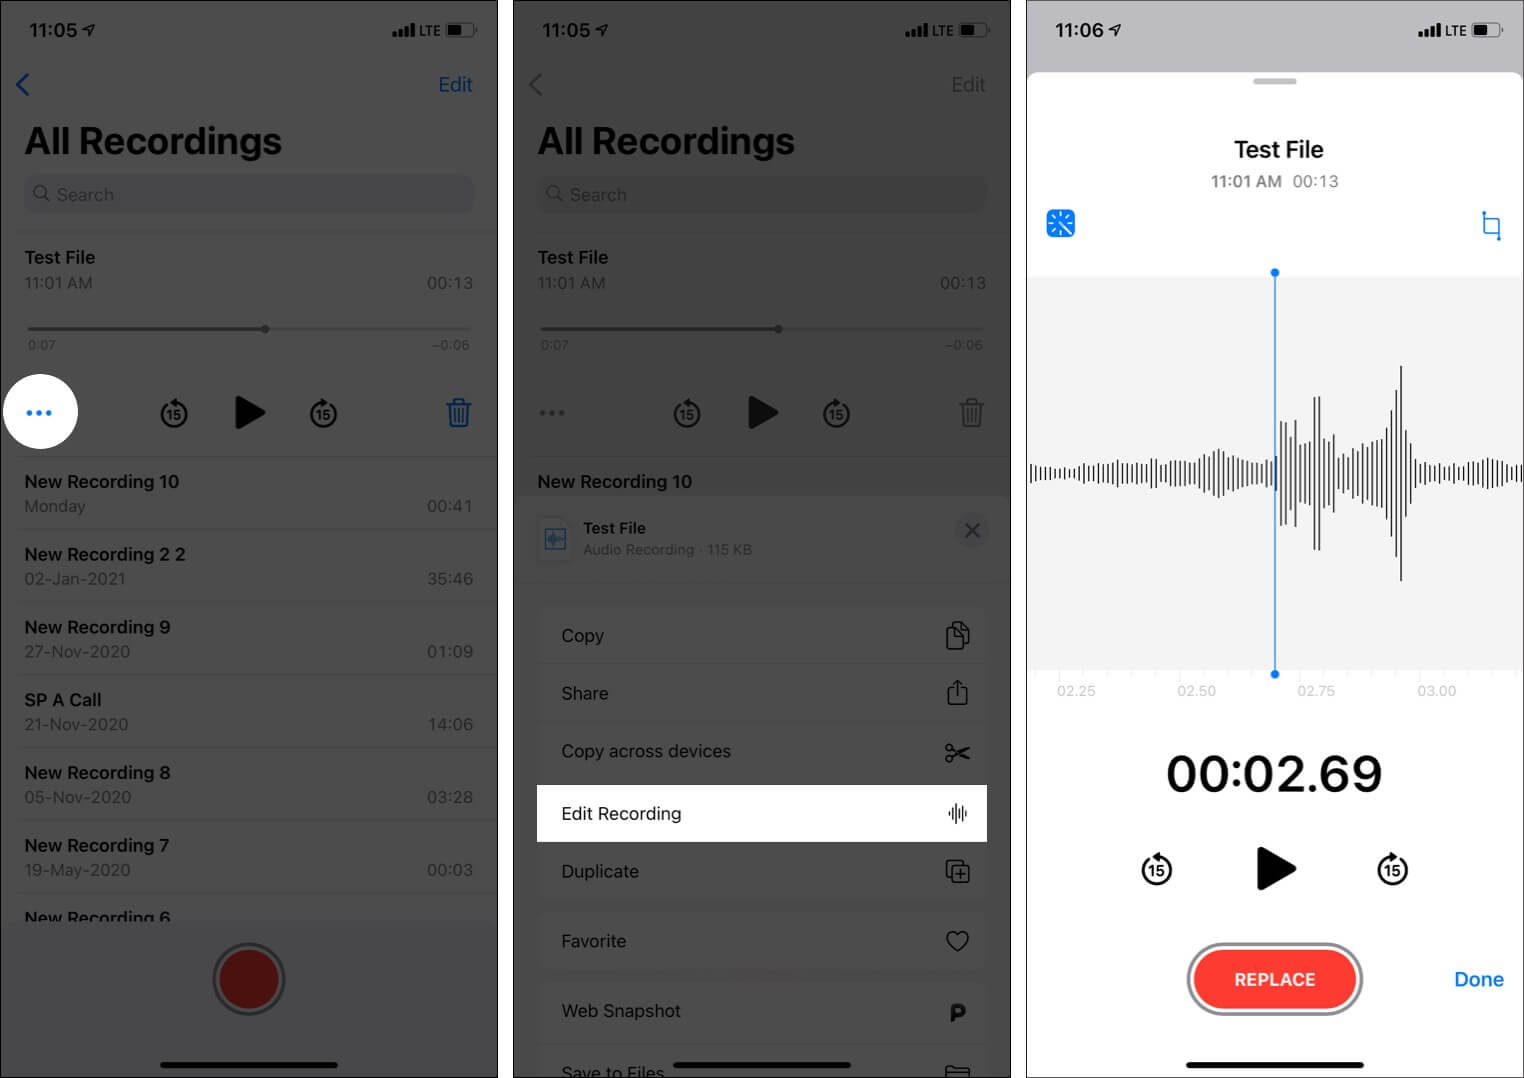
- Tap a voice memo from under ‘All Recordings.’
- Tap the three dots icon and choose Edit Recording.
- Now, drag the waveform to the position from where you want to make a new recording. Use two fingers to expand the waveform for precise results. Anytime, tap the triangle button to play the clip.
- Once you follow step 3 and reach the perfect point, tap REPLACE and start recording.
- Tap the pause button if needed.
- Once again, use the triangle button to play the clip. When satisfied, tap Done to save the changes.
Trim the voice memo
Are you familiar with trimming videos in the iPhone using Photos app? If yes, trimming voice memos will be familiar. Even if not, the process is effortless. Let me show how;
- Tap a voice memo under ‘All Recordings.’
- Select the three dots icon and choose Edit Recording.
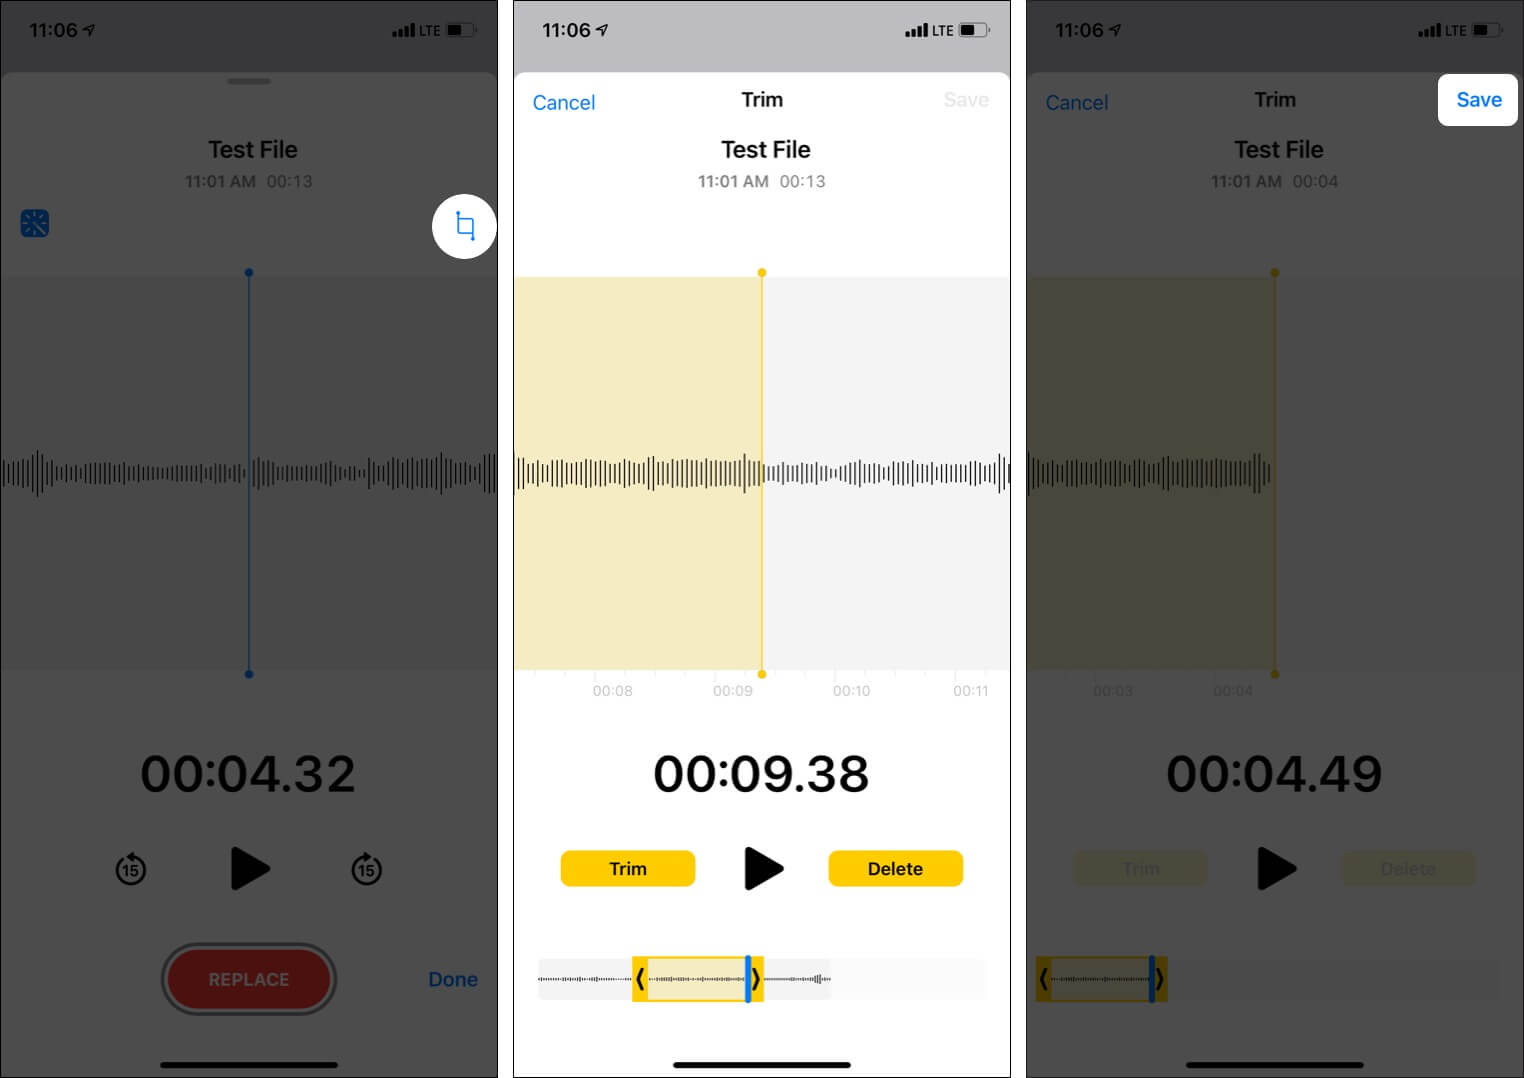
- Tap the trim icon that resembles a square at the top.
- Drag the yellow ends to make your selection. Use two fingers to expand the top waveform to reach the precise points.
- Tap the triangle button to play the highlighted portion inside the yellow selection.
- Once happy with the result, tap Trim. Finally, tap Save → Done. This will keep only the selected portion and delete the rest.
- Shake the iPhone or swipe left or right with three fingers to undo and redo.
Delete part of a voice memo
You saw how to trim the voice recording in the above steps and save the selected portion. But if you wish to delete a part of the voice memo and keep the rest, follow steps 1 to 5 above. After that, tap Delete. This will remove the selected yellow portion and keep the rest of the clip.
How to organize your recordings
Like photos and videos, you can organize voice notes into relevant folders or mark them as favorites. Here’s how to do it;
Favorite a voice recording
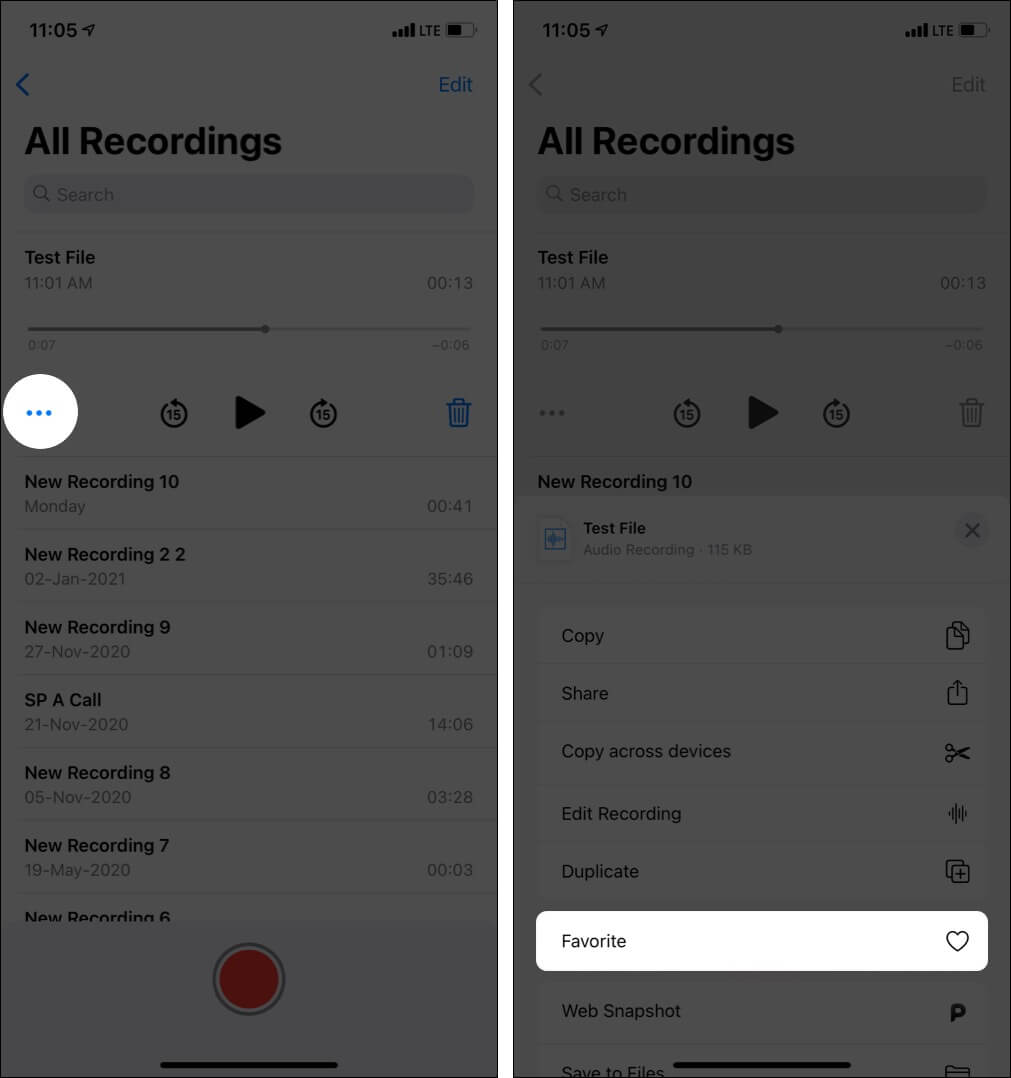
- Tap a recording and then tap the three dots icon.
- Tap Favorite.
- To see all your favorite voice memos, tap < at the top left.
Keep voice recordings in folders
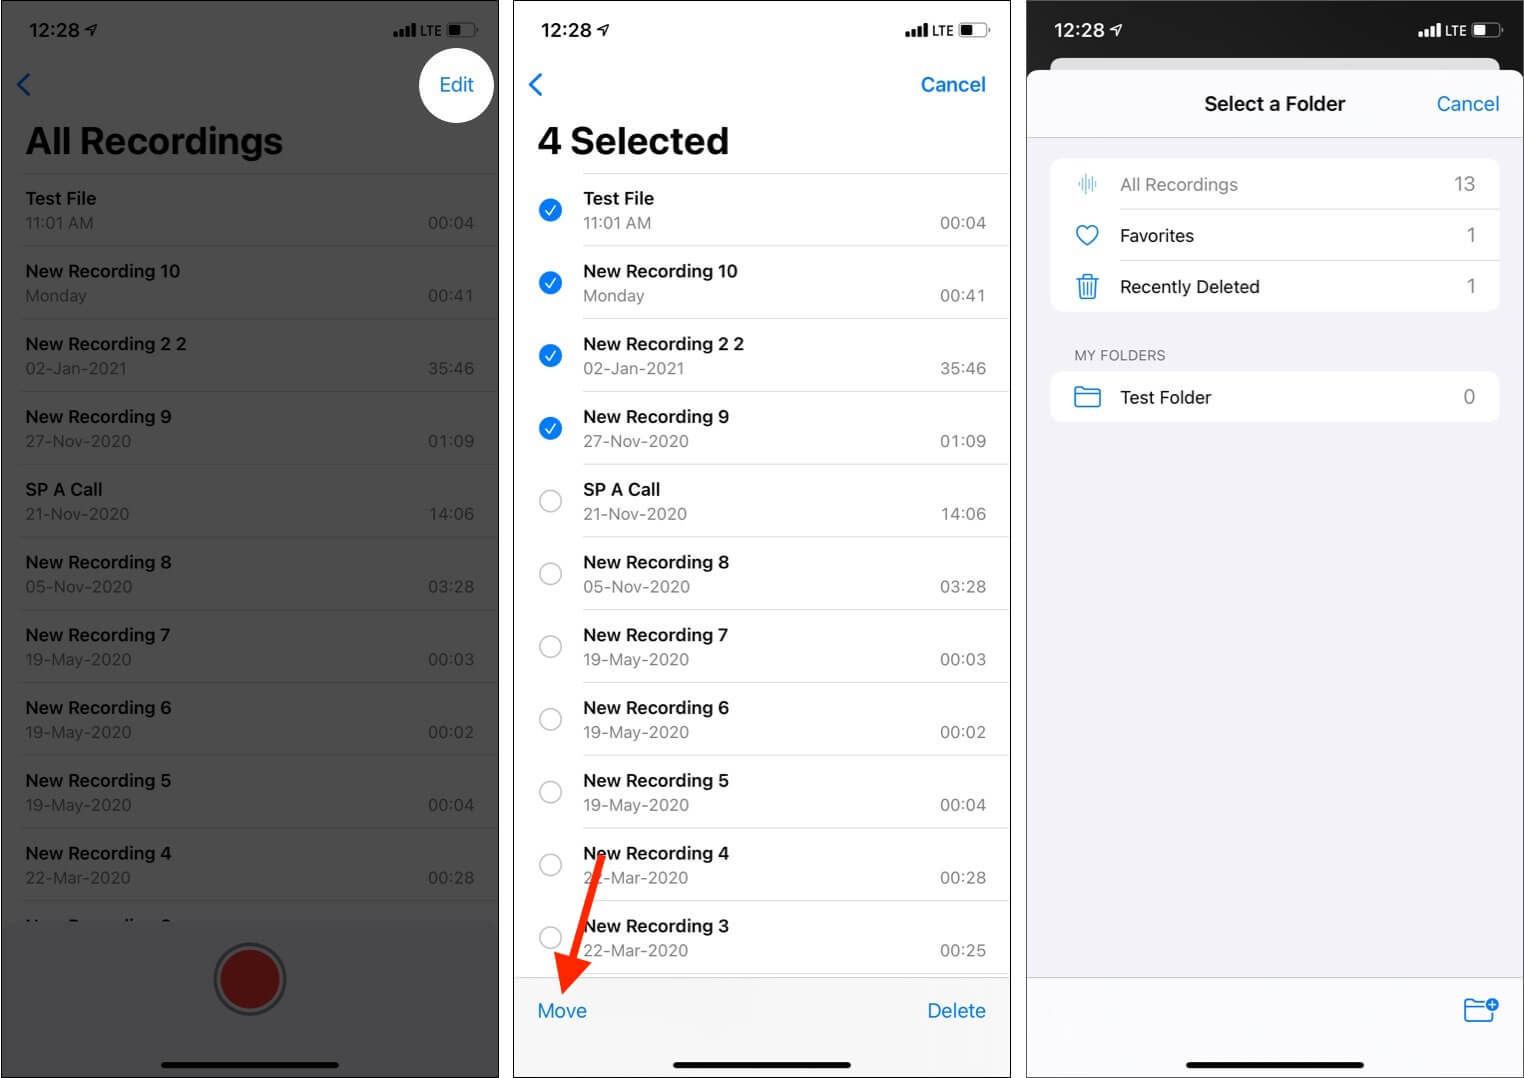
- Open the Voice Memos app and tap Edit at the top.
- Select one or more recordings and tap Move.
- Choose one of the existing folders or tap the icon at the bottom right to create a new folder.
- To access all folders, tap < from the top left.
How to delete the voice memo folder and voice recording
Have old or unnecessary recordings that you no longer need? Let me show you how to remove them.
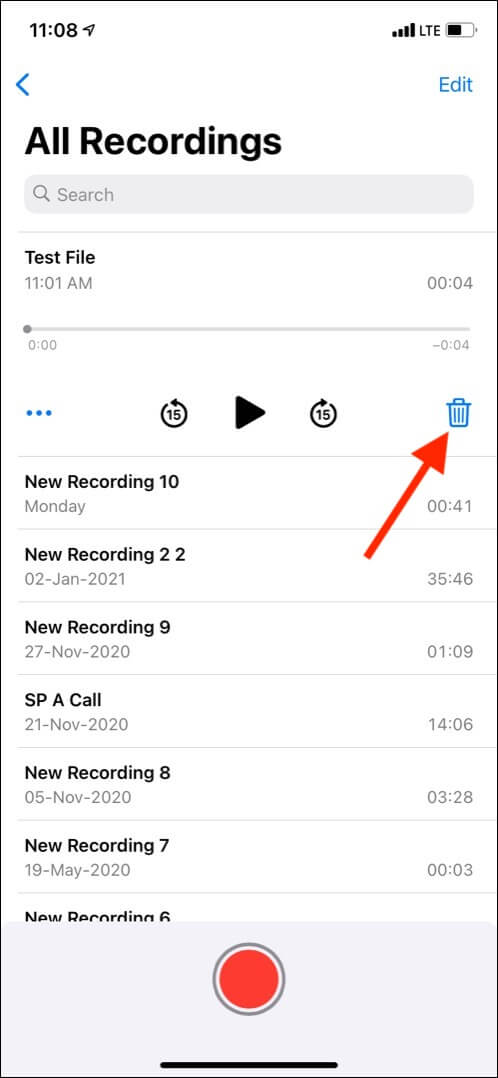
- Open the Voice Memos app and tap a recording. Tap the Trash icon.
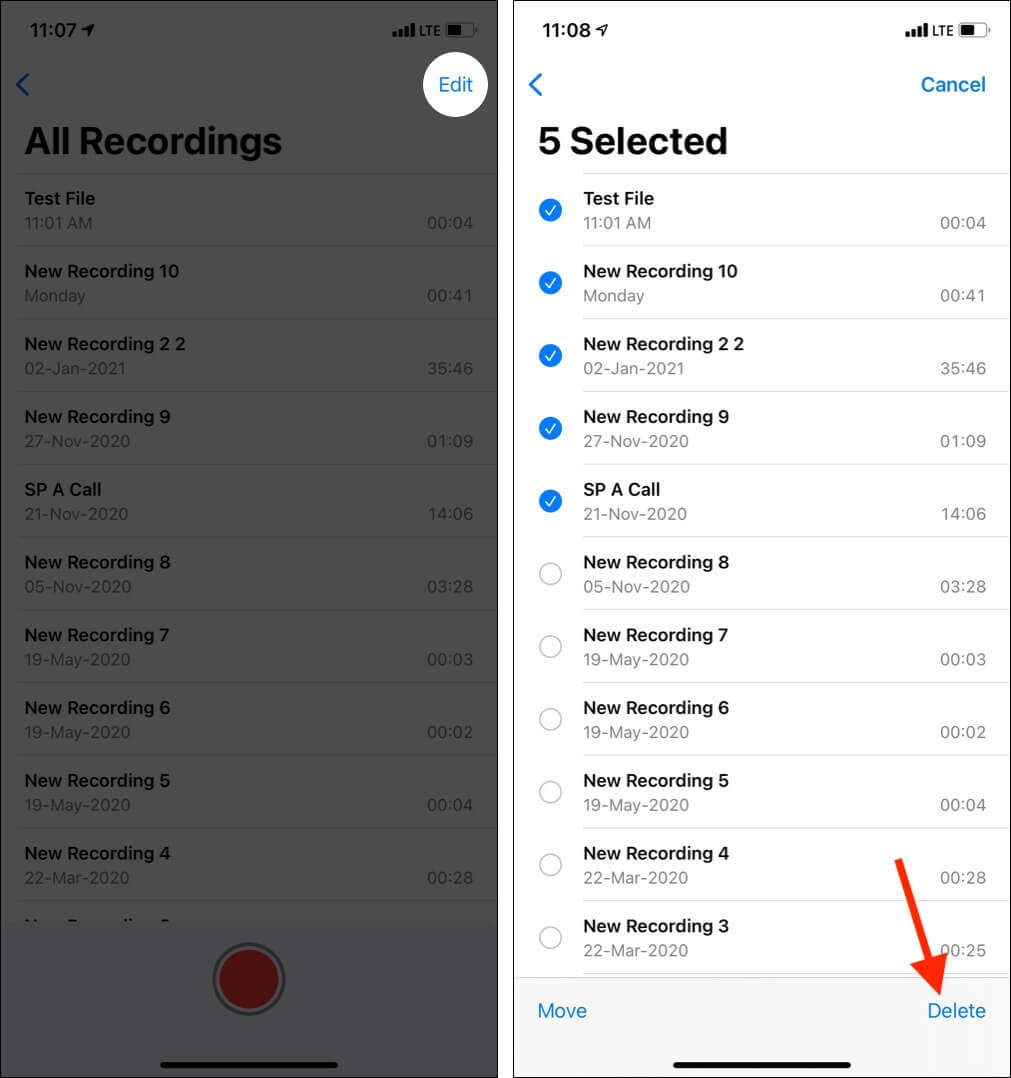
- To delete multiple voice memos: Tap Edit at the top and select the recordings. Finally, tap Delete.
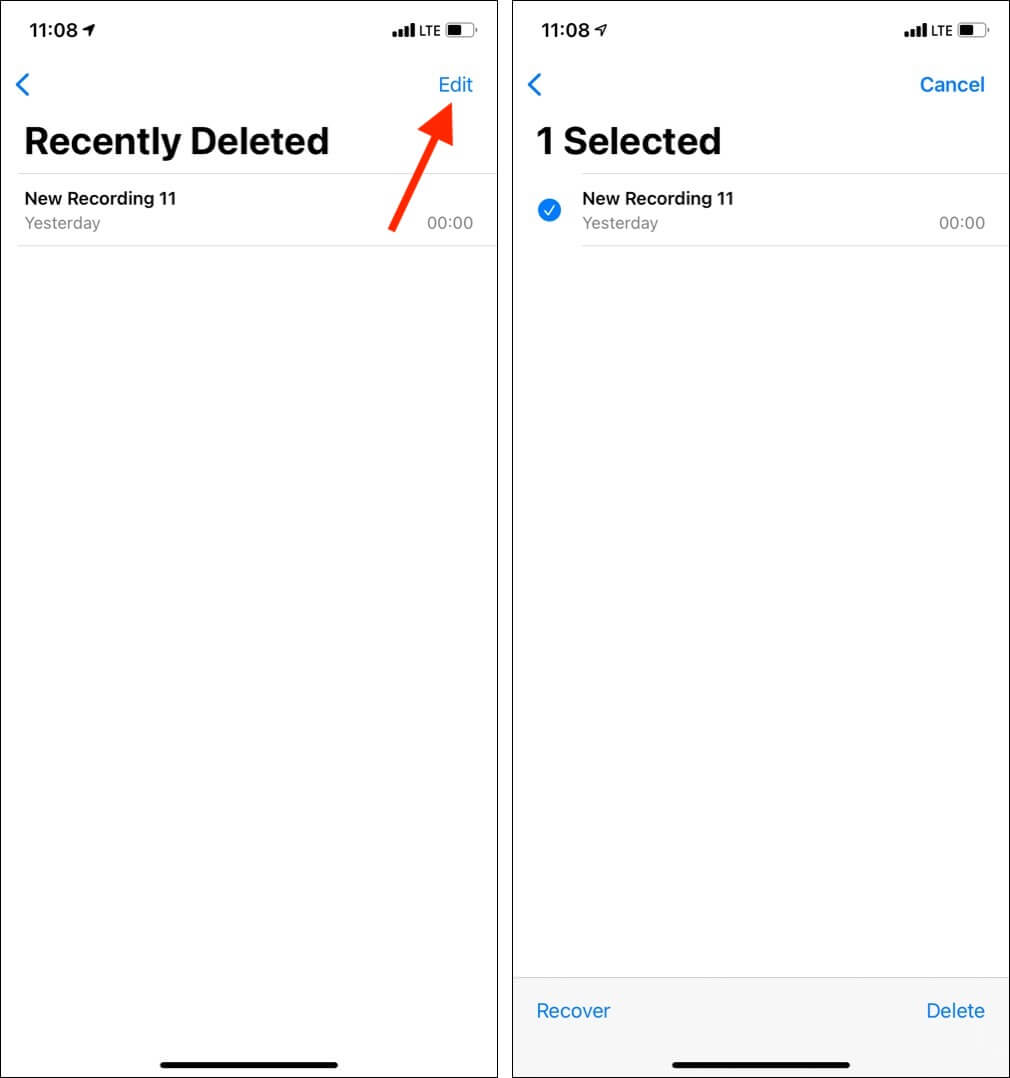
- Just like photos, the deleted voice memos are stored for 30 days in the ‘Recently Deleted’ folder. Tap < to access this.
- If you wish to delete the voice memos permanently, tap Edit from the Recently Deleted screen.
- Next, select and delete or tap Delete All. Tap Recover or Recover All if you want them back.
Record, rewind, edit, and enjoy voice memos on your iPhone!
This is how you can become a master in using the Voice Memos app on your iOS and iPadOS device. I believe this post was helpful. If you have additional questions, please feel free to reach me via the comments below.
You will love these:
