Mail is one of the best email apps for iPhone, thanks to its intuitive interface and several useful features. However, there are times when it may start showing you the Cannot Verify Server Identity error on your iPhone, preventing you from accessing or sending emails.
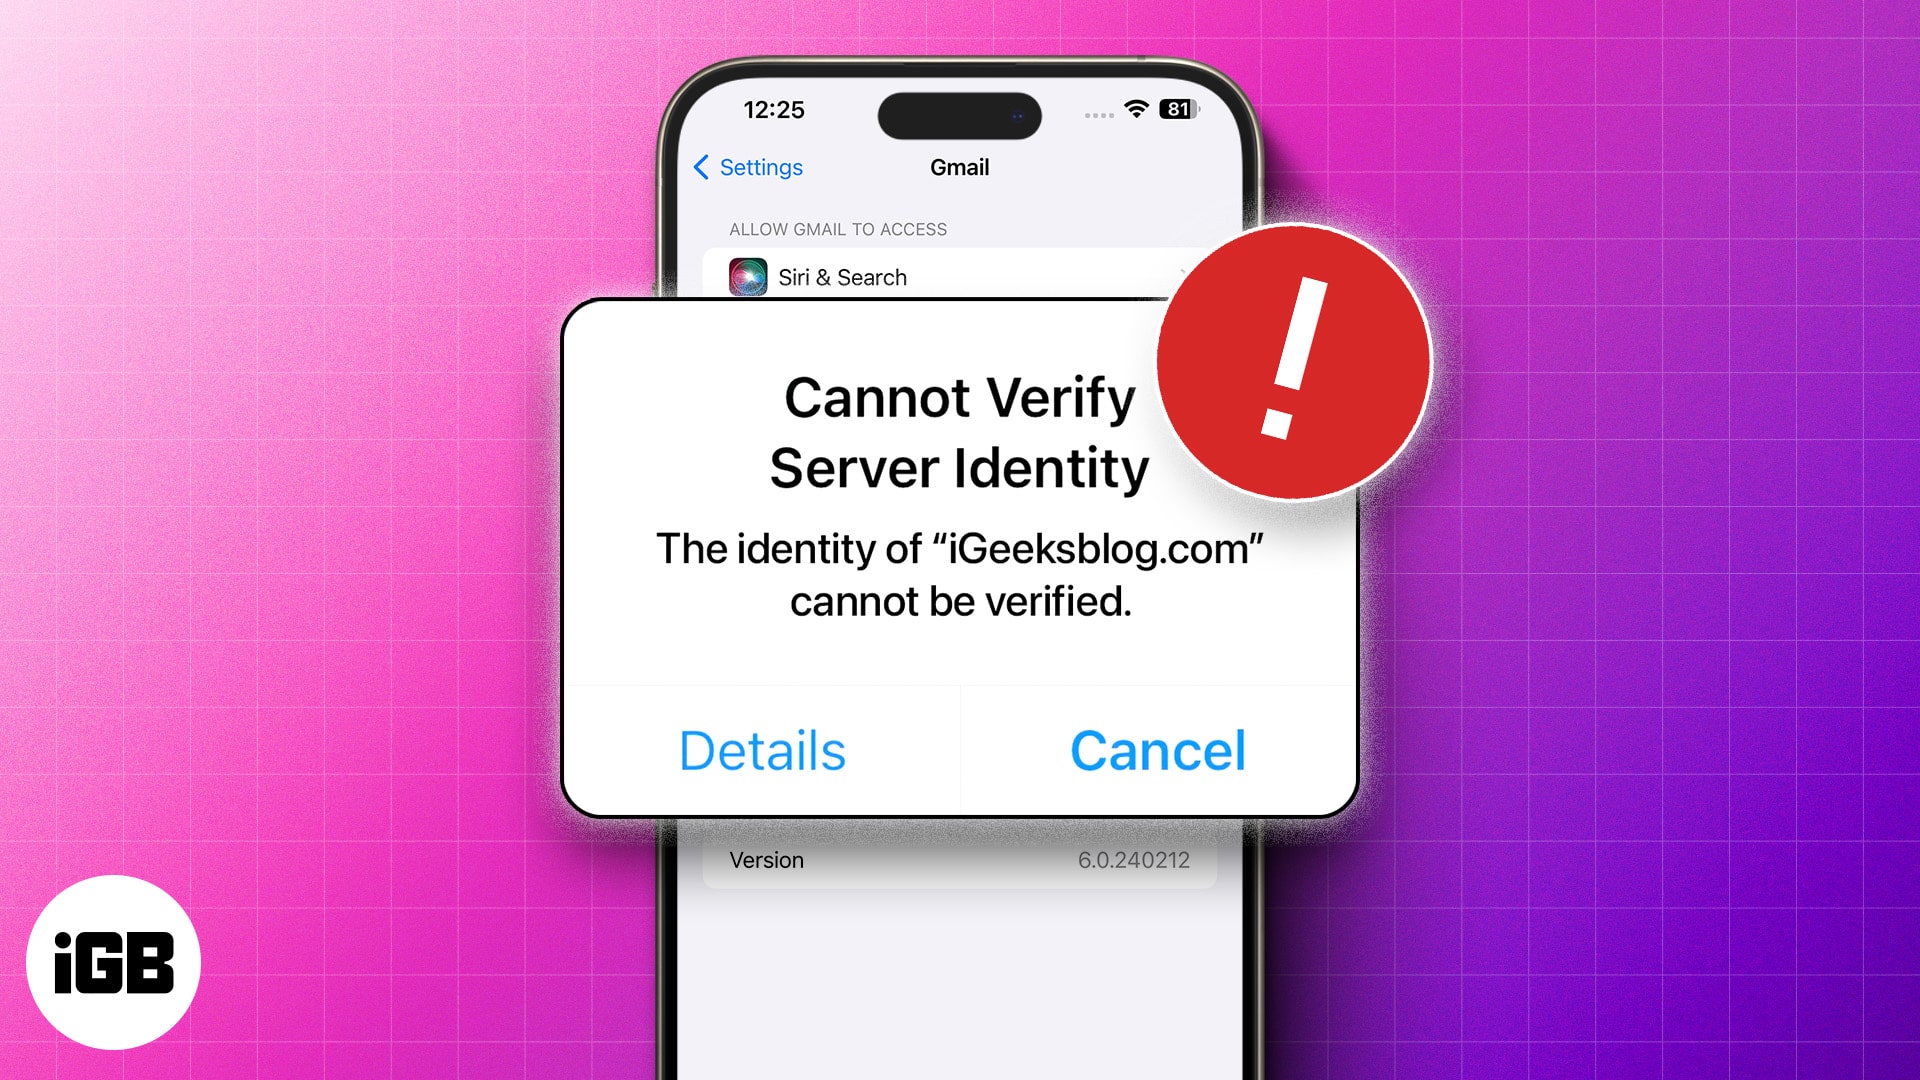
If you’ve run into this error, don’t worry. In this guide, we’ve compiled a list of practical solutions to get you back on track.
Table of Contents
- Why does my iPhone keep saying, "Cannot Verify Server Identity?"
- 11 ways to fix the Cannot Verify Server Identity on iPhone
- 1. Force quit and reopen the Mail app
- 2. Restart your iPhone
- 3. Check your date and time settings
- 4. Install the latest system update
- 5. Unsubscribe from third-party calendars
- 6. Delete your email account and re-add it
- 7. Try changing the SSL settings in Mail
- 8. Ensure you've installed an MDM profile
- 9. Check your Certificate Trust Settings
- 10. Reset network settings
- 11. Factory reset your iPhone
- Video: iPhone Cannot Verify Server Identity? 6 Quick Fixes
Why does my iPhone keep saying, “Cannot Verify Server Identity?”
There are various reasons why the Mail app on your iPhone or iPad could be showing the Cannot Verify Server Identity error. In most cases, it’s probably because your device can’t establish a secure connection with the mail server due to an issue with the SSL/TLS certificate. Other times, it could be due to misconfigured settings, temporary software glitches, or network-related issues.
11 ways to fix the Cannot Verify Server Identity on iPhone
Here’s a list of tried and tested fixes that can help you get rid of this error in the Mail app:
1. Force quit and reopen the Mail app
The easiest way to fix this is to force quit and reopen the Mail app on your iPhone. This will eliminate any temporary software issues by flushing out all processes related to the Mail app from the RAM and giving it a fresh start.
- Open the App Switcher on your iPhone or iPad.
- Locate and swipe up on the Mail app to close it.
- Reopen the Mail app to check if the issue persists.
2. Restart your iPhone
In most cases, force quitting and reopening the Mail app should work just fine. However, if that doesn’t work, you may want to try restarting your iPhone. Doing this will close all system processes to resolve temporary software glitches and re-establish a network connection to phase out network-related issues.
- On iPhone X and later: Long-press the Volume Up or Volume Down and Side buttons and swipe right on the power slider to shut down the device. Wait a few seconds and press the Side button to turn it on again.
- On iPhone 8 and earlier: Long-press the Side Button and swipe right on the power off slider to shut down the device. After some time, turn on the device by pressing and holding the Side button for around ten seconds.
3. Check your date and time settings
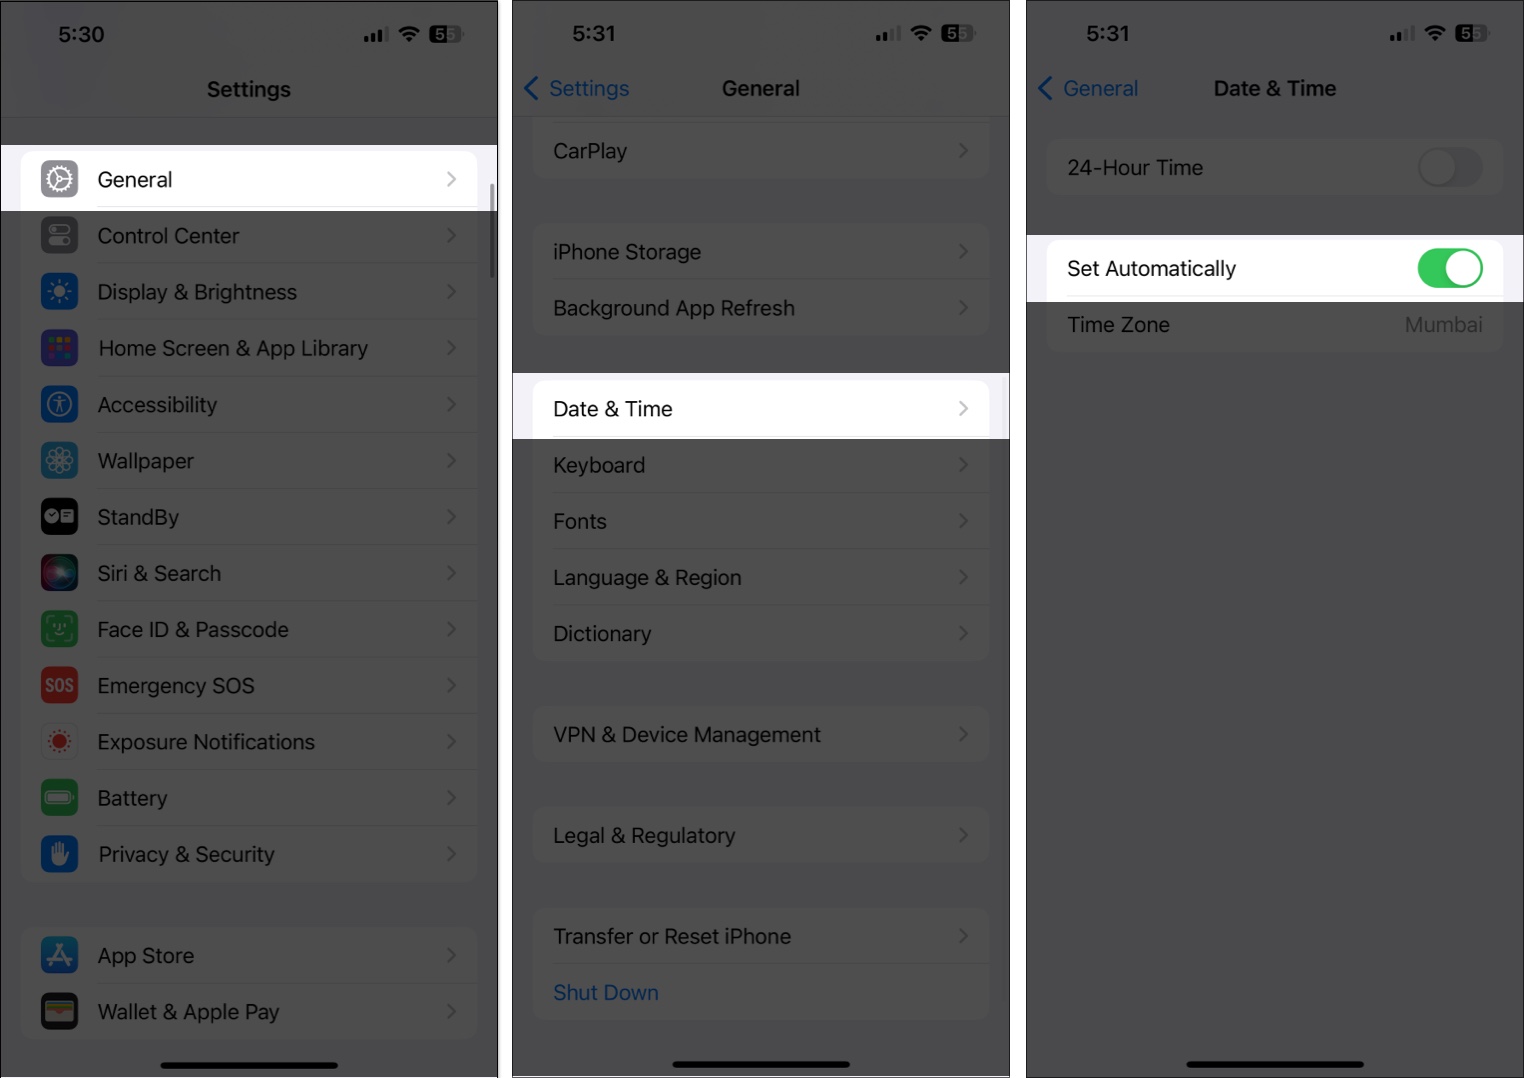
Inaccurate date and time on an iPhone or iPad can prevent it from contacting the Mail server and lead to the Cannot Verify Server Identity error. As such, you must check the date and time settings on the device as explained below:
- Open the Settings app on your iPhone or iPad.
- Then navigate to General and tap on Date & Time.
- Turn on Set Automatically.
4. Install the latest system update
Yet another basic solution you can try to resolve this error is updating your iPhone or iPad to the most recent iOS or iPadOS version. Almost all software updates contain bug fixes and other important security patches that address common issues that can lead to unusual errors or glitches on your device.
- Open the Settings app on your iPhone or iPad.
- Navigate to General and tap on Software Updates.
- If an iOS or iPadOS update is available, tap Update Now.
- Enter your passcode and wait for the update to install.
5. Unsubscribe from third-party calendars
Have you recently subscribed to a third-party calendar related to an event? If yes, the calendar you’ve subscribed to may lack the proper security certificate, which can lead to errors in the Mail app. If you want to fix this, you’ll need to unsubscribe from the calendar event as explained in the steps below:
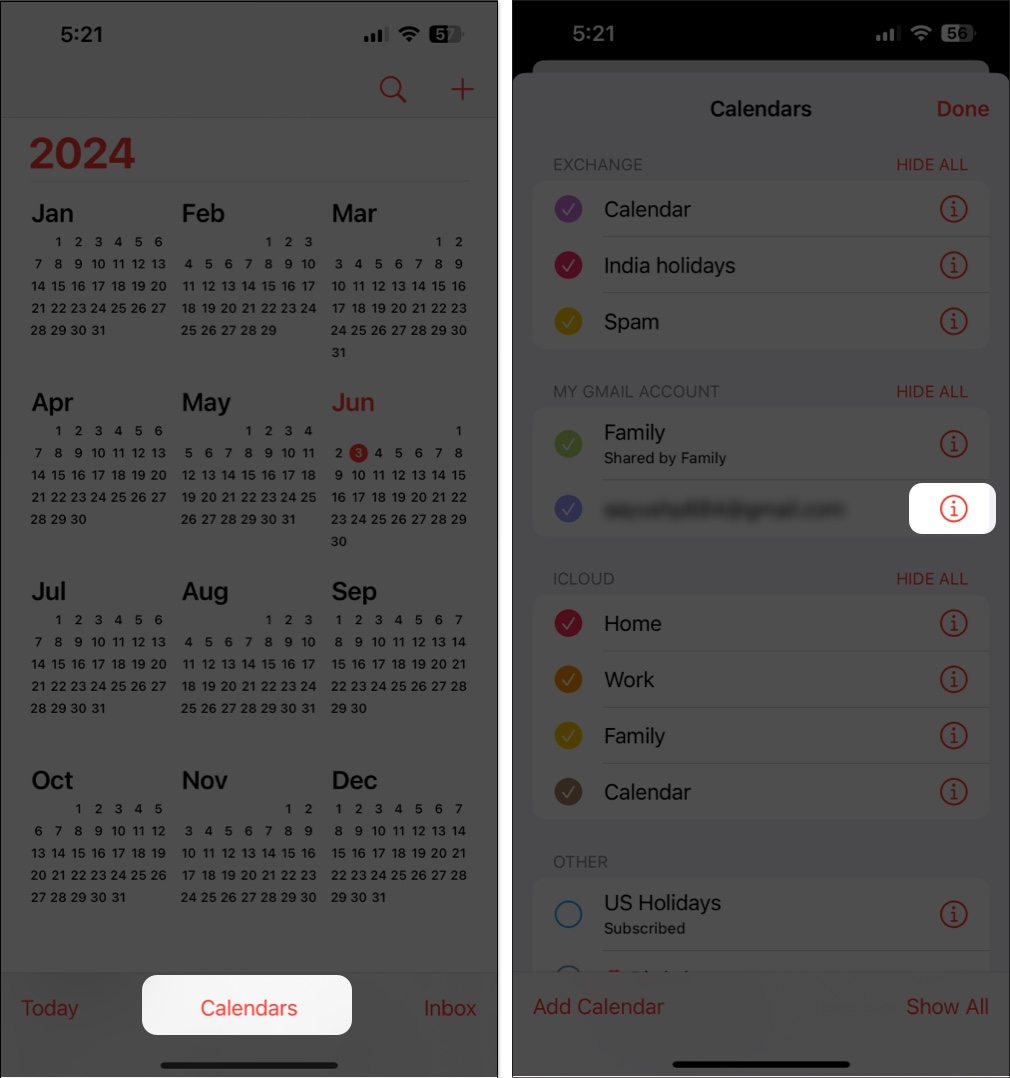
- Open the Calendar app on your iPhone or iPad.
- Tap Calendars to view a list of subscribed calendars.
- Tap the i icon next to a calendar you want to unsubscribe.
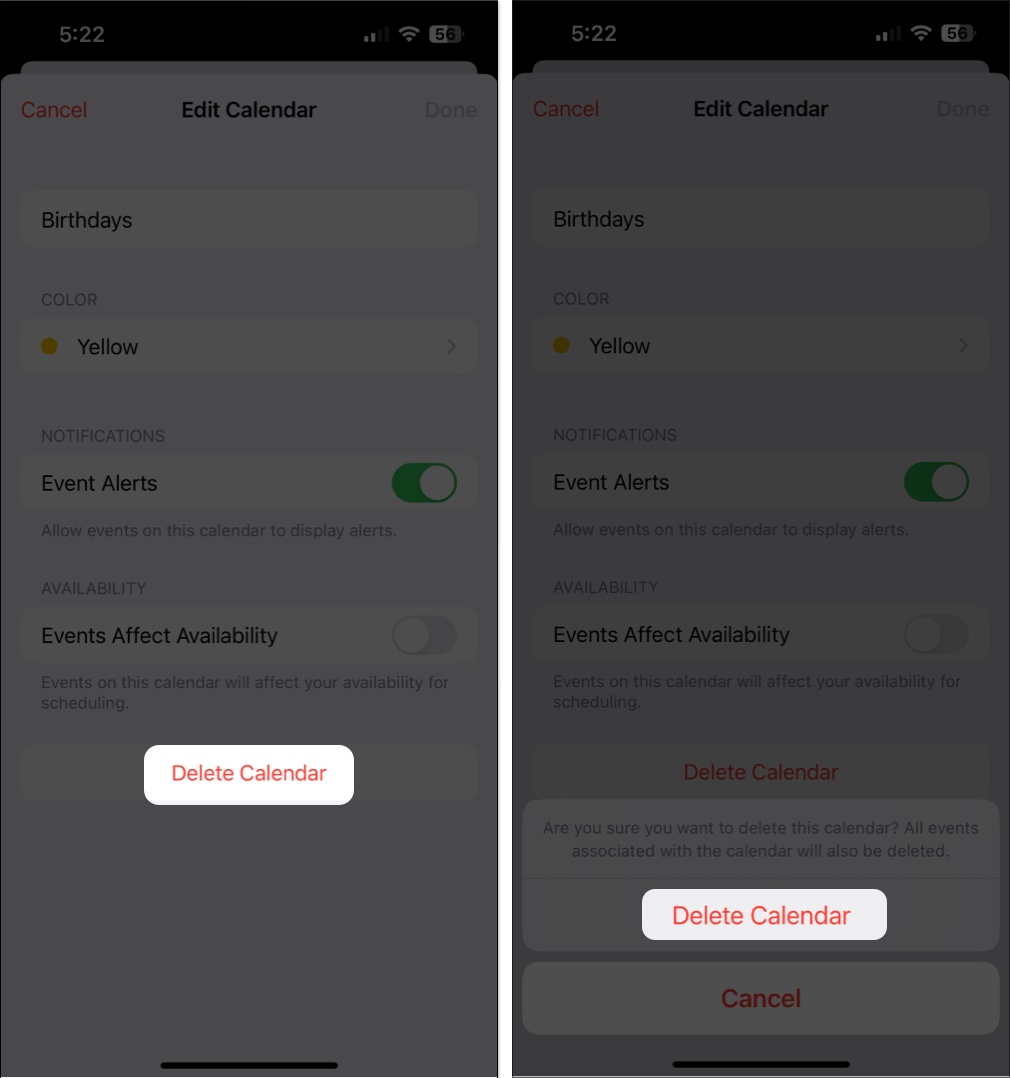
- Tap Delete Calendar to unsubscribe from the said calendar.
6. Delete your email account and re-add it
If the basic fixes don’t work and you’re still seeing the error, it might be time to delete and re-add your email account. This will restore your account’s email settings to their default state and fix login issues that can prevent you from accessing emails in the Mail app.
Become an iGeeksBlog Premium member and access our content ad-free with additional perks.
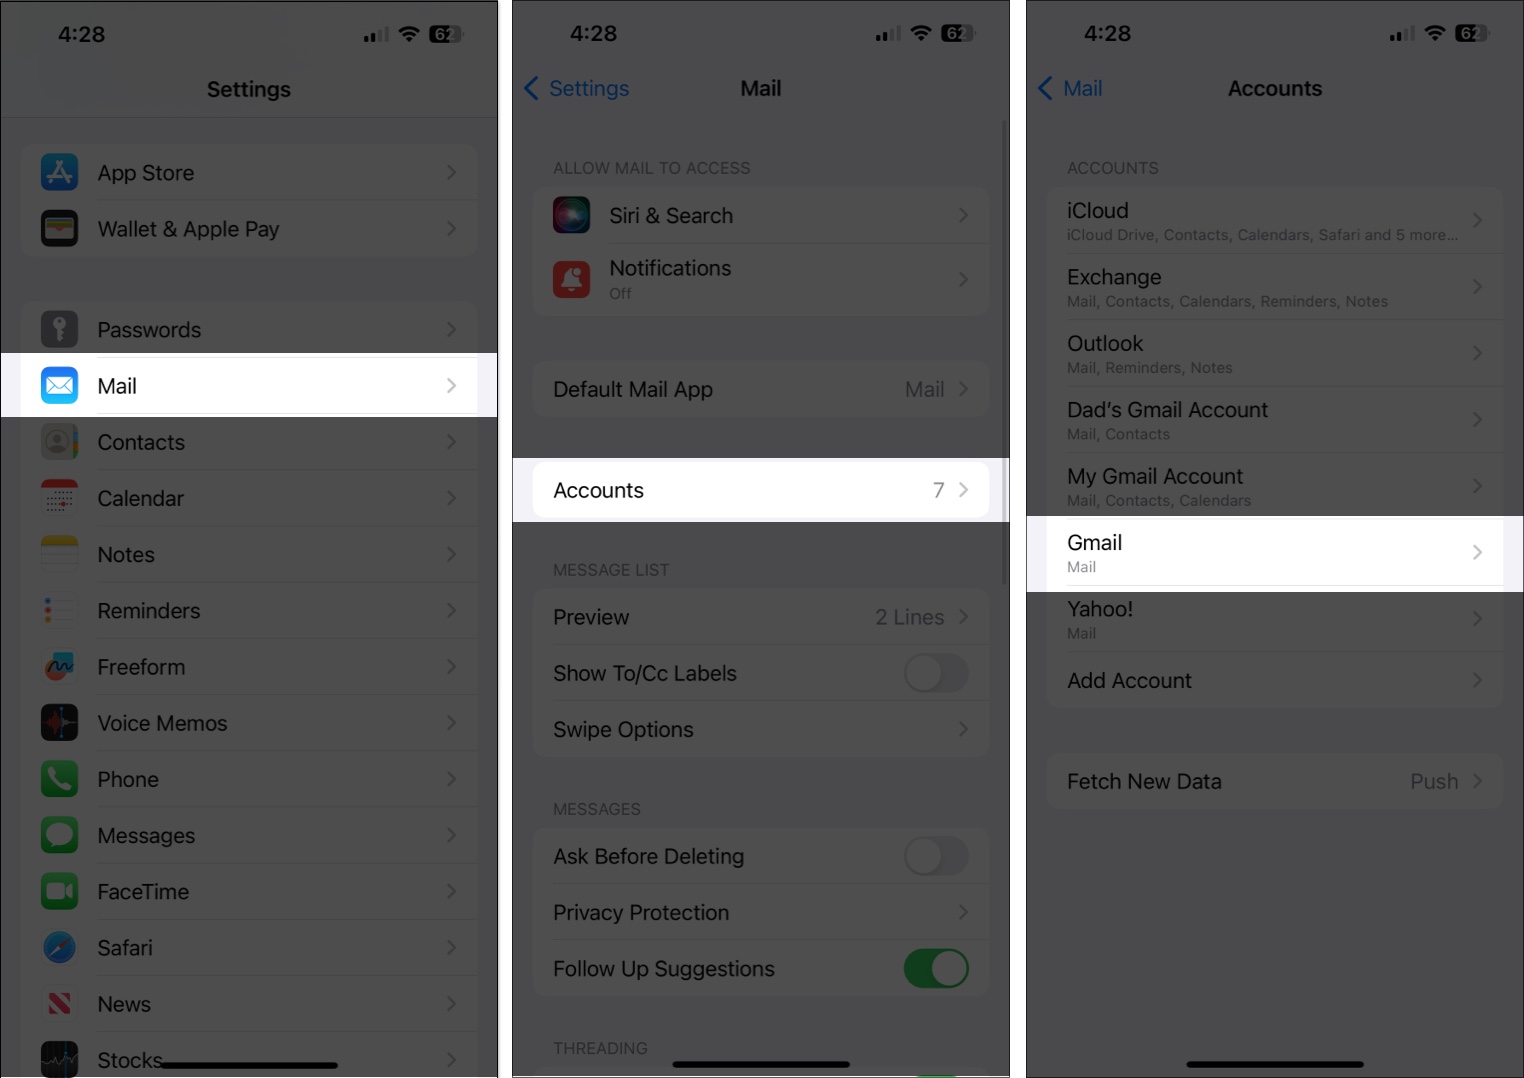
- Open the Settings app on your iPhone or iPad.
- Scroll down, tap on Mail, and select Accounts.
- Select the account you want to delete and re-add.
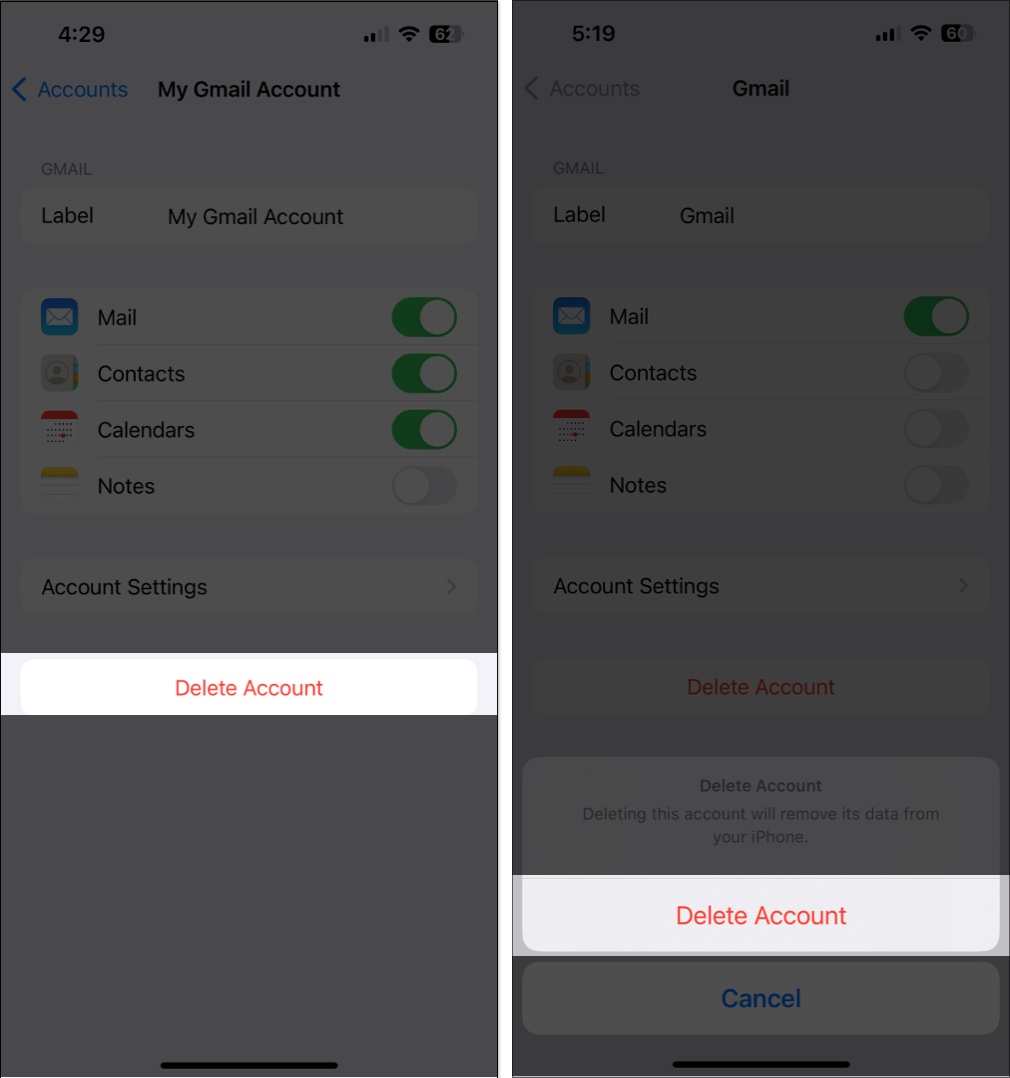
- Tap Delete Account. Then, tap Delete from My iPhone.
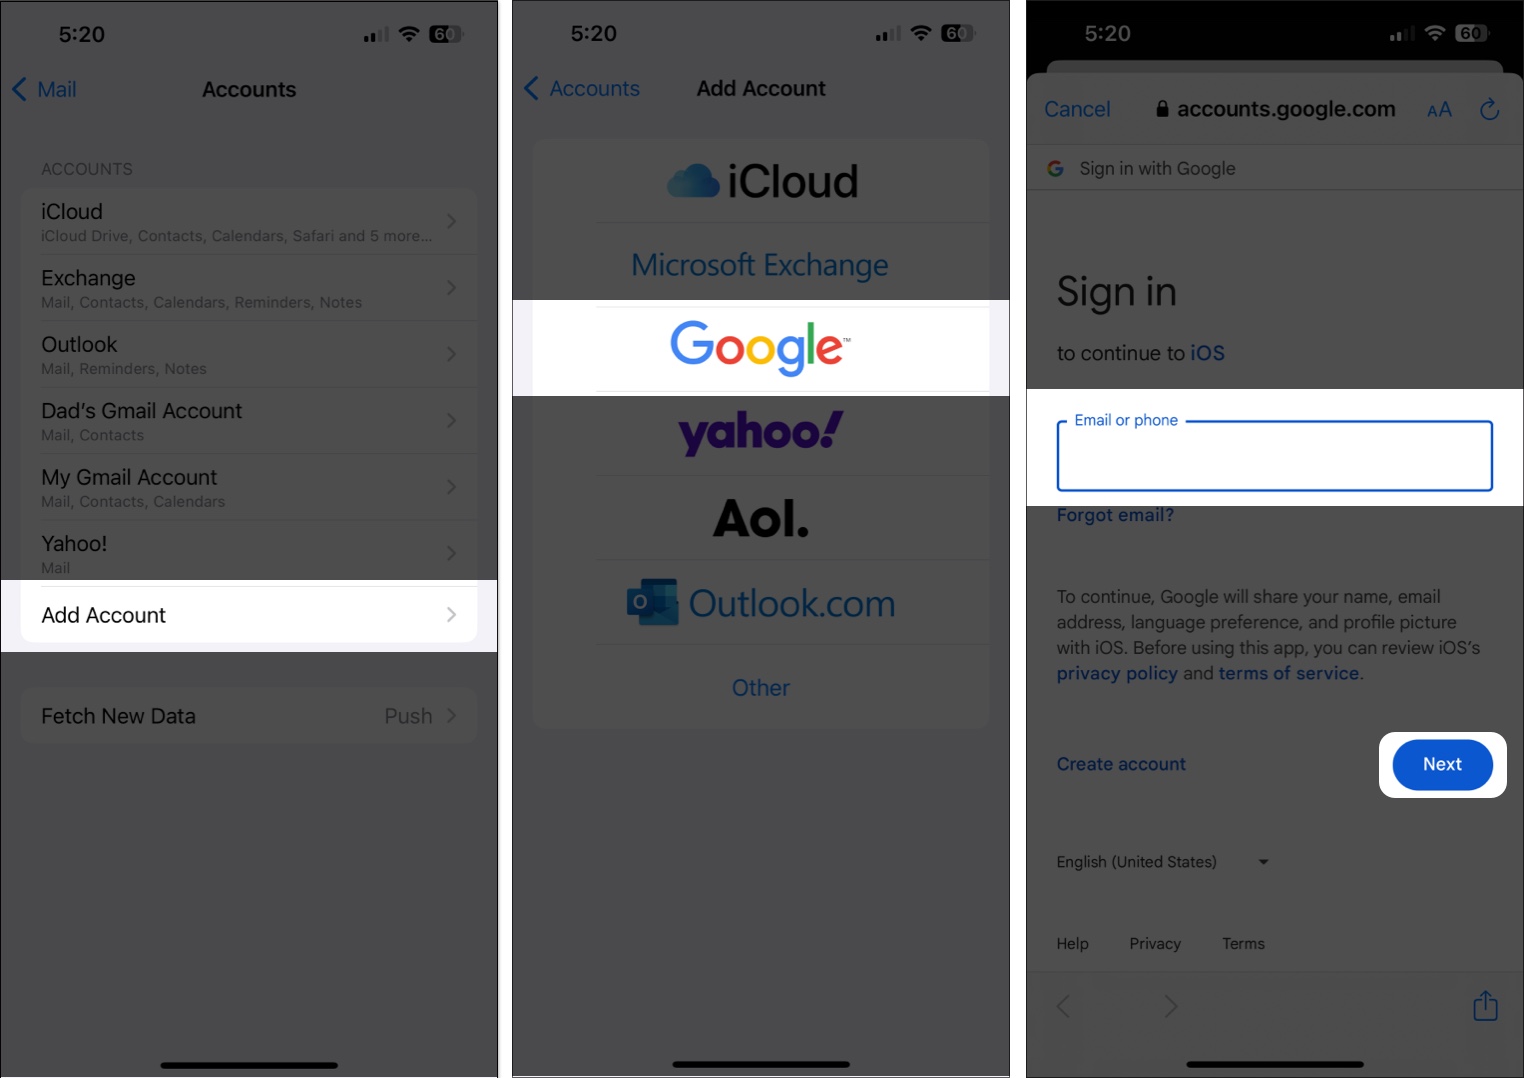
- Once you remove the email account, tap Add Account.
- Select your account provider and enter your credentials.
7. Try changing the SSL settings in Mail
Misconfigured SSL security settings are among the most common causes of the error on iPhones and iPads. Hence, you must try changing the SSL settings on your device to see if that helps you rectify the issue and freely access emails in the Mail app.
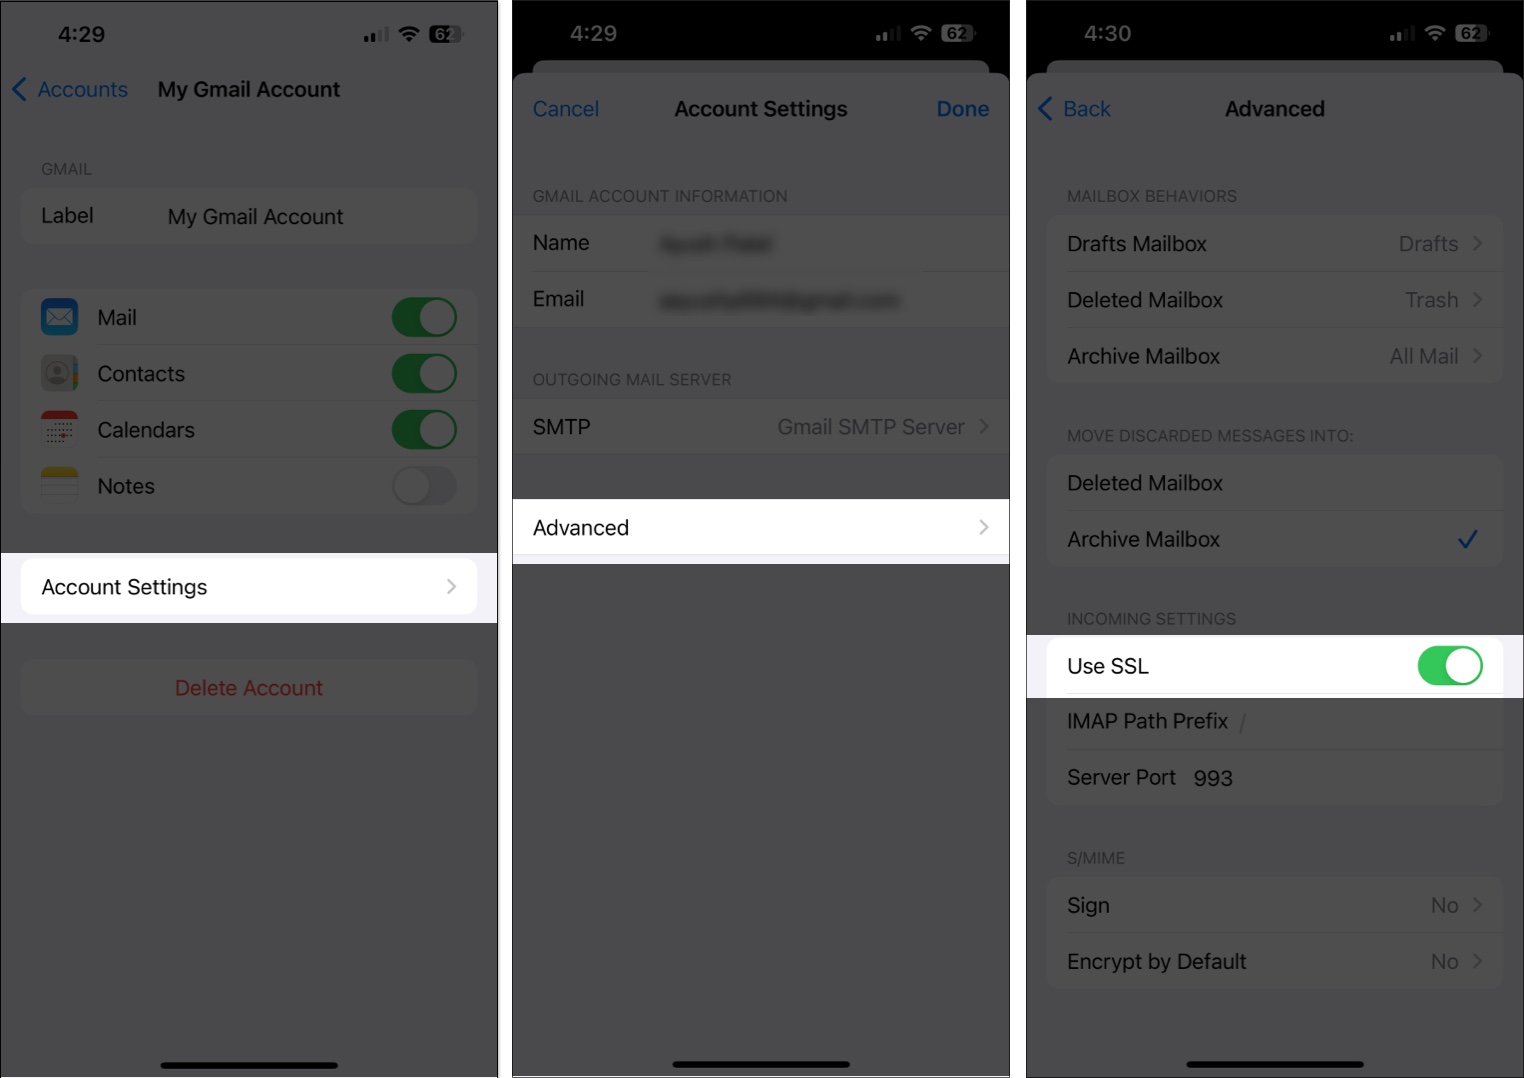
- Open the Settings app on your iPhone or iPad.
- Scroll down and tap on Mail. Then, tap on Accounts.

- Tap an account for which you want to check the SSL settings.
- Now, tap Account Settings and then tap Advanced.
- Turn Use SSL on or off and check if that fixes the error for you.
8. Ensure you’ve installed an MDM profile
If you’re facing trouble viewing emails from your workplace due to the Cannot Verify Server Identity error, it’s likely that you haven’t installed an MDM (Mobile Device Management) profile provided by your employer or the email service. MDM profiles often come with a trusted root certificate that your devices require to establish a secure connection with the mail server. Here’s how to install an MDM profile on your iPhone or iPad:
- Download the MDM profile provided by your employer or email service.
- Open Settings and tap Profile Downloaded or Enroll In (Organization) at the top of the screen.
- Tap Install in the top-right corner, then follow the onscreen instructions.
9. Check your Certificate Trust Settings
Sometimes, you may face issues accessing emails from your workplace even if an MDM profile is installed on your device. In such cases, you should check the Certificate Trust Settings on your iPhone or iPad to see if you’ve enabled the relevant security certificate, as shown below. If a certificate is turned off, the Mail app won’t be able to establish a secure connection with the mail server.
- Open the Settings app on your iPhone or iPad.
- Navigate to General and tap on About.
- Scroll down to the bottom and tap Certificate Trust Settings.
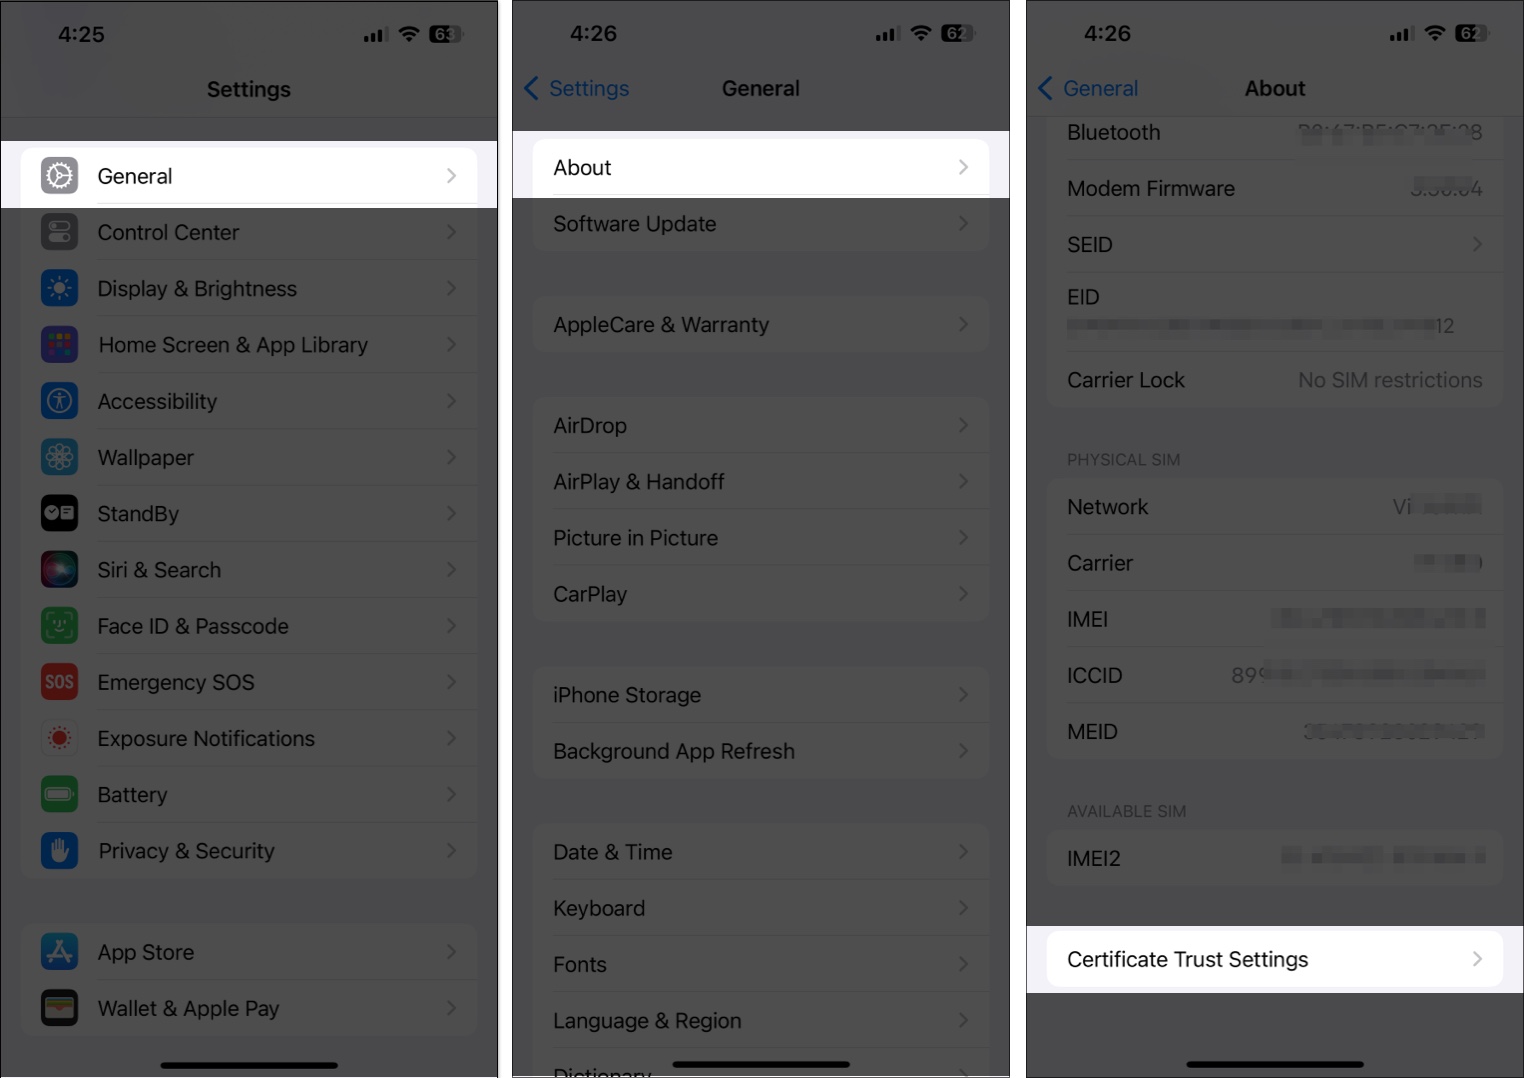
- Under Enable full trust for root certificates turn on trust certificates.
10. Reset network settings
Are you seeing the Cannot Verify Server Identity error in the Mail app after you recently made changes to the network settings on your iPhone? If yes, it’s possible that you’ve changed something you shouldn’t have, and you must reset the network settings to revert the changes you’ve made. You can check out our in-depth guide on how to reset network settings on your iPhone to find the exact steps you need to follow.
11. Factory reset your iPhone
Have you tried every solution in this guide, but nothing seems to work? Well, in that case, the last thing you can try is to factory reset your device. This action will erase all data and system settings and restore your device to the default state as it came in the box. If you don’t know how to factory reset your iPhone, you might want to check out our in-depth guide on how to factory reset your iPhone or iPad.
Video: iPhone Cannot Verify Server Identity? 6 Quick Fixes
Wrapping up…
With so many potential solutions available, knowing which one to use when can be helpful. If the issue is limited to your personal email, basic fixes like relaunching the Mail app, restarting your device, installing system updates, or checking the date and time settings should help. But if it’s related to your work email, installing an MDM profile or checking the SSL and certificate trust settings will be more effective solutions.
If none of the solutions helped you in either situation, you might want to consider resetting your network settings or factory resetting your iPhone or iPad as a last-ditch effort. Alternatively, you can also raise a support request asking Apple to diagnose the issue further.
Also Read:
