Live Activities is a handy feature that shows real-time information from an app you’re currently using on your Lock Screen or Dynamic Island. It was first introduced on iOS 16 and is a convenient way to quickly view relevant info such as live sports scores, food delivery updates, etc.
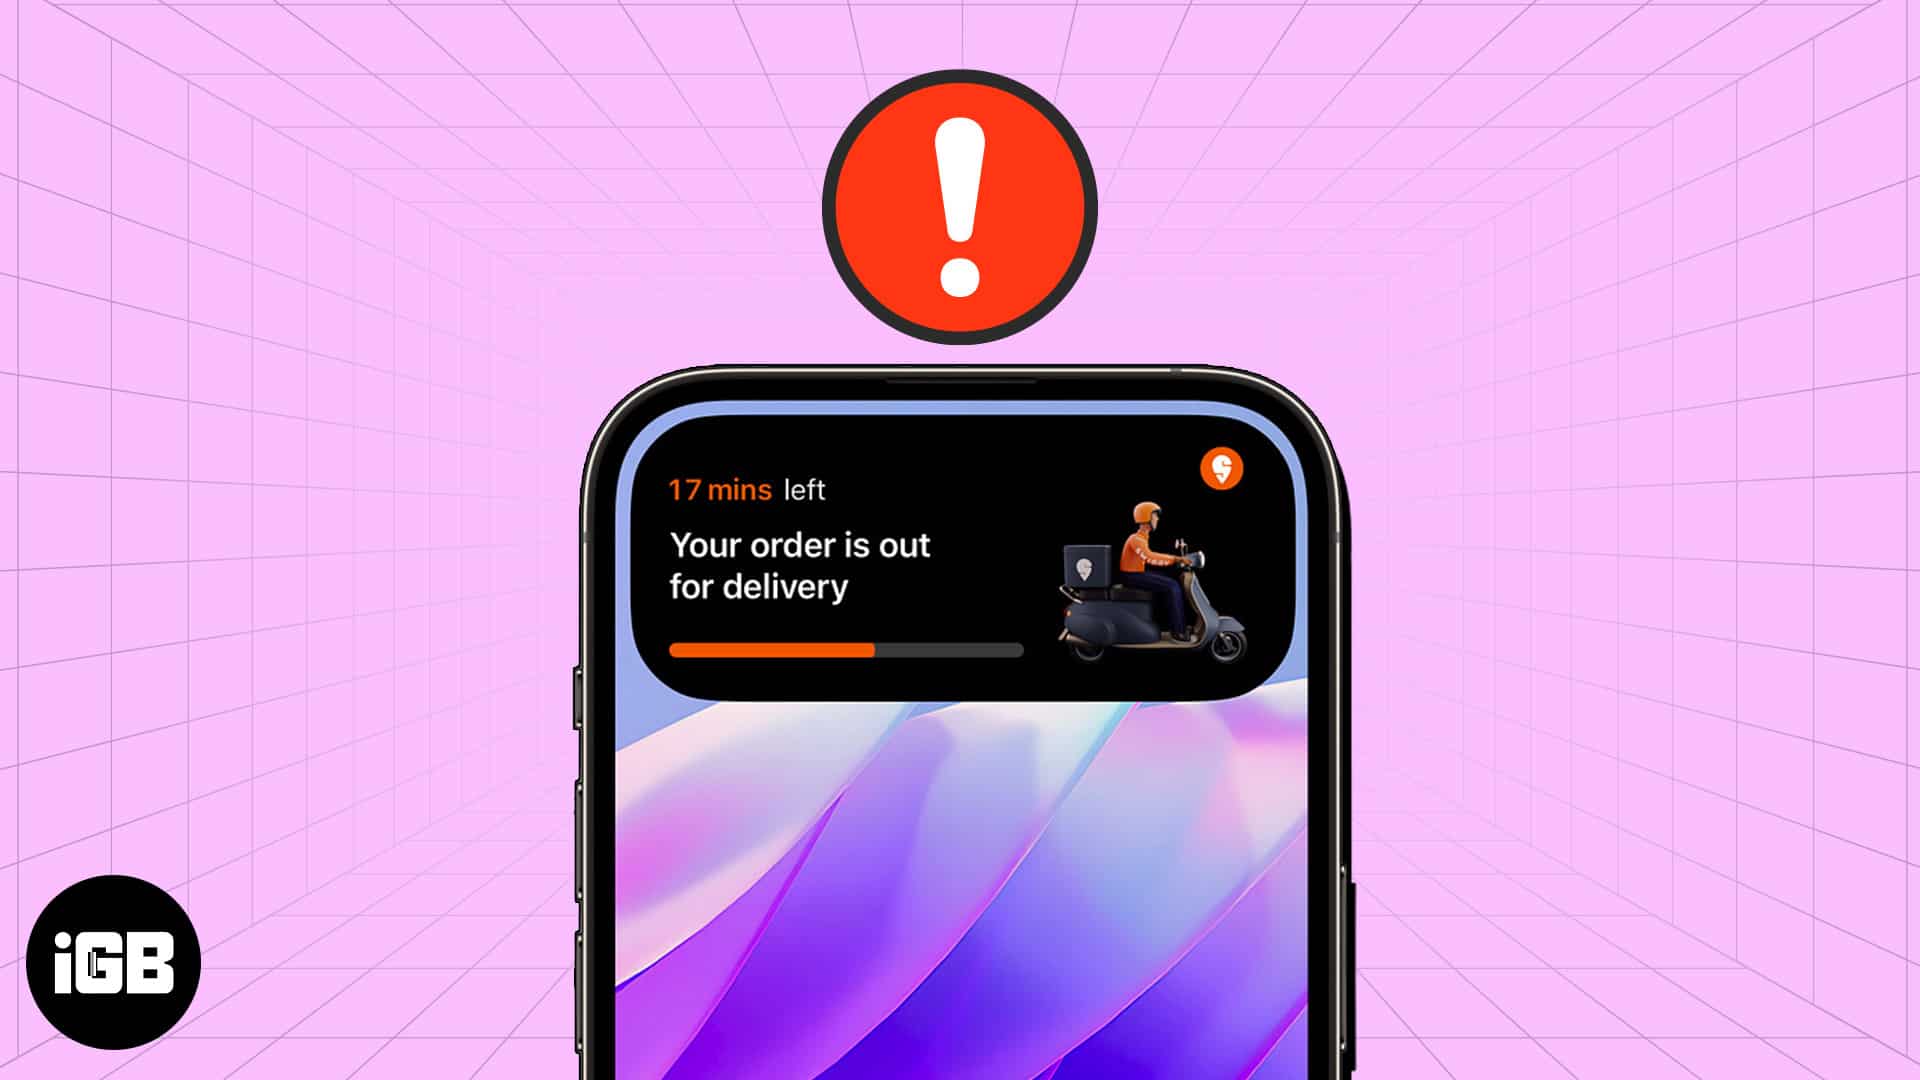
If Live Activities is not working on your iPhone, it can be quite frustrating because you won’t be able to see info from apps on your Lock Screen or Dynamic Island. Let’s troubleshoot and find out how to fix Live Activities so that you can continue enjoying the feature.
Table of Contents
- Why is Live Activities not working on my iPhone?
- 10 ways to fix Live Activities not working on iPhone
- Check if the app supports Live Activities
- Disable and re-enable Live Activities
- Enable Live Activities for the app facing issues
- Check for network issues
- Check if notifications for the app are enabled
- Ensure that Location Services for the app are enabled
- Turn on Background App Refresh for the app
- Disable Low Power and Low Data Mode
- Force restart your iPhone
- Reset All Settings
Why is Live Activities not working on my iPhone?
There are several reasons why Live Activities may not show up on your iPhone. The most common causes are as follows:
- Maybe the app you’re currently using doesn’t support Live Activities
- You may not have enabled Live Activities in settings or specifically for the app you’re using
- Some iOS glitches may be interfering
- Maybe you have a poor network connection
- Location services might be disabled and interfering with Live Activities
- Low Power mode and/or Low Data mode may be enabled on your iPhone
10 ways to fix Live Activities not working on iPhone
Whatever the reason, follow the steps below to quickly fix Live Activities on your iPhone.
1. Check if the app supports Live Activities
You can use Live Activities across many popular apps. However, it’s possible that certain apps might not support it. Therefore, when Live Activities is not working on your iPhone, the first thing to do is check whether the app you’re using supports the feature. You can do this by reading through the app’s features on its App Store page or official website.
Also, make sure to update the app so that you always have access to the latest features. If the app doesn’t yet support Live Activities, you can only try an alternative app that does.
If you verify that the app supports Live Activities but it’s not working as expected, try the solutions listed below.
2. Disable and re-enable Live Activities
The Live Activities feature is enabled by default on all iPhones running iOS 16 and later. However, you might have accidentally turned it off, so it’s worth checking if the feature is enabled. Follow the steps below.
- Open the Settings app on your iPhone.
- Scroll down and choose Face ID & Passcode.
- Enter your iPhone’s passcode.
- Scroll down and toggle on Live Activities.
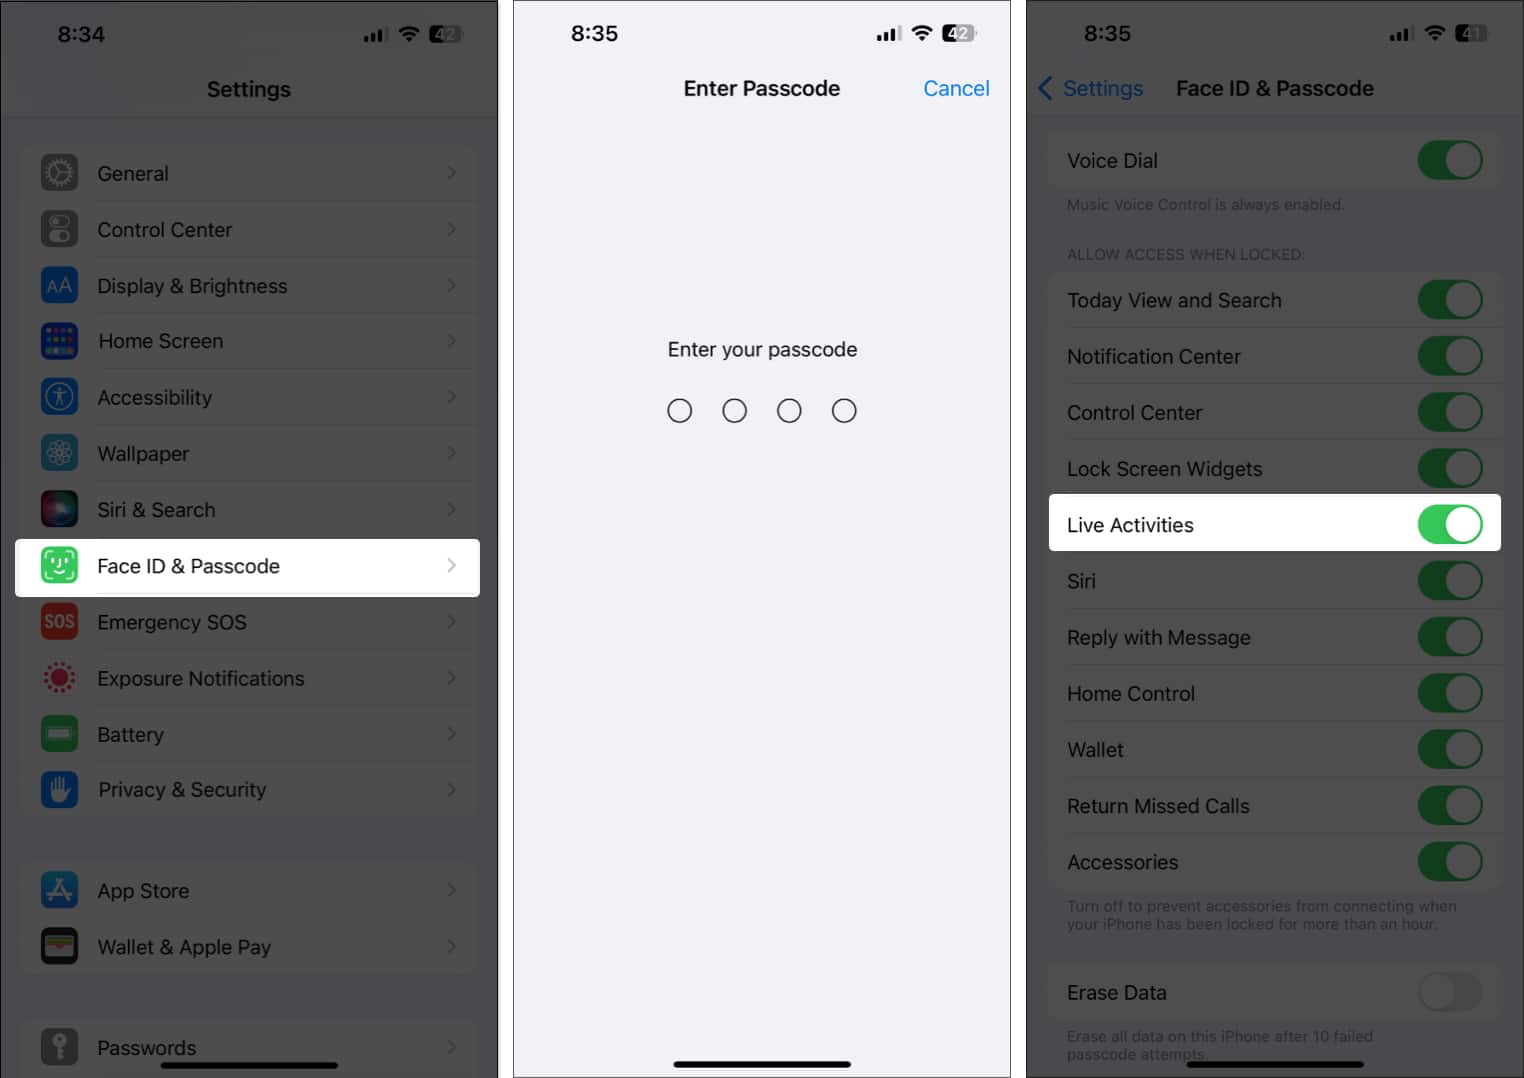
If it’s already toggled on, you can toggle it off, wait a few moments, and then turn it back on again to clear any glitches. If it still doesn’t function as expected, move on to the next solutions described below.
3. Enable Live Activities for the app facing issues
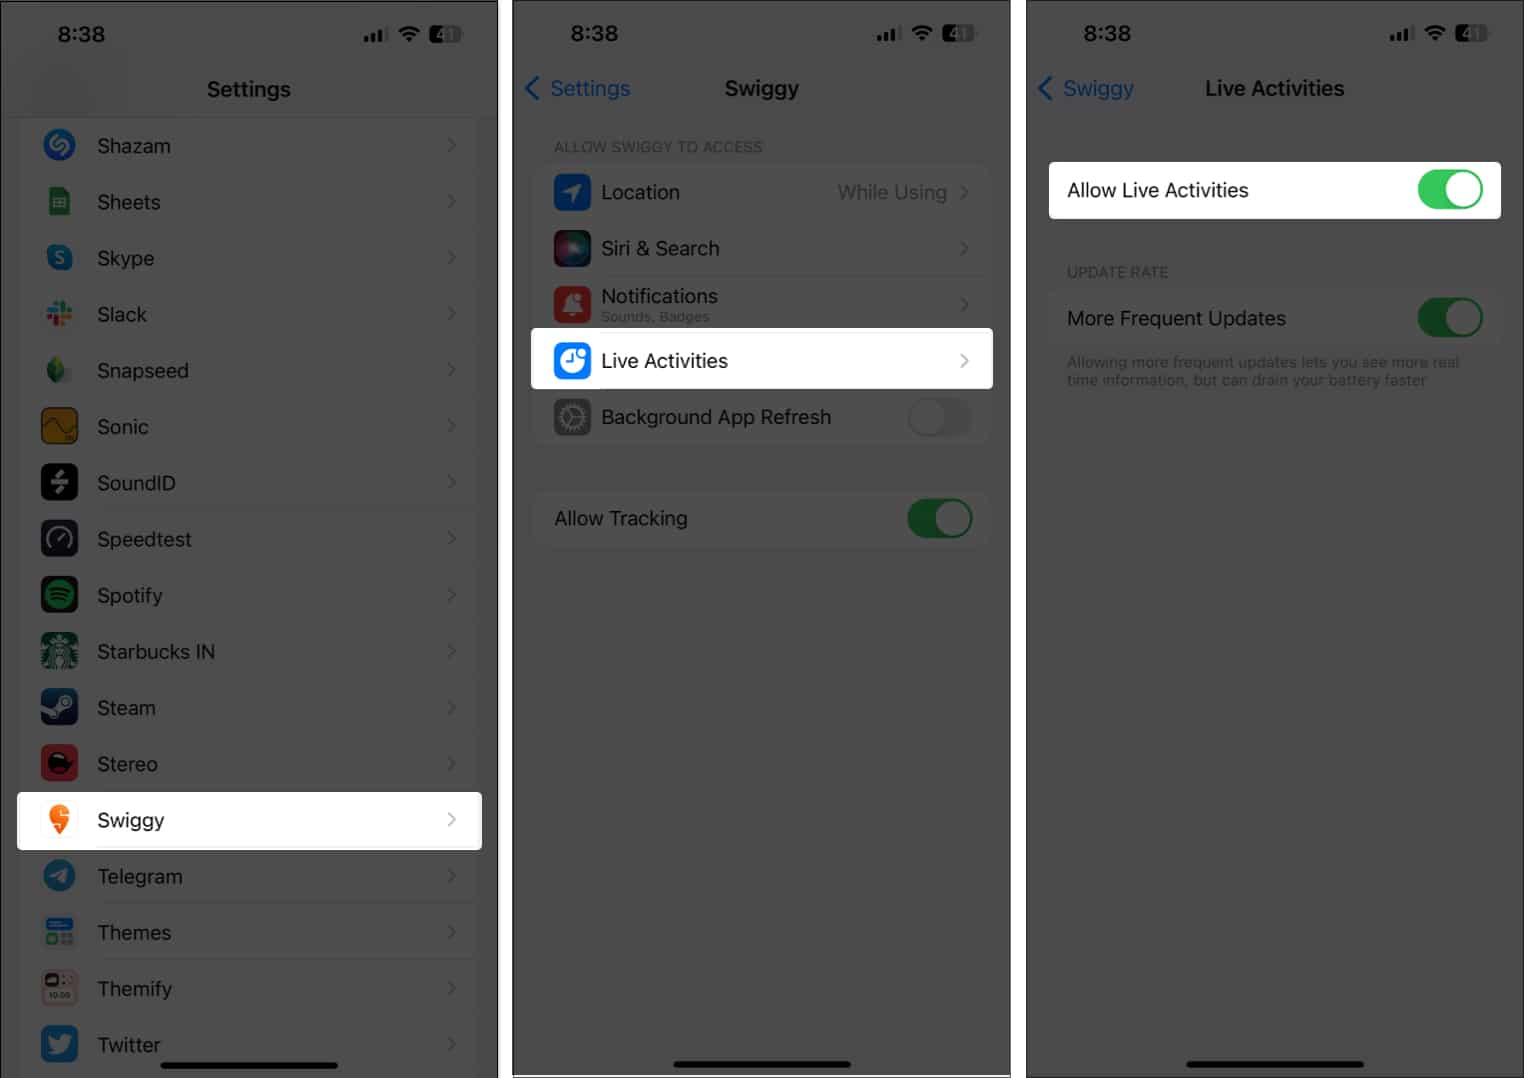
Many apps need you to manually enable the Live Activities feature and grant necessary permissions. You can do this for specific apps using the following method.
- Go to Settings and select Apps.
- Select the app that you want to use Live Activities with.
For instance, I selected a food delivery app called Swiggy. - Select Live Activities.
- Toggle ON Allow Live Activities.
- You can also enable More Frequent Updates to get real-time minute-by-minute details on the Live Activities banner.
4. Check for network issues
Live Activities requires a stable network connection to function effectively. Therefore, if you’re facing any connectivity issues, Live Activities may not work on your iPhone. Ensure you’re connected to a strong Wi-Fi or cellular network.
You can open a video streaming app such as YouTube and check if you’re able to play videos smoothly. If not, your network signal may not be strong enough. You can toggle ON and then toggle OFF Airplane Mode to see if it improves the network connection.
Become an iGeeksBlog Premium member and access our content ad-free with additional perks.
5. Check if notifications for the app are enabled
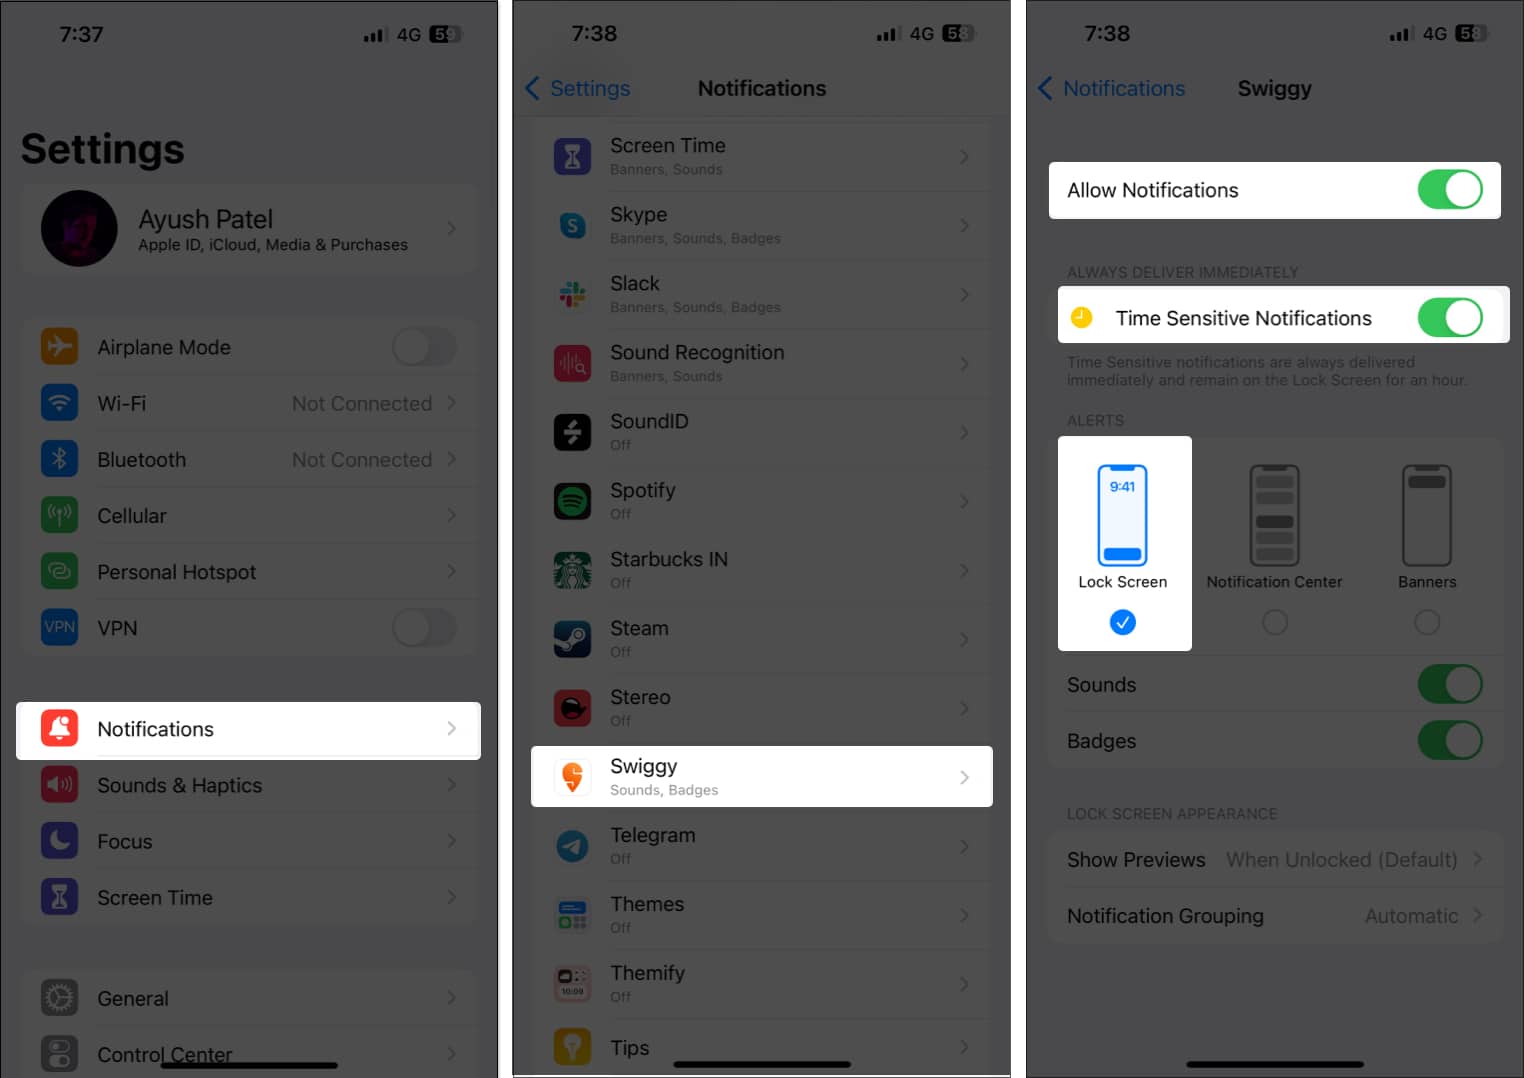
For Live Activities to work, notifications need to appear on your iPhone’s lock screen. Follow the steps below to check if notifications for the app in question are enabled.
- Go to Settings → Notifications.
- Select the app that’s facing issues.
- Toggle on Allow Notifications and Time Sensitive Notifications.
- Then, select the option for Lock Screen alerts.
6. Ensure that Location Services for the app are enabled
Some apps that support Live Activities may require access to your iPhone’s Location Services to work as expected. This includes apps such as food delivery or ride-sharing apps. Follow the steps below to ensure an app has access to Location Services on your iPhone.
- Go to Settings → Scroll down and select Privacy & Security.
- Tap Location Services.
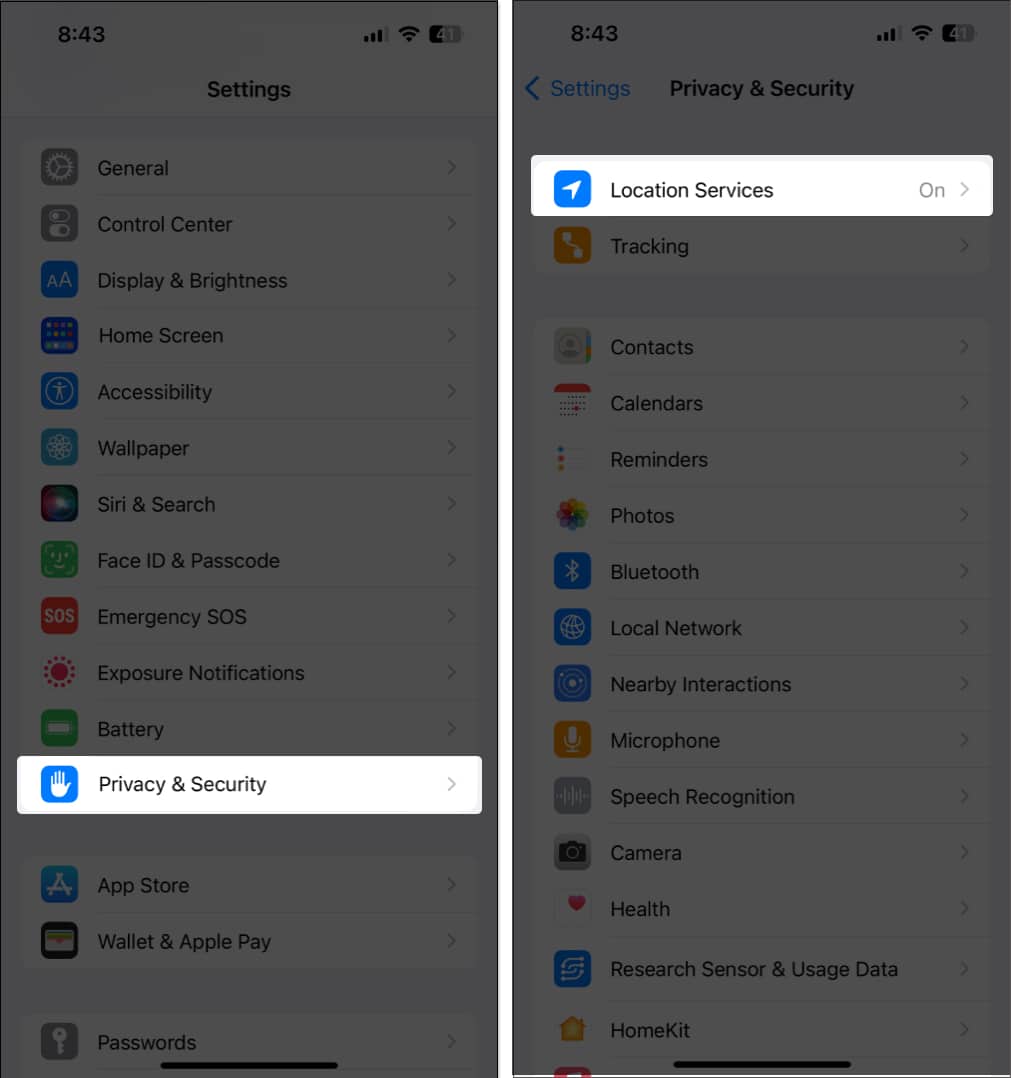
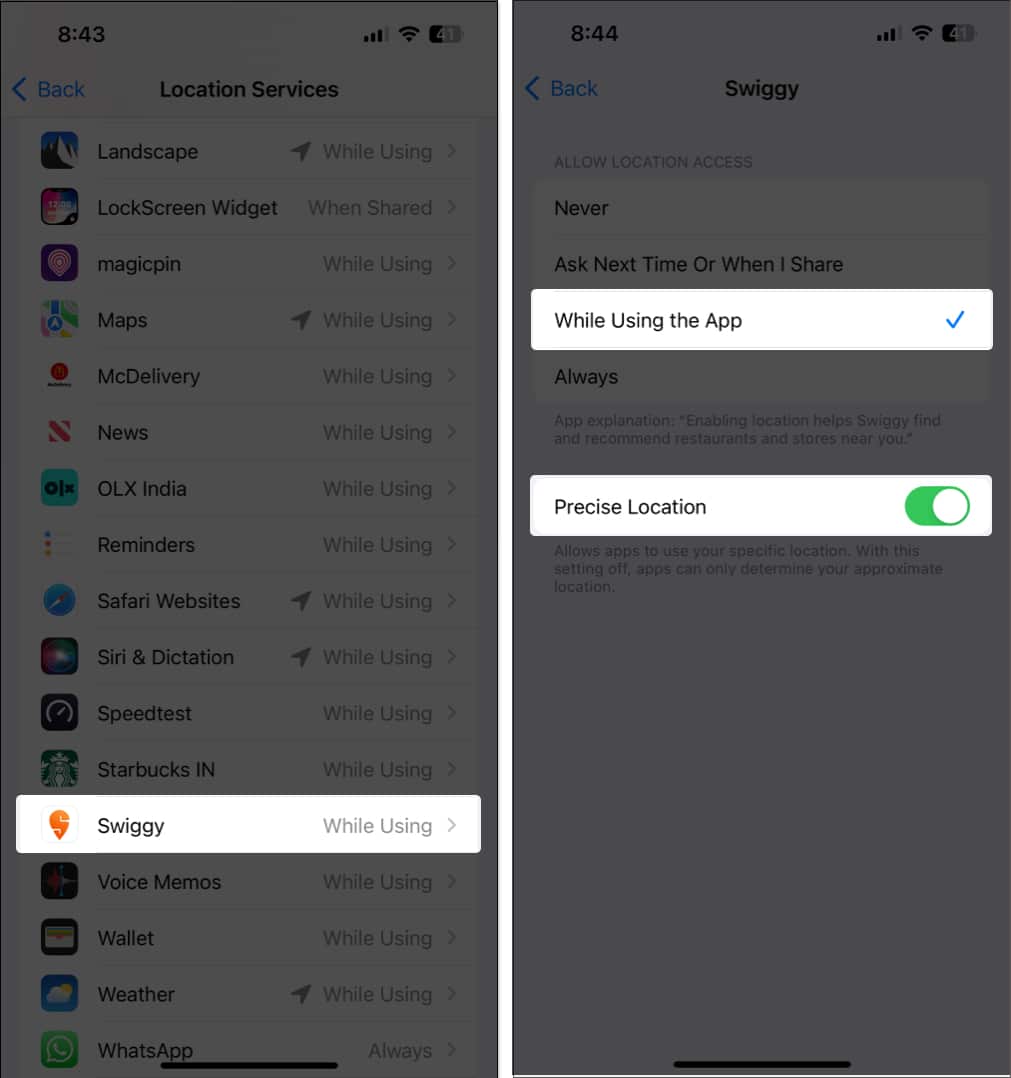
- Select the app that is facing issues.
- Ensure that the While Using the App option is selected. Then, toggle on Precise Location.
7. Turn on Background App Refresh for the app
For Live Activities to work, you must keep the app running in the background—do not force close it from the App Switcher screen. At the same time, you must turn Background App Refresh on to ensure that the app can fetch the latest data.
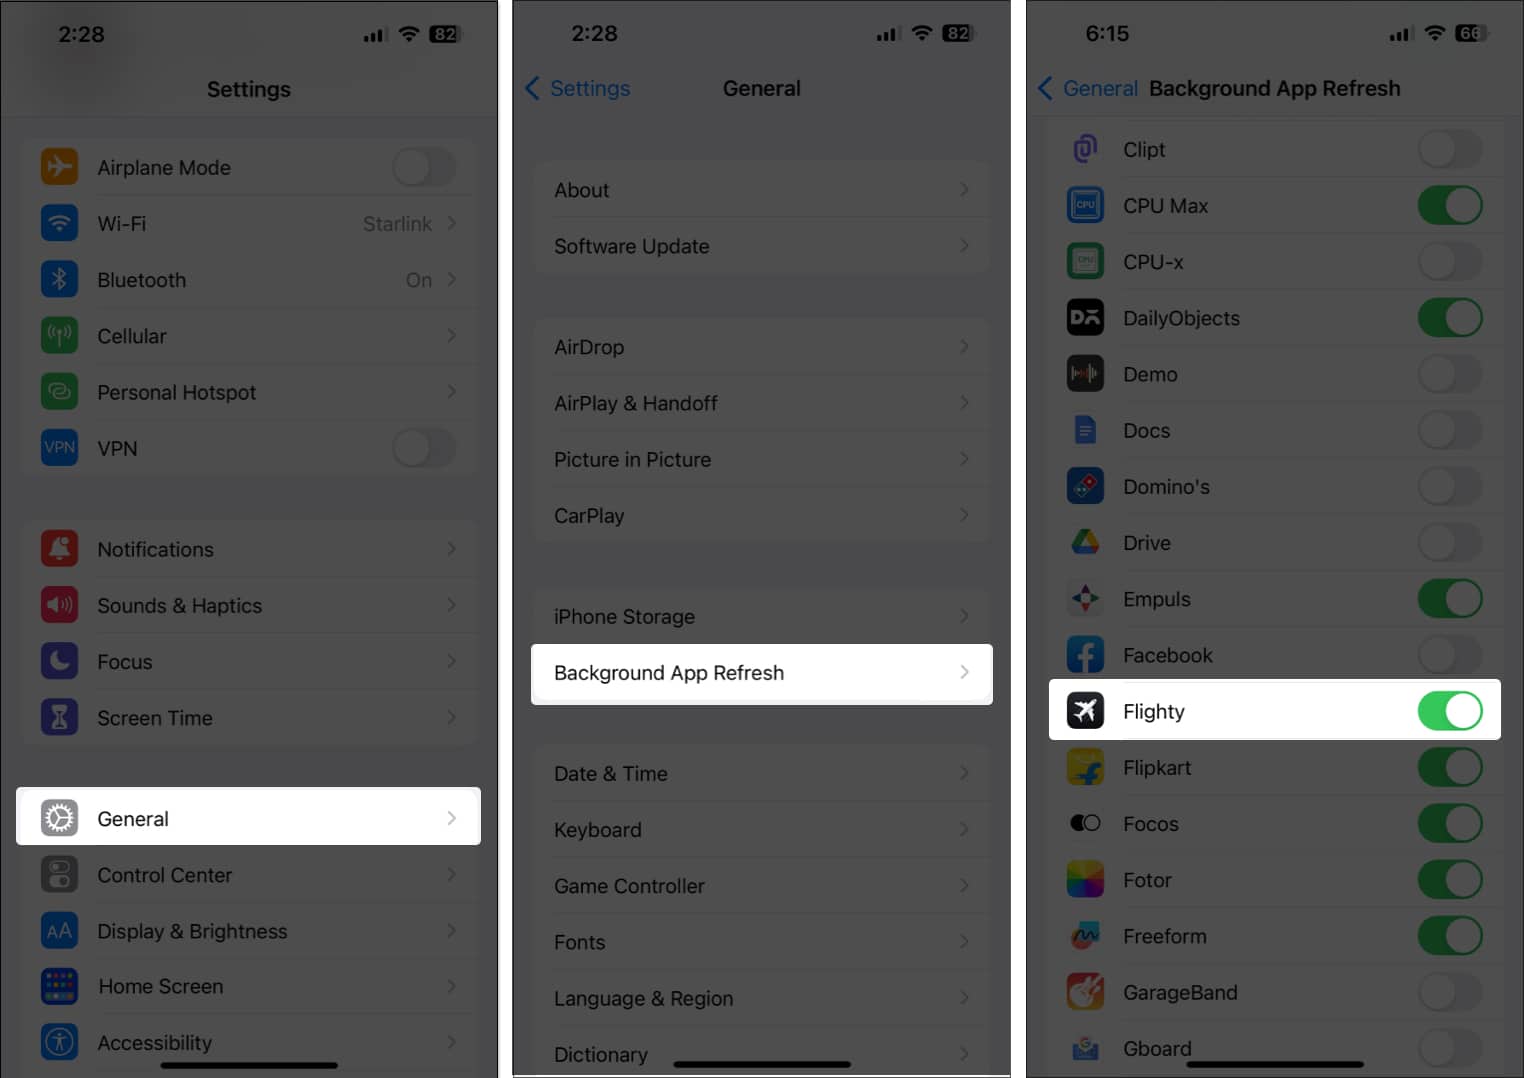
- Go to Settings → General.
- Select Background App Refresh.
- Toggle on the app in question.
8. Disable Low Power and Low Data Mode
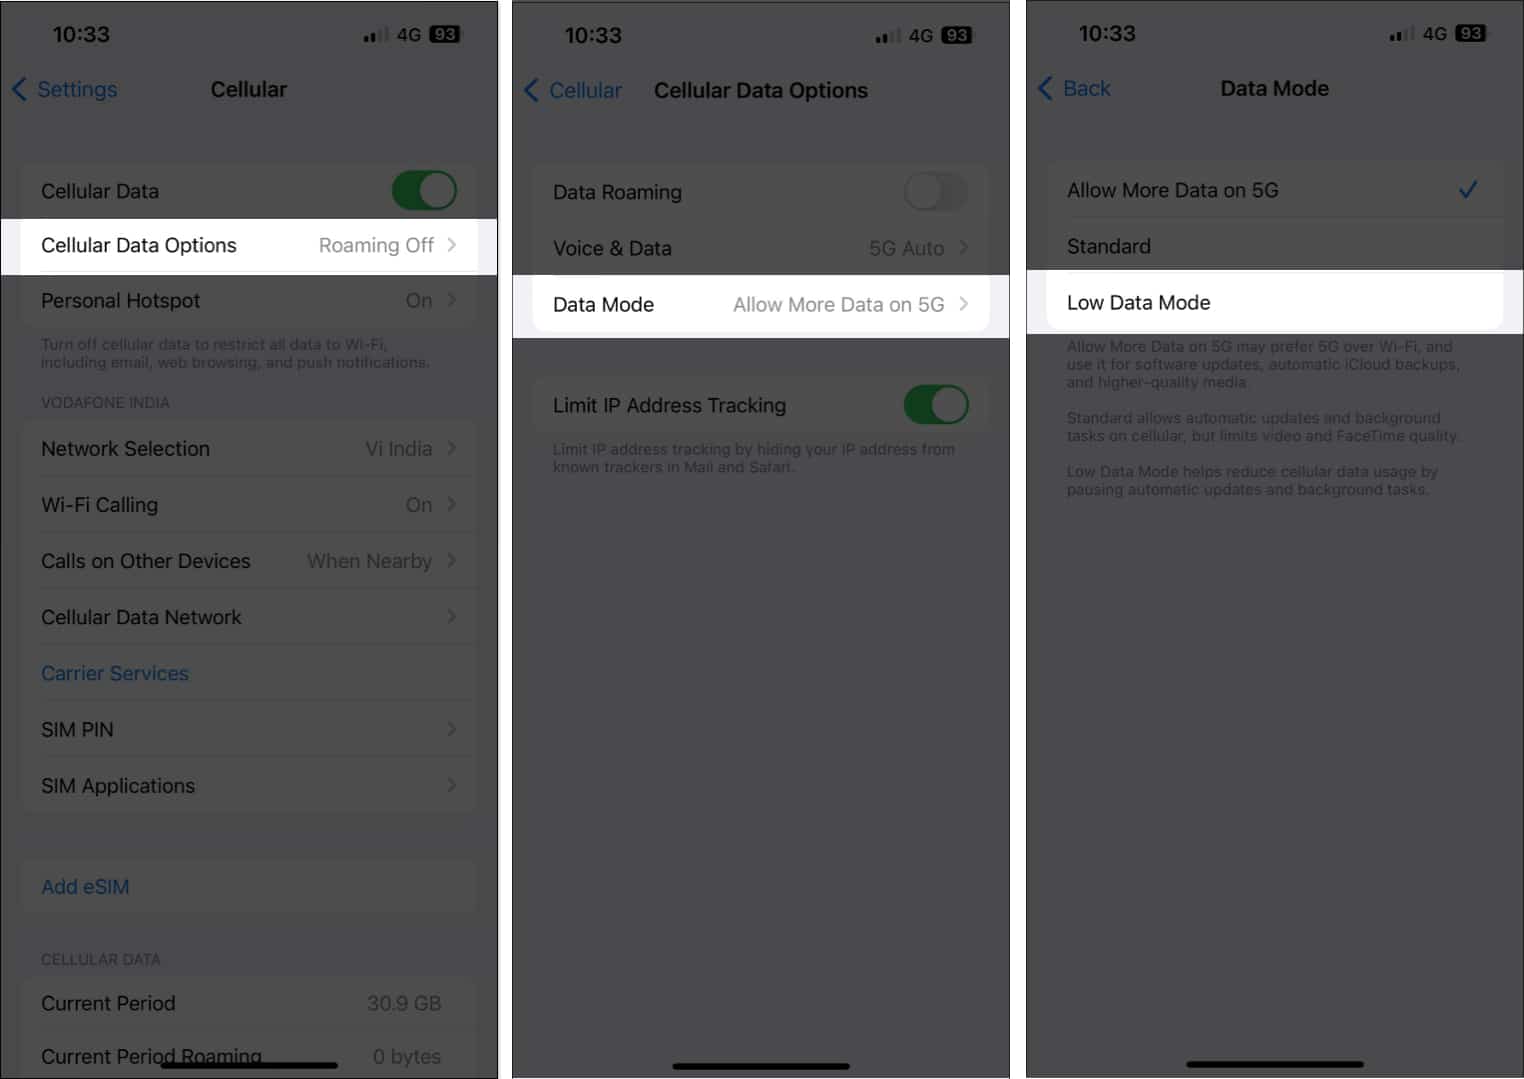
While using Low Power and Low Data Mode can help reduce your iPhone’s battery and cellular data consumption, it can also stop some features from functioning as usual. This includes the Live Activities feature. Therefore, follow the steps below to disable Low Power and Low Data modes.
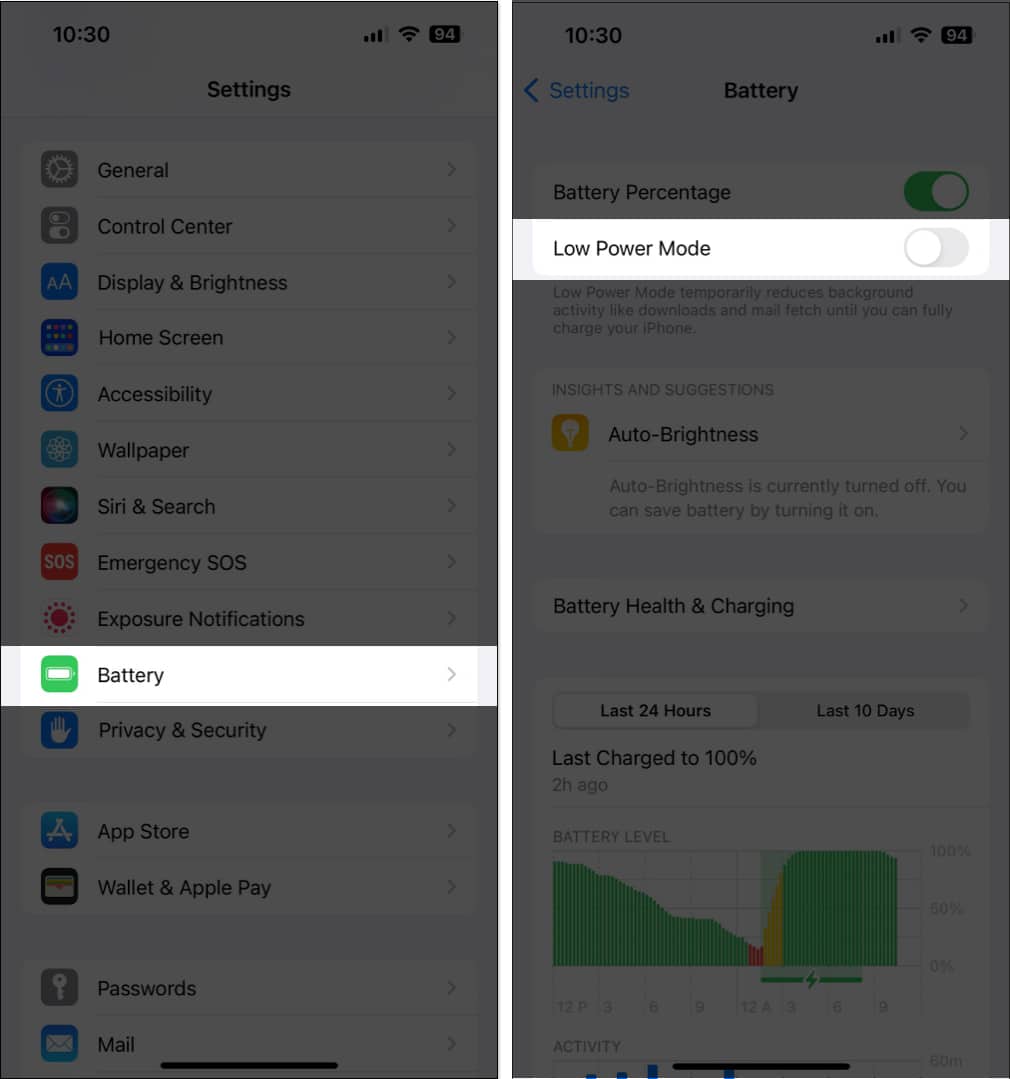
- Go to Settings → Battery.
- Toggle off Low Power Mode.
- Then, go back to Settings → Cellular → Cellular Data Options.
- Tap Data Mode.
- Deselect Low Data Mode. Select any of the other options.
9. Force restart your iPhone
If none of the solutions given above have worked, you can force restart your iPhone to resolve any temporary software glitches that may be interfering with Live Activities.
- Press and quickly release the Volume Up button on the left side of the device.
- Now, quickly press and release the Volume Down button.
- On the device’s right side, press and hold the Side button.
- Release when you see the Apple logo appear on the screen.
10. Reset All Settings
If Lve Activities does not work even after a force restart, the last option is to reset all settings on your iPhone.
This action will restore all settings to the default, but it will not affect your photos or other data on your device.
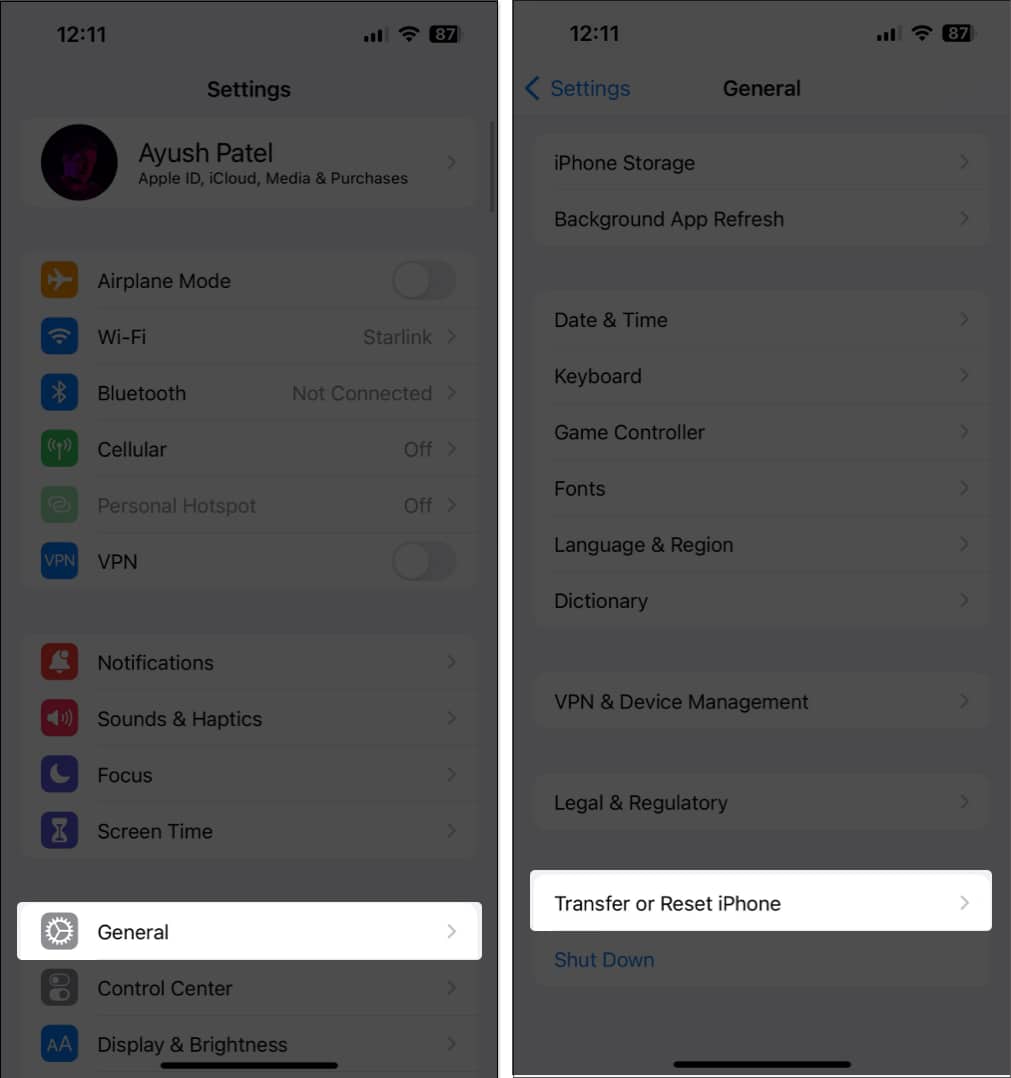
- Go to Settings → General → Transfer or Reset iPhone.
- Tap Reset → Reset All Settings.
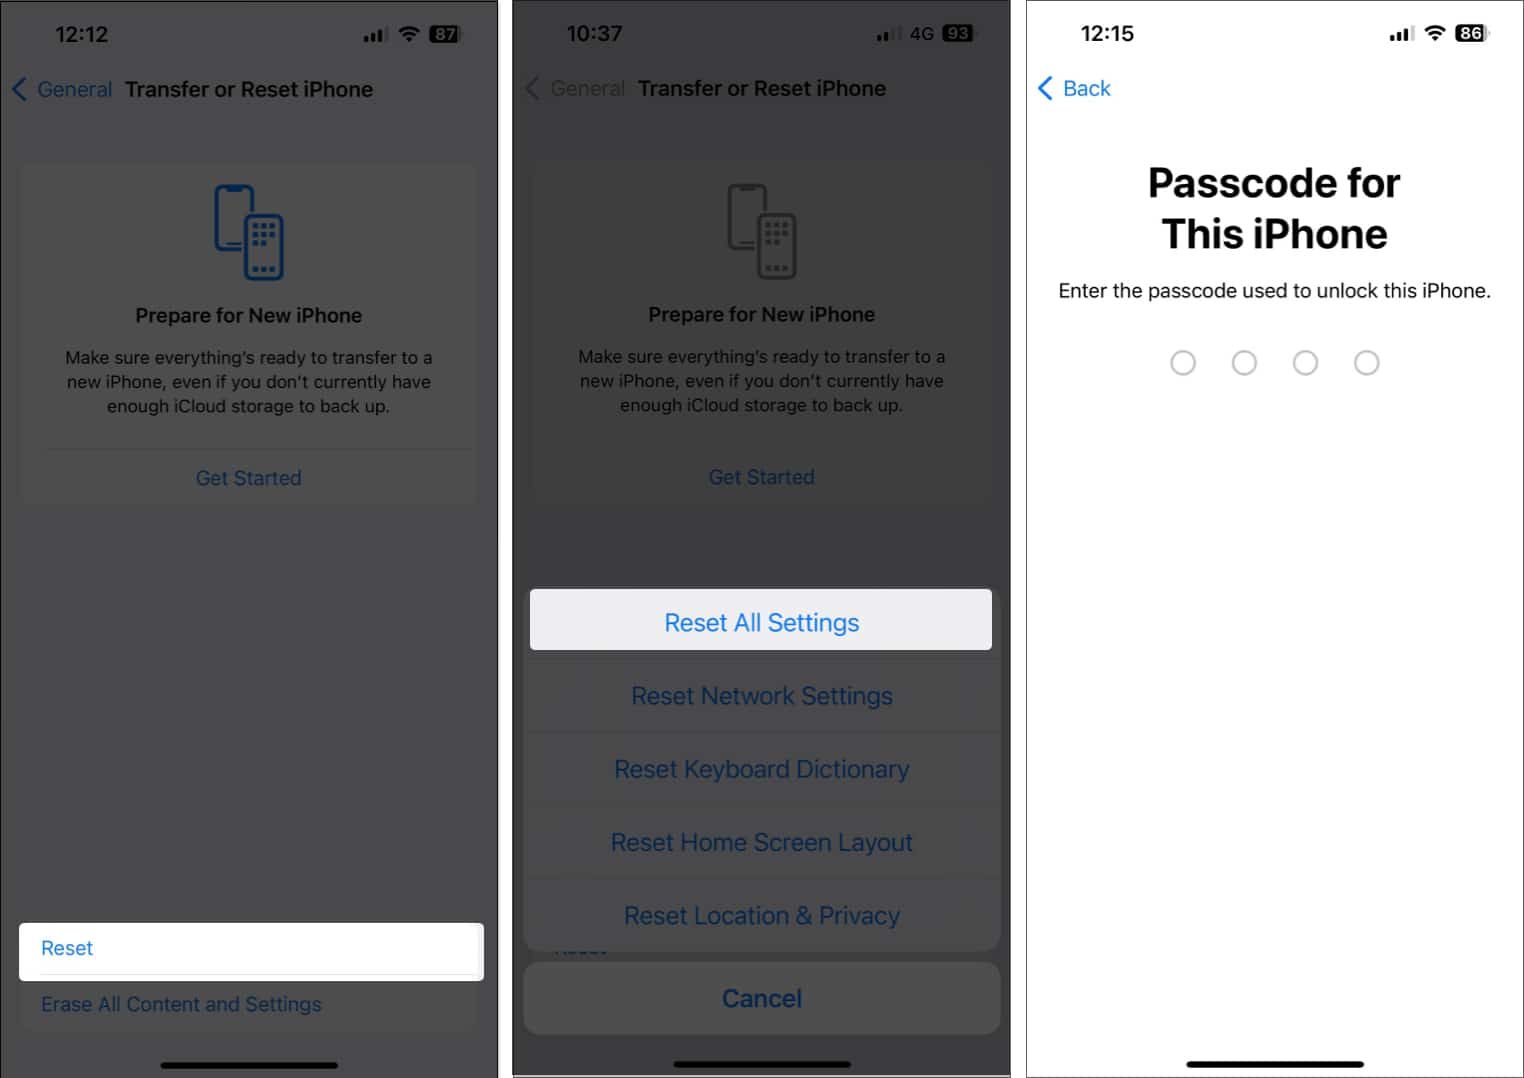
- Enter your passcode.
- Tap Reset All Settings again to complete the process.
Signing off
I hope this has helped you fix Live Activities on your iPhone. If you continue to face issues, you might need to factory reset your iPhone. Alternatively, you can contact Apple Support for assistance. Let me know in the comments below if you have any further questions.
Read more:
