Notifications not working on your iPhone after the latest iOS 18 update? This is one of those annoying yet common issues that can occur after a new software release. I know it can be frustrating to miss notifications on your lock screen containing important updates or reminders, but don’t worry. Keep reading below to know some easy but effective solutions , if you are not getting notifications on your iPhone after the iOS 18 update.

Table of Contents
- Why are notifications not showing up on my iPhone after iOS 18 update?
- How to fix iPhone notifications not working
- 1. Check app notification settings
- 2. Check in-app notification settings
- 3. Enable Notification Center on Lock Screen
- 4. Restart your iPhone
- 5. Ensure Focus Mode is turned off
- 6. Turn off Share Across Devices
- 7. Turn off Notification summary
- 8. Enable Background App refresh
- 9. Turn off Low Power and Low Data Mode on iPhone
- 10. Wait for the latest iOS update
- Video: How to fix notifications not working on iPhone
Why are notifications not showing up on my iPhone after iOS 18 update?
Before we get into troubleshooting, let me clarify why you might not be receiving notifications after the iOS 18 update.
Your iPhone may not be lighting up despite notifications being turned on because new software updates are usually a bit unstable. They may have bugs or glitches that cause issues, like notifications not showing up. Subsequent updates usually fix this as the iOS version improves and stabilizes.
However, in the meantime, try the steps below to get notifications working again on your iPhone.
How to fix iPhone notifications not working
If notifications are not showing up on your iPhone, here are some reliable solutions to fix this issue on iOS 17 or iOS 18.
1. Check app notification settings
If you’re not seeing notifications from specific apps on your iPhone, it’s possible that you haven’t allowed the app to send you notifications. Check this as follows:
- Go to Settings → Notifications and select the app that you’re missing notifications from.
- Toggle on Allow Notifications.
- You can choose the banner style you want and toggle on Sound.
- Also, ensure that the Lock Screen option is ticked if you want to get notifications on your lock screen.
You can repeat this for individual apps to ensure that you get notifications.
2. Check in-app notification settings
In addition to the above, you can also check notification settings within specific apps from which you wish to receive notifications.
For instance, for WhatsApp, go to Settings → Notifications and adjust settings as per your preference.
The same can be done in other apps too.
3. Enable Notification Center on Lock Screen
If you’re not seeing notifications on your iPhone lock screen, you might have disabled the Notification Center on the lock screen. Enable this with the steps below:
- Open the Settings app on your iPhone
- Select Face ID & Passcode
- Toggle ON Notification Center
4. Restart your iPhone
It sounds simple but many times, restarting your iPhone can fix a lot of issues. So, if your iPhone notifications aren’t working after installing iOS 18, you can restart your device to clear any temporary glitches. Here’s how:
- On iPhone 8 or newer, press and hold the volume up or volume down button on the left side and the power button on the right side until the slider appears.
- Drag the slider from right to left.
- Wait about thirty seconds, and then power on your iPhone again.
Note: In iOS 18, you can also turn off your iPhone using the power button in Control Center.
5. Ensure Focus Mode is turned off
Focus Mode can mute your notifications even when you’re not actively using it.
Check if Focus Mode is enabled if you’re not receiving notifications after updating to iOS 18. Turn it off to ensure all notifications are delivered without fail.
- Open the Control Center → Tap and hold Focus.
Focus is replaced by the name of the Focus Mode that’s active. - Select a Focus Mode you want to turn off. Once you turn off a Focus, all banners will go from white to grey.


Once you turn off Focus Mode on your iPhone, you should also turn off its automatic activation to prevent it from being enabled automatically.
Become an iGeeksBlog Premium member and access our content ad-free with additional perks.
- Open the Control Centre → Tap and hold Focus.
Focus is replaced by the name of the Focus Mode that’s active. - Tap the three-dot menu next to the Focus Mode → Select Settings.

- Select Smart Activation or Custom Schedule → Tap Delete Schedule.


Once Focus is turned off, ask someone to text you to check whether you get the notification.
One of Focus’s many great features is that it can be enabled across all Apple ecosystems. But what if you want to Focus on your Mac or iPad but not on your iPhone?
- Go to Settings → Focus.
- Toggle off the switch next to Share Across Devices.


7. Turn off Notification summary
Although the iPhone’s Scheduled Summary feature can help you manage notifications easily without getting overloaded, it can also inadvertently silence alerts you need to see immediately.
Therefore, you should check if turning off Scheduled Summary fixes your iOS 18 notifications.
- Go to Settings → Notifications.
- Tap Scheduled Summary.
- Toggle off Schedule Summary.


8. Enable Background App refresh
If background app refresh is disabled for an app, it might be unable to deliver notifications.
Many iPhone apps rely on background app refresh to stay up-to-date and deliver timely notifications. So, do the following to check if this setting is enabled:
- Locate and open the Settings app on your iPhone or iPad.
- Navigate to General → Background App Refresh.

- Tap Background App Refresh → Select Wi-Fi & Cellular Data.
- Go Back and enable the toggle next to the apps you use.


9. Turn off Low Power and Low Data Mode on iPhone
While these modes are useful, they are known to restrict background app refresh on your iPhone. This can cause notifications to be delayed or not delivered.
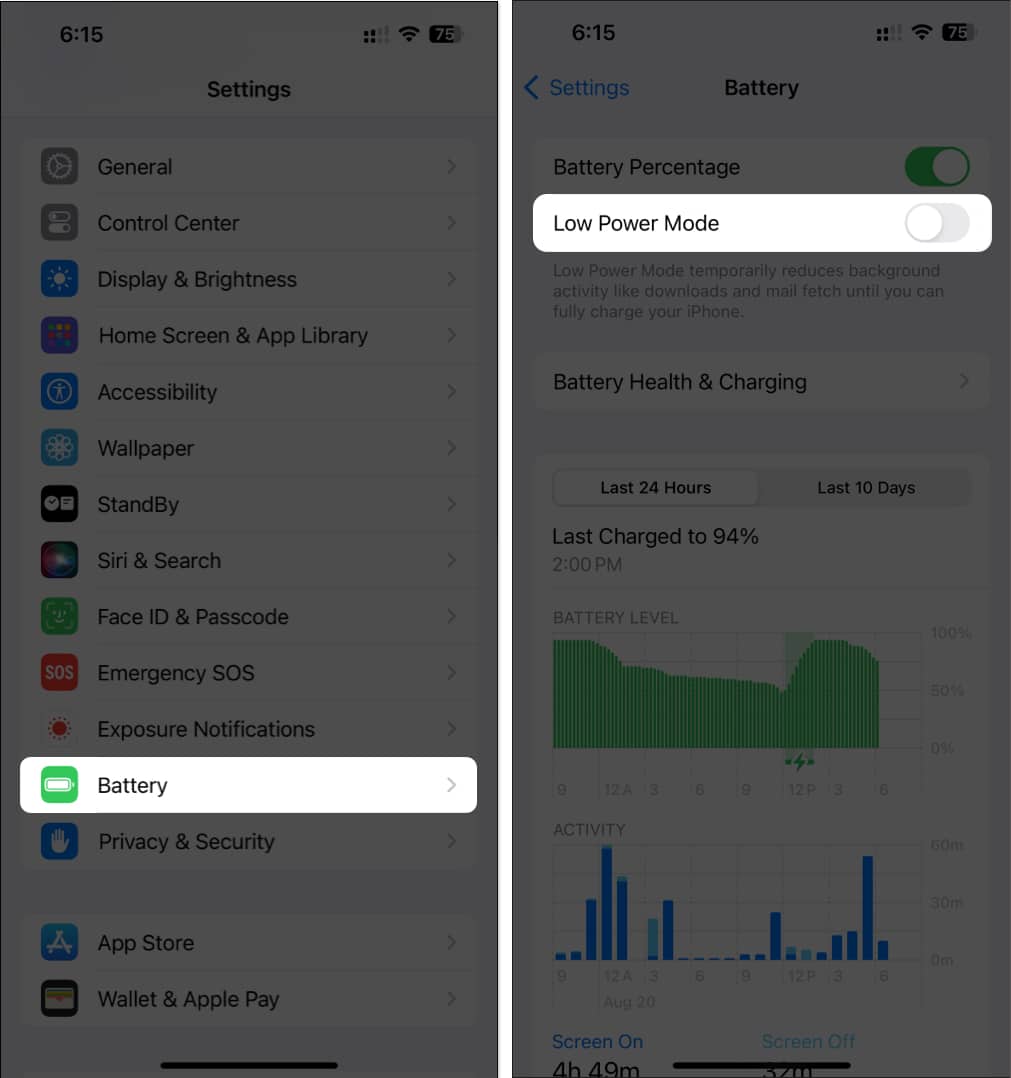
- To toggle off Low Power Mode:
- Go to Settings → Battery → Toggle off Low Power Mode.
- Go to Settings → Battery → Toggle off Low Power Mode.
- To toggle off Low Data Mode for Cellular:
- Go to Settings → Cellular → Cellular Data Options.
If you use dual SIMs, select a SIM to locate Cellular Data Options.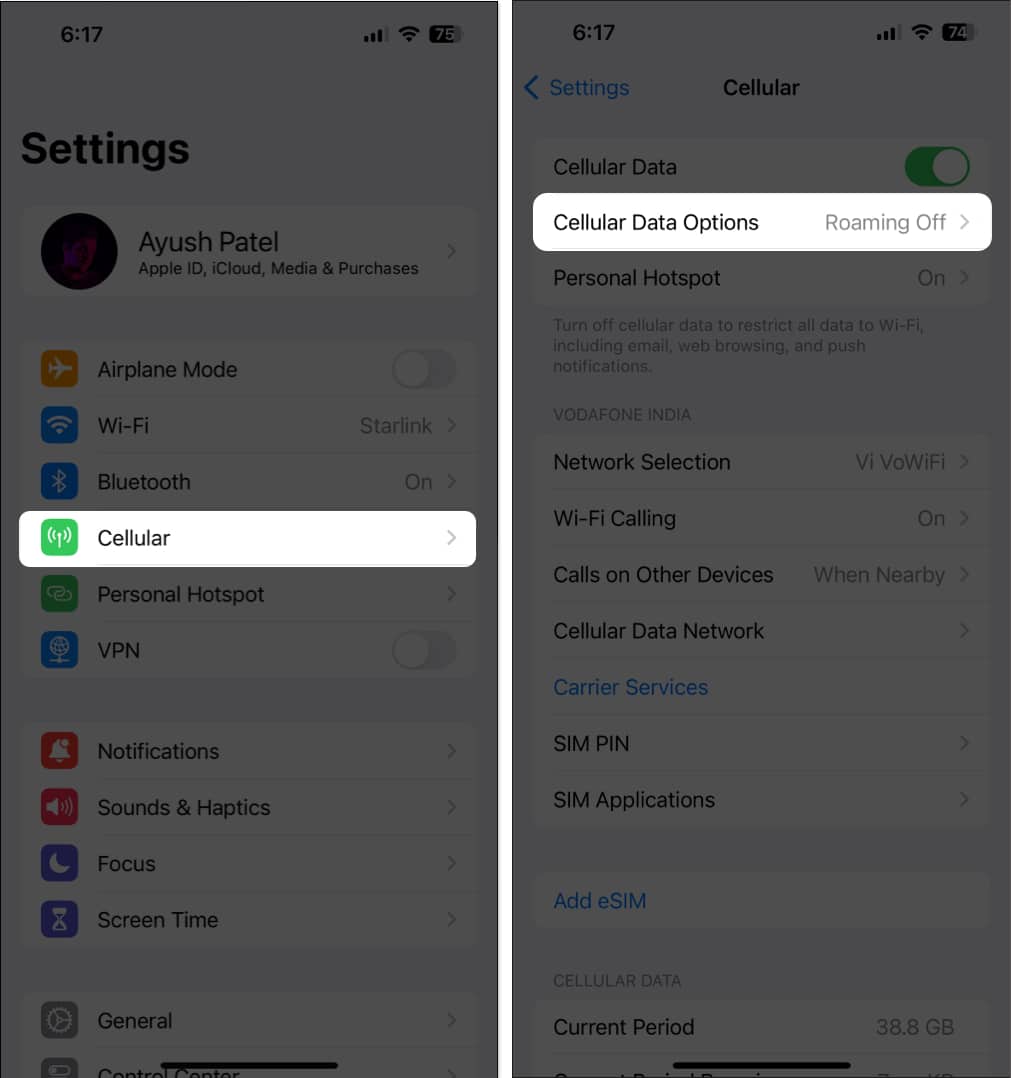
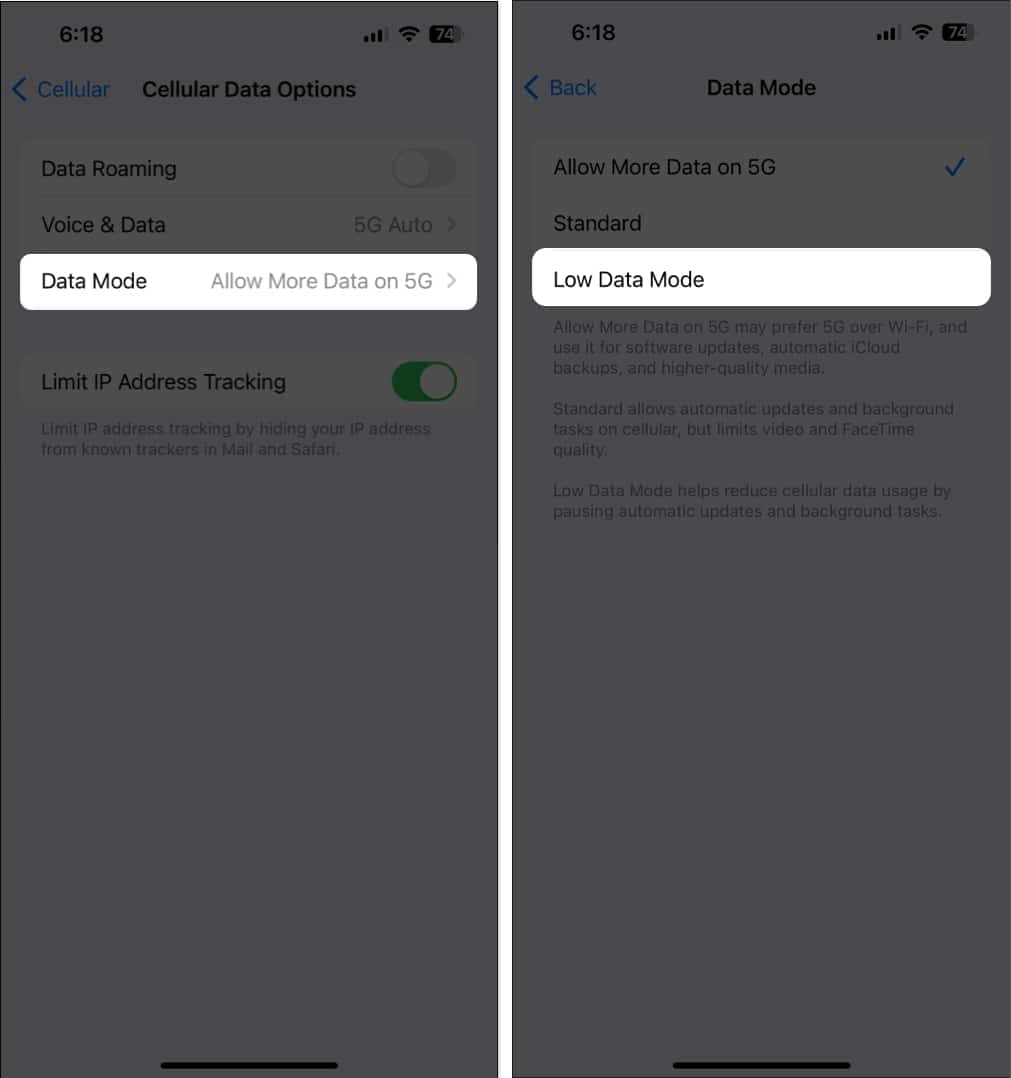
- Tap Data Mode → Deselect Low Data Mode.
- Go to Settings → Cellular → Cellular Data Options.
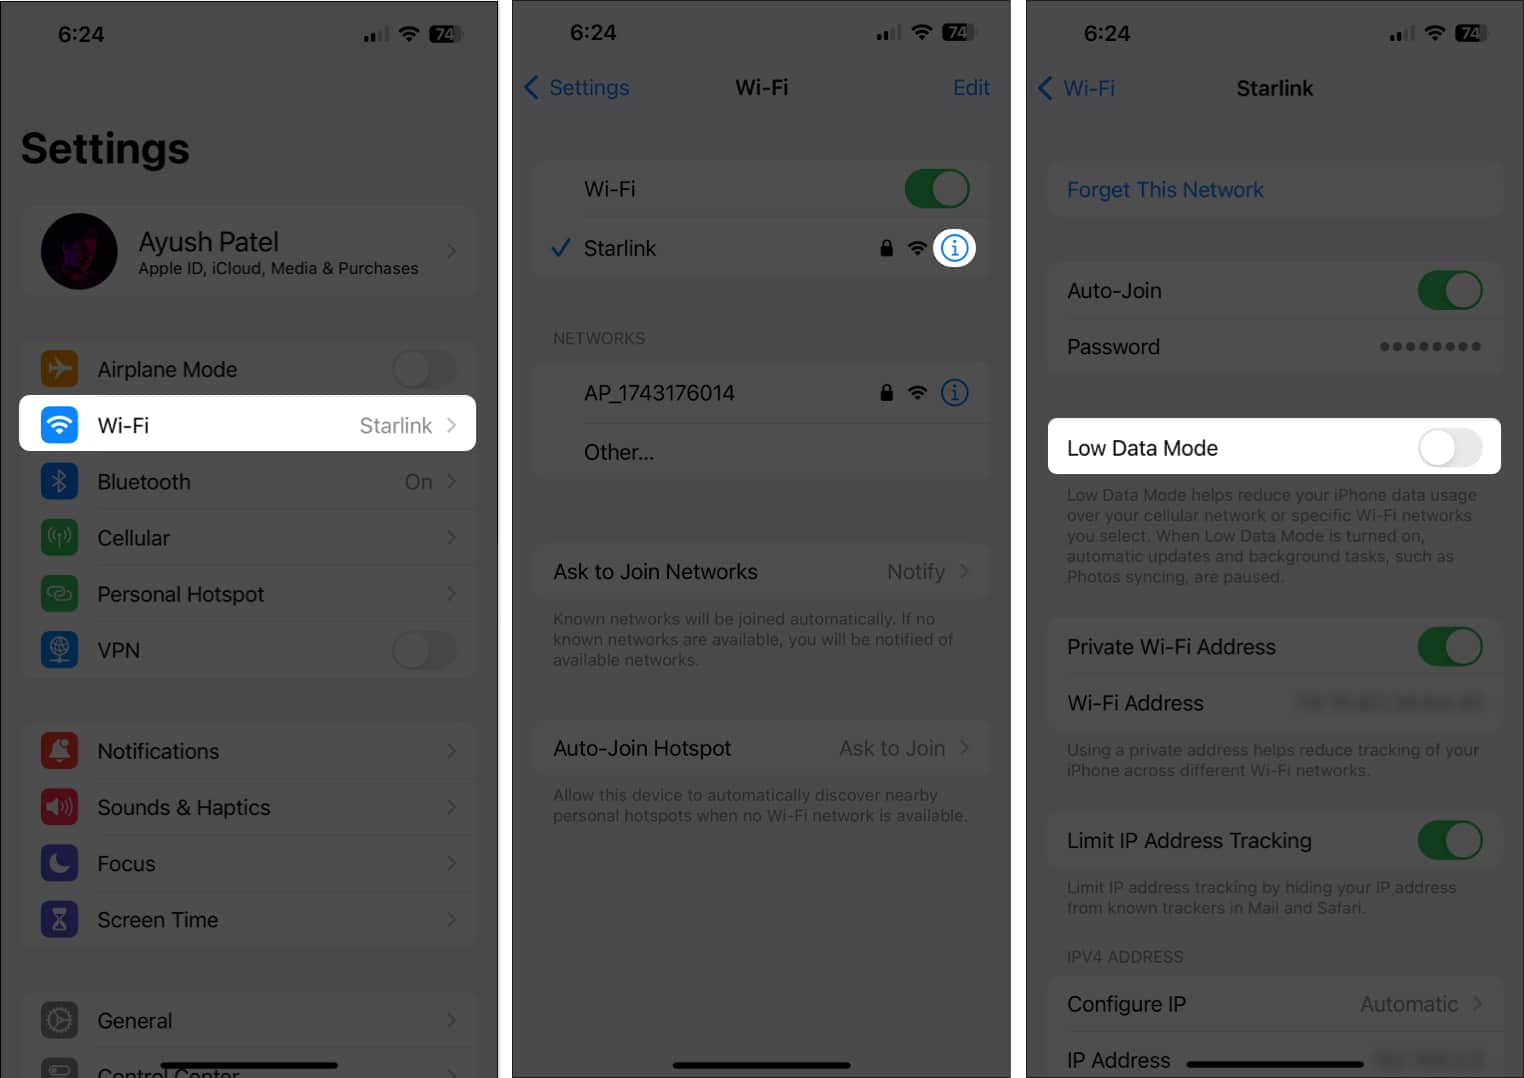
- To disable Low Data Mode for Wi-Fi:
- Navigate to Settings → Wi-Fi.
- Tap the blue ‘i’ icon next to a network → Turn off Low Data Mode.


10. Wait for the latest iOS update
If you’ve tried all the steps above and still don’t get notifications on your iPhone, it’s almost certainly a software glitch in iOS that will be fixed through an update. Therefore, ensure that your iPhone always has the latest version of iOS. This ensures you have the latest bug fixes and other refinements.
- Navigate to Settings → General → Software Update.
- Tap Update Now if a software update is available.
Video: How to fix notifications not working on iPhone
Wrapping up…
I hope I’ve helped you fix the issue of notifications not working after updating to iOS 18. Let me know if you have any questions in the comments below.
Read More: