Feeling lost? Don’t fret! Sending your location in iMessage is a breeze; no third-party apps are needed. Whether it’s a new city adventure or a safety precaution, sharing your whereabouts is just a few taps away with your iPhone, iPad, or Mac. This guide dives into the simple steps for sharing location in iMessage from iPhone, iPad, and Mac. So, relax, share, and enjoy the journey!
- How to enable Location Services for iMessage on iPhone, iPad, and Mac
- How to share live location in iMessage on iPhone and Mac
- How to share and update location in iMessage
- How to request someone else’s location in iMessage on iPhone and Mac
- How to stop sharing your location in iMessage on iPhone and iPad
How to enable Location Services for iMessage on iPhone, iPad, and Mac
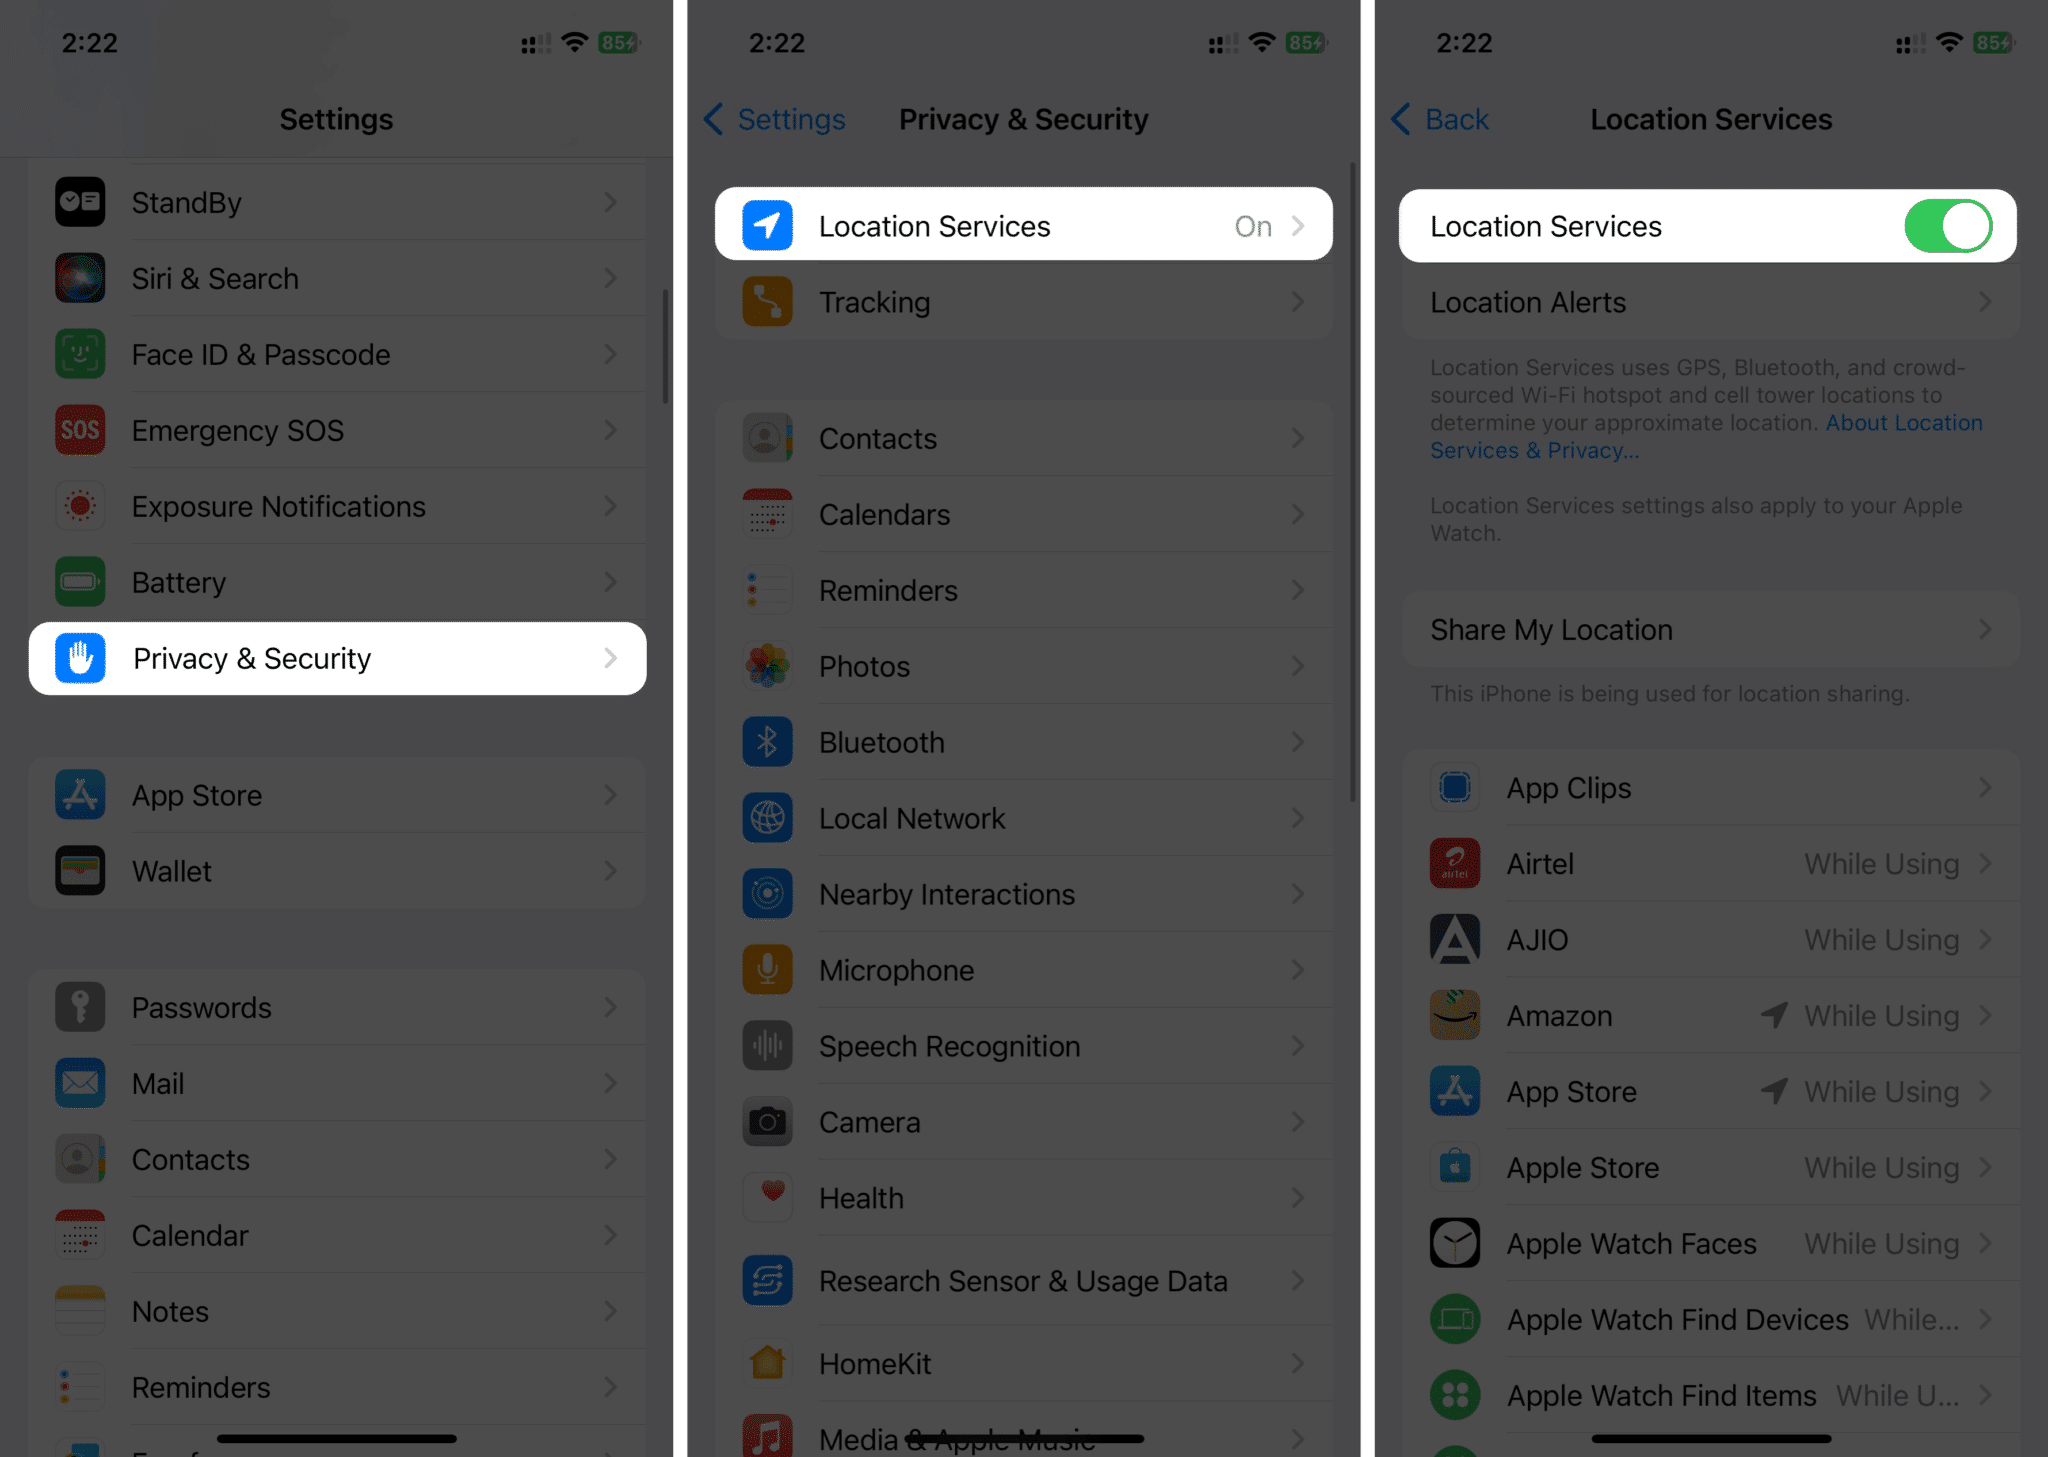
To send your location on iMessage, you’ll need to enable Location Services. If you don’t know how to do it, follow the instructions below:
On iPhone and iPad:
- Open the Settings app.
- Navigate to Privacy & Security → Location Services.
- Enable the Location Services option.
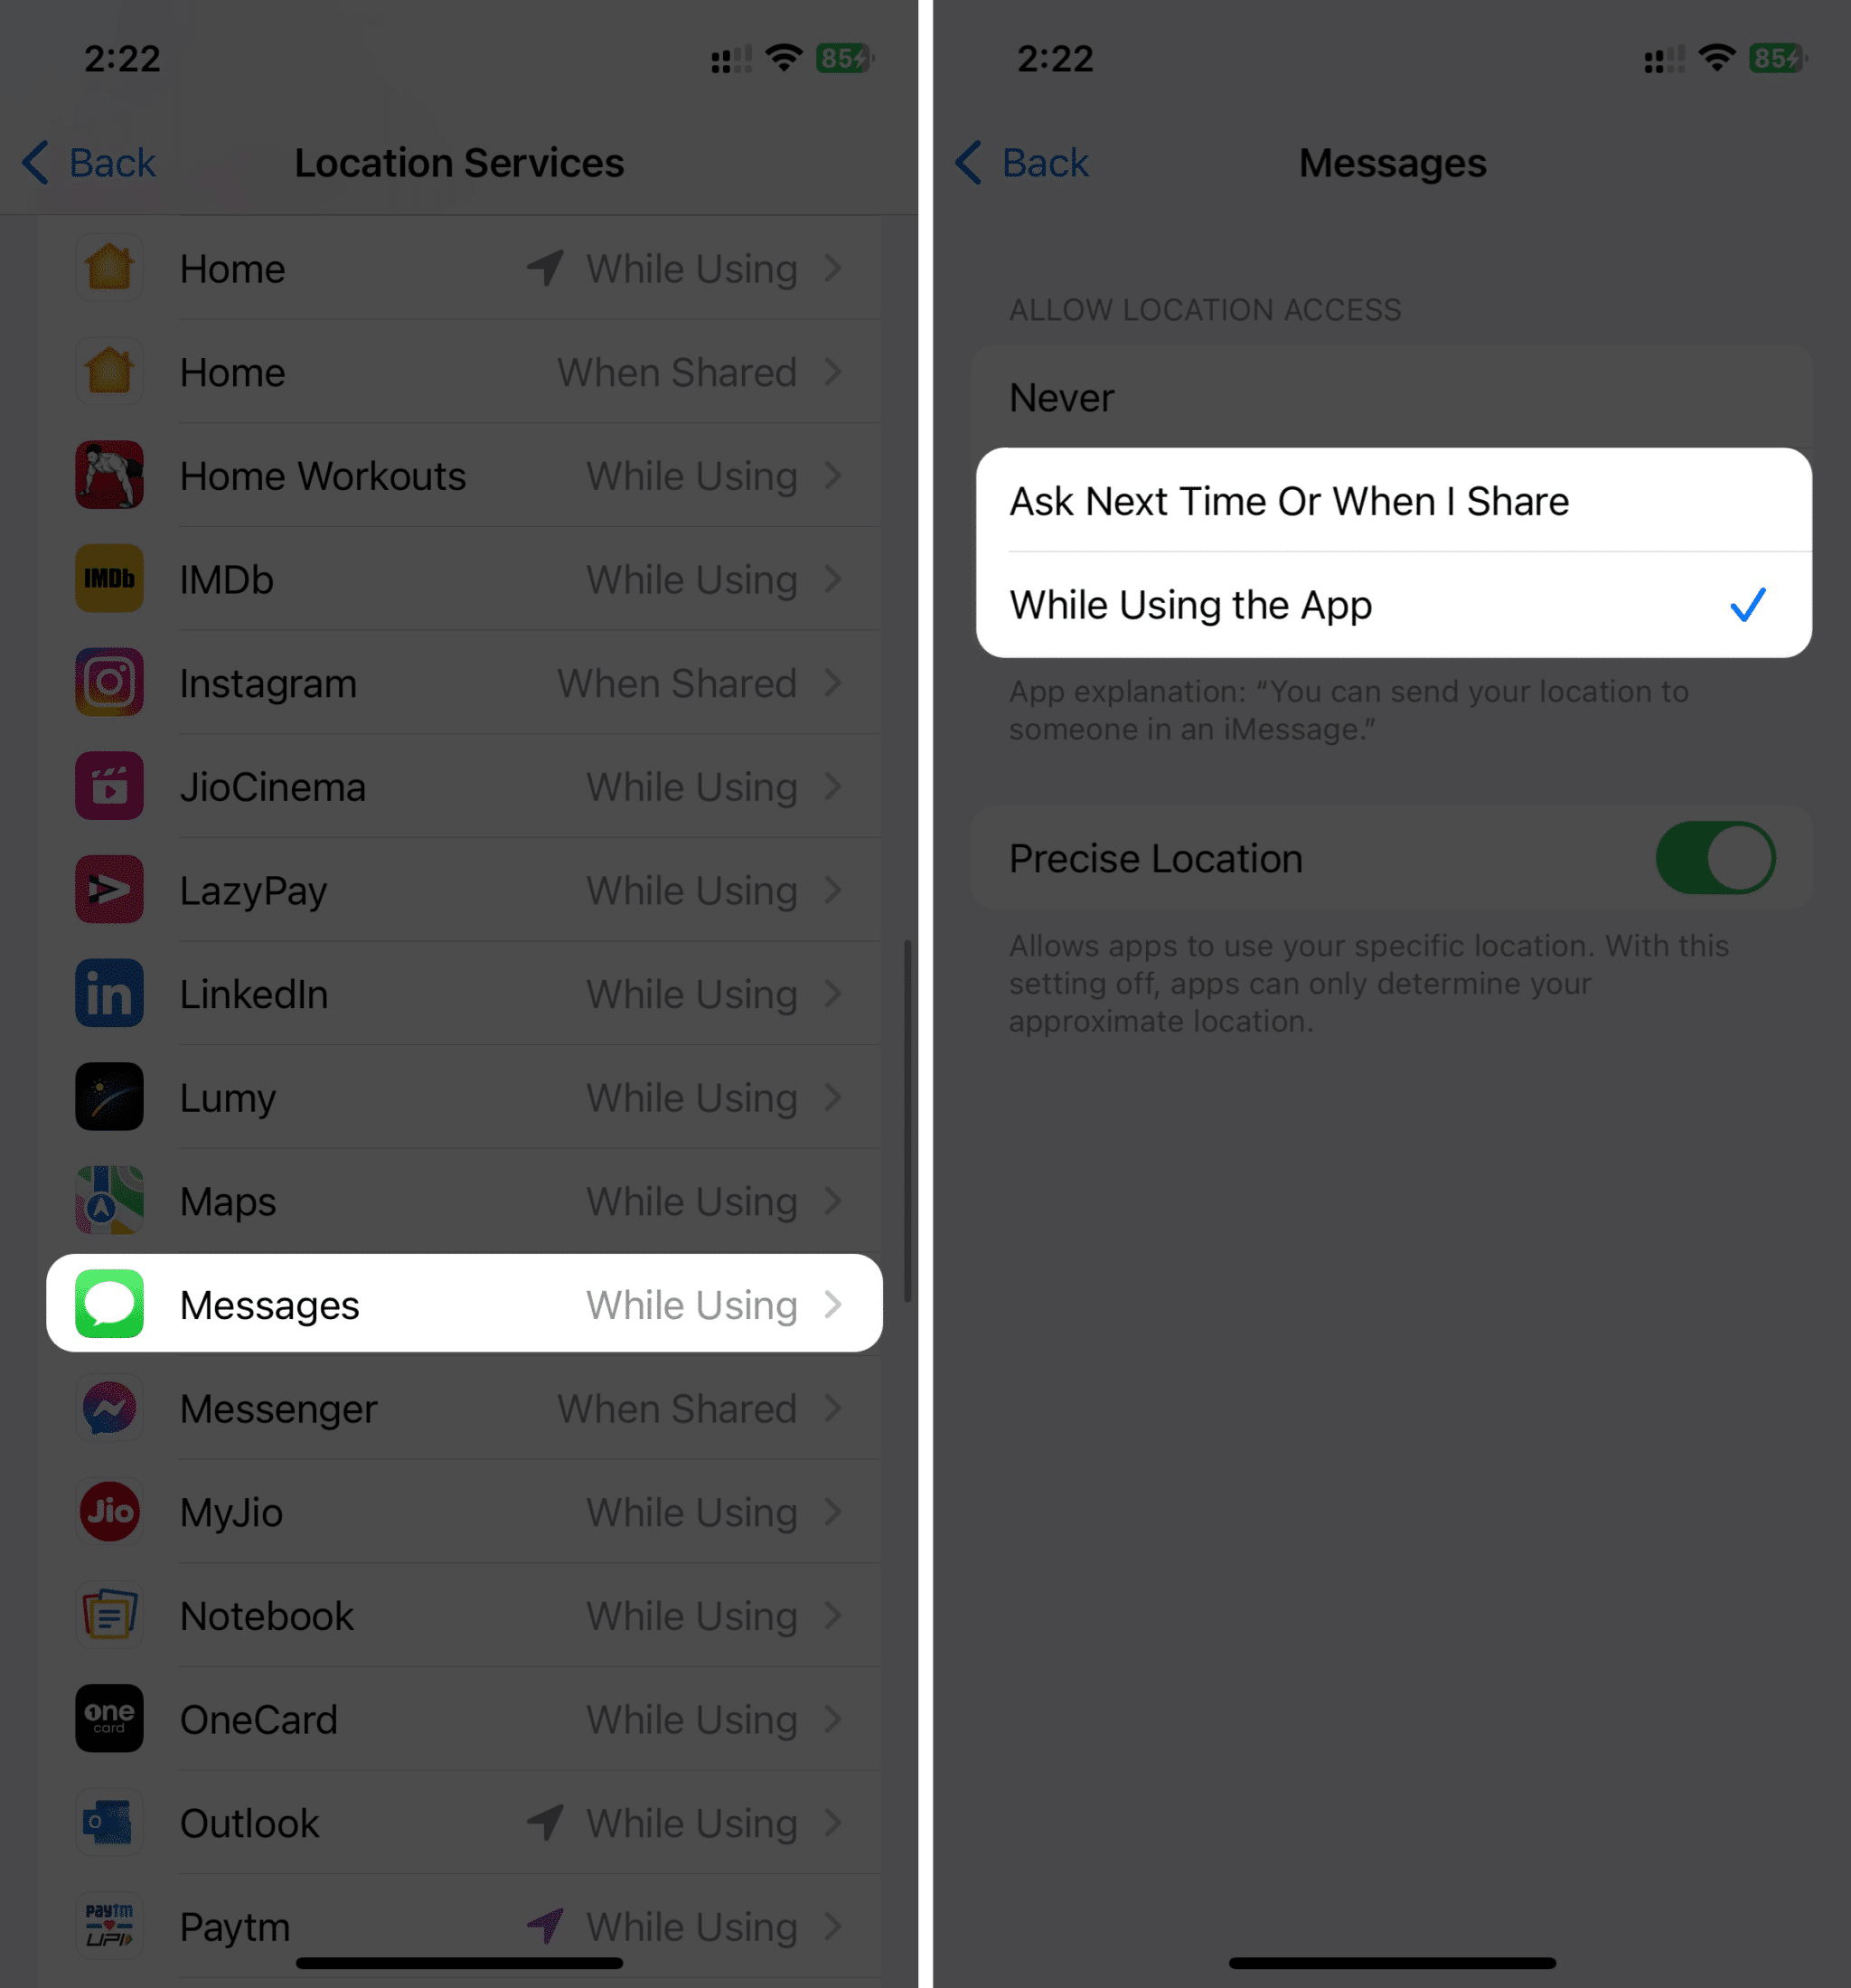
- Scroll to the bottom, tap Messages → Choose While Using the App or Ask Next Time or When I Share.
On Mac:
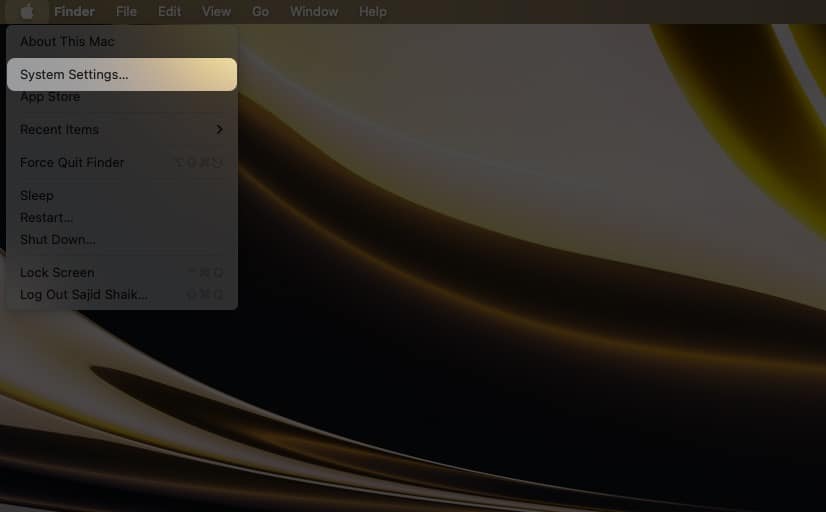
- Open System Settings from the Apple menu () on the top-left.
- Select Privacy & Security on the side pane and click Location Services on the left.
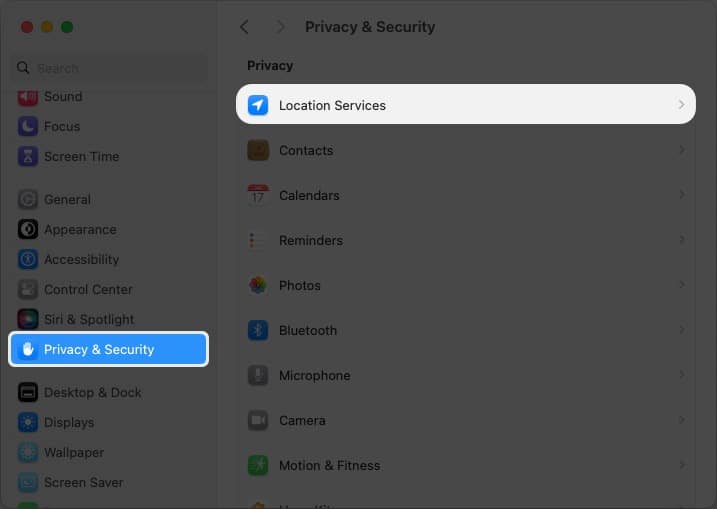
- Enable the toggle next to Location Services.
- Scroll down and turn on the toggle next to Messages.
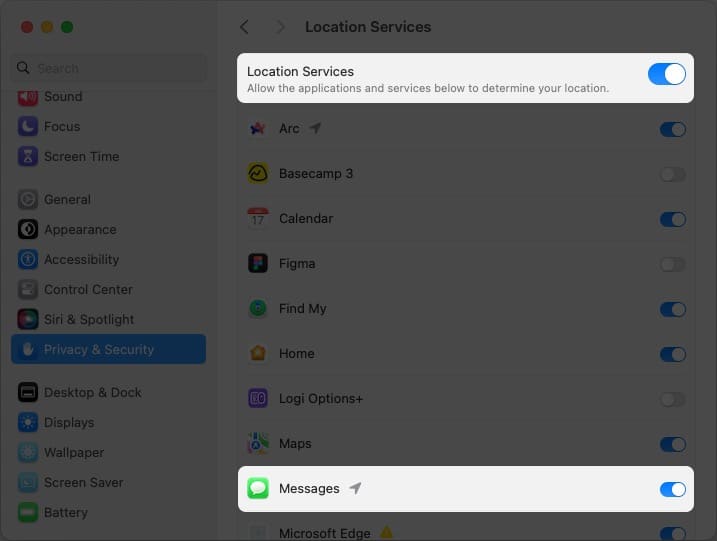
You can send your location after enabling Location Services to the Messages app.
Sending your current location in iMessage differs for iPhones/iPads and Macs. Here’s how to send current location in iMessage.
On iPhone and iPad:
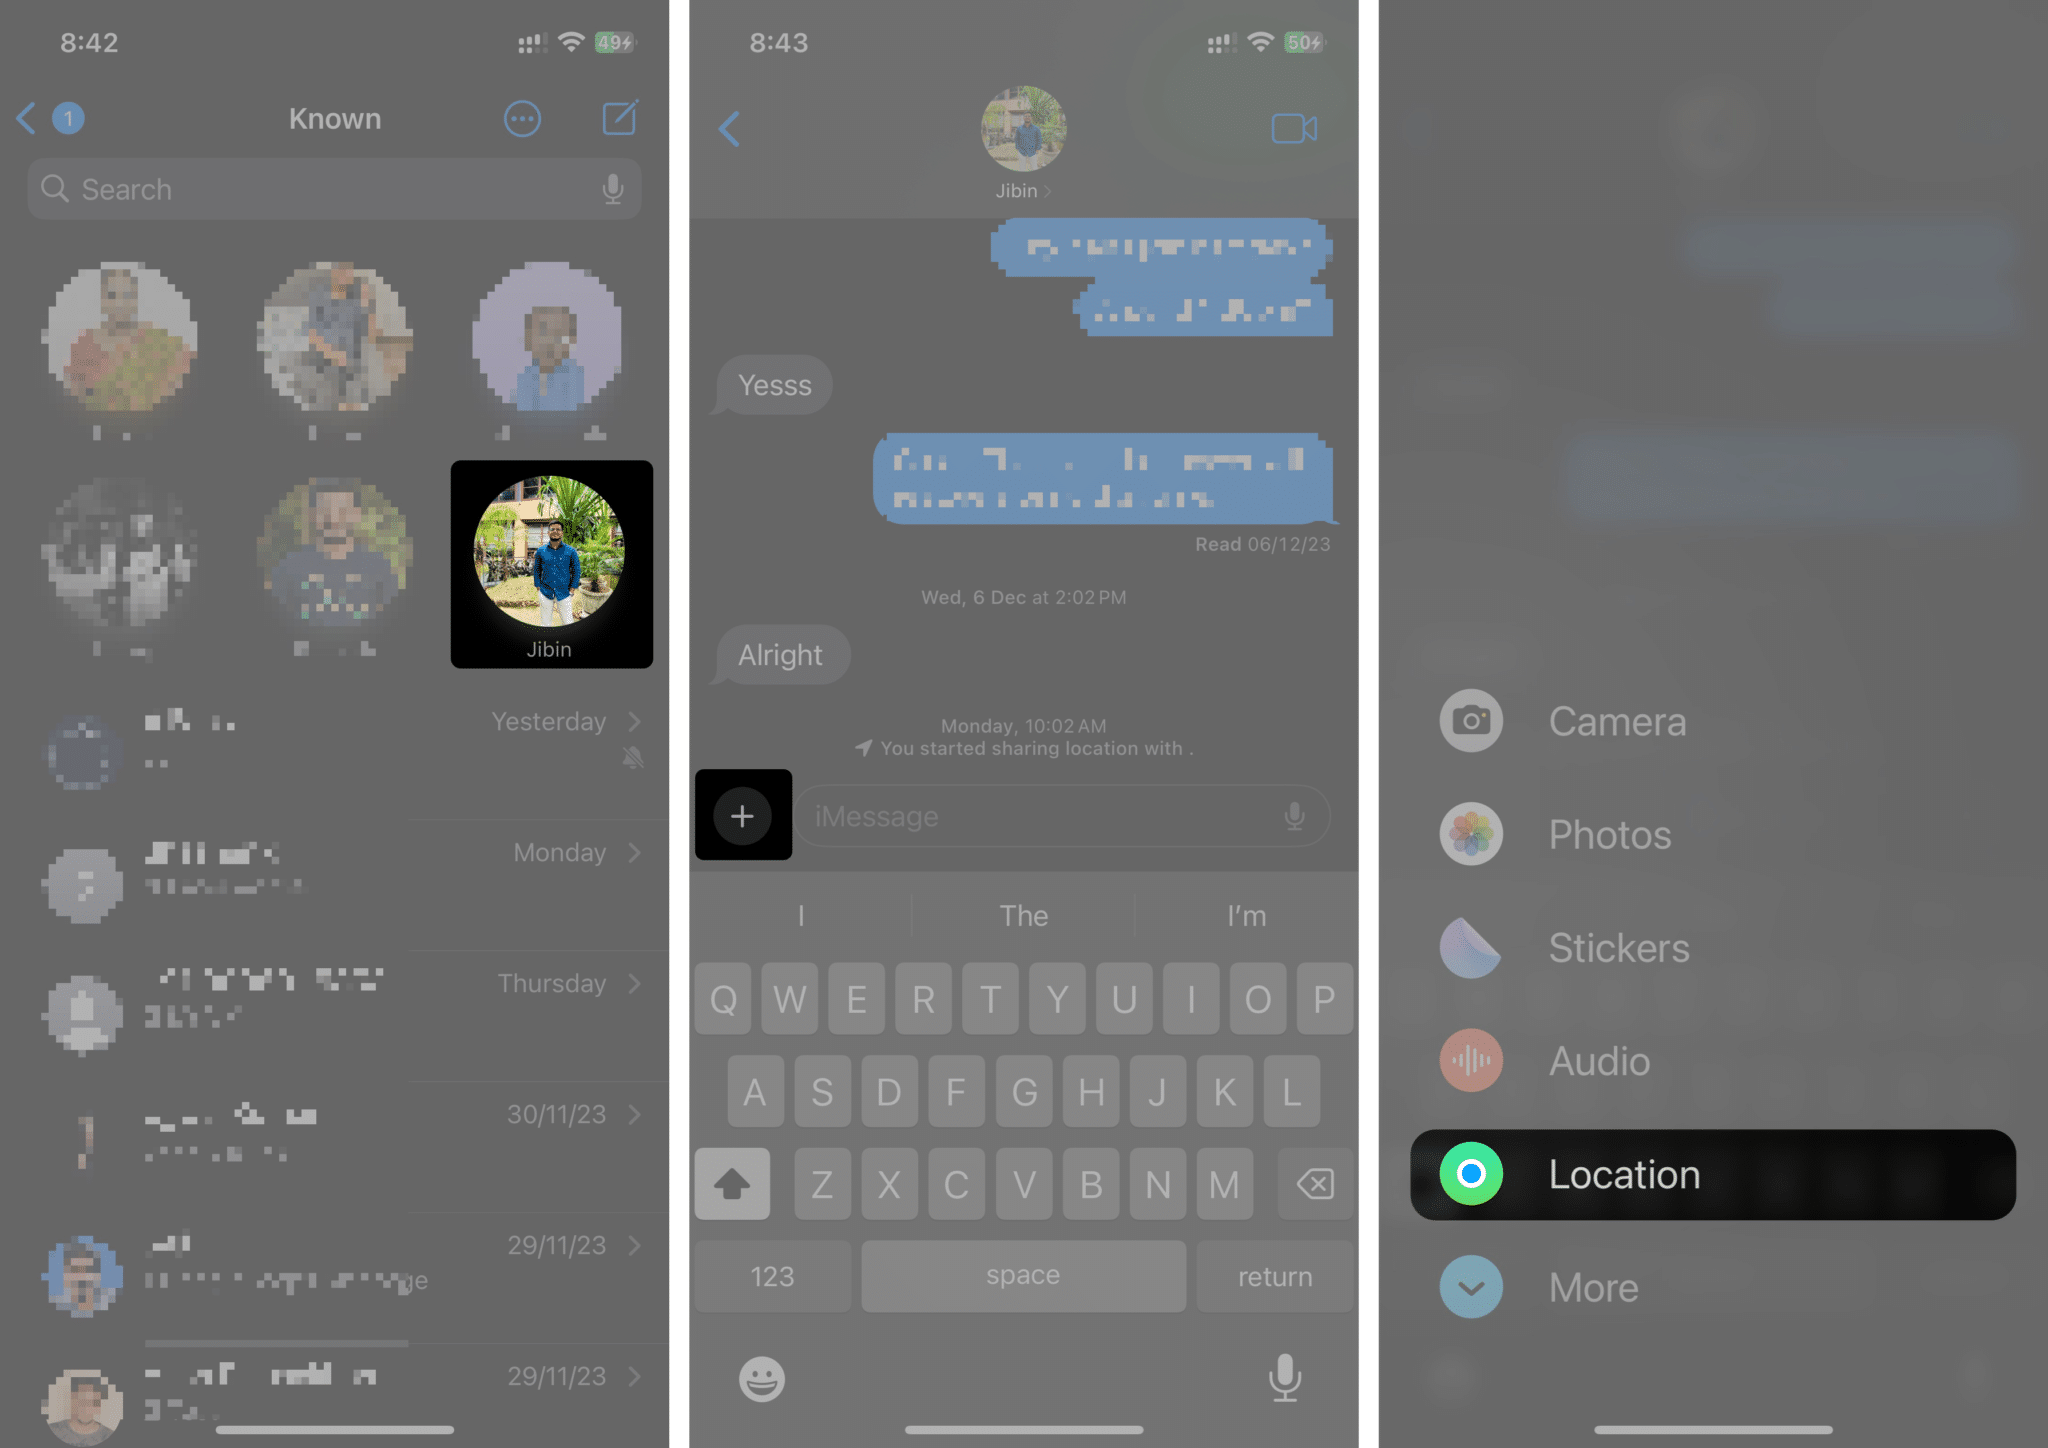
- Open Messages and select the contact/conversation to which you want to send the location.
- Tap the Plus (+) icon on the right side of the text field.
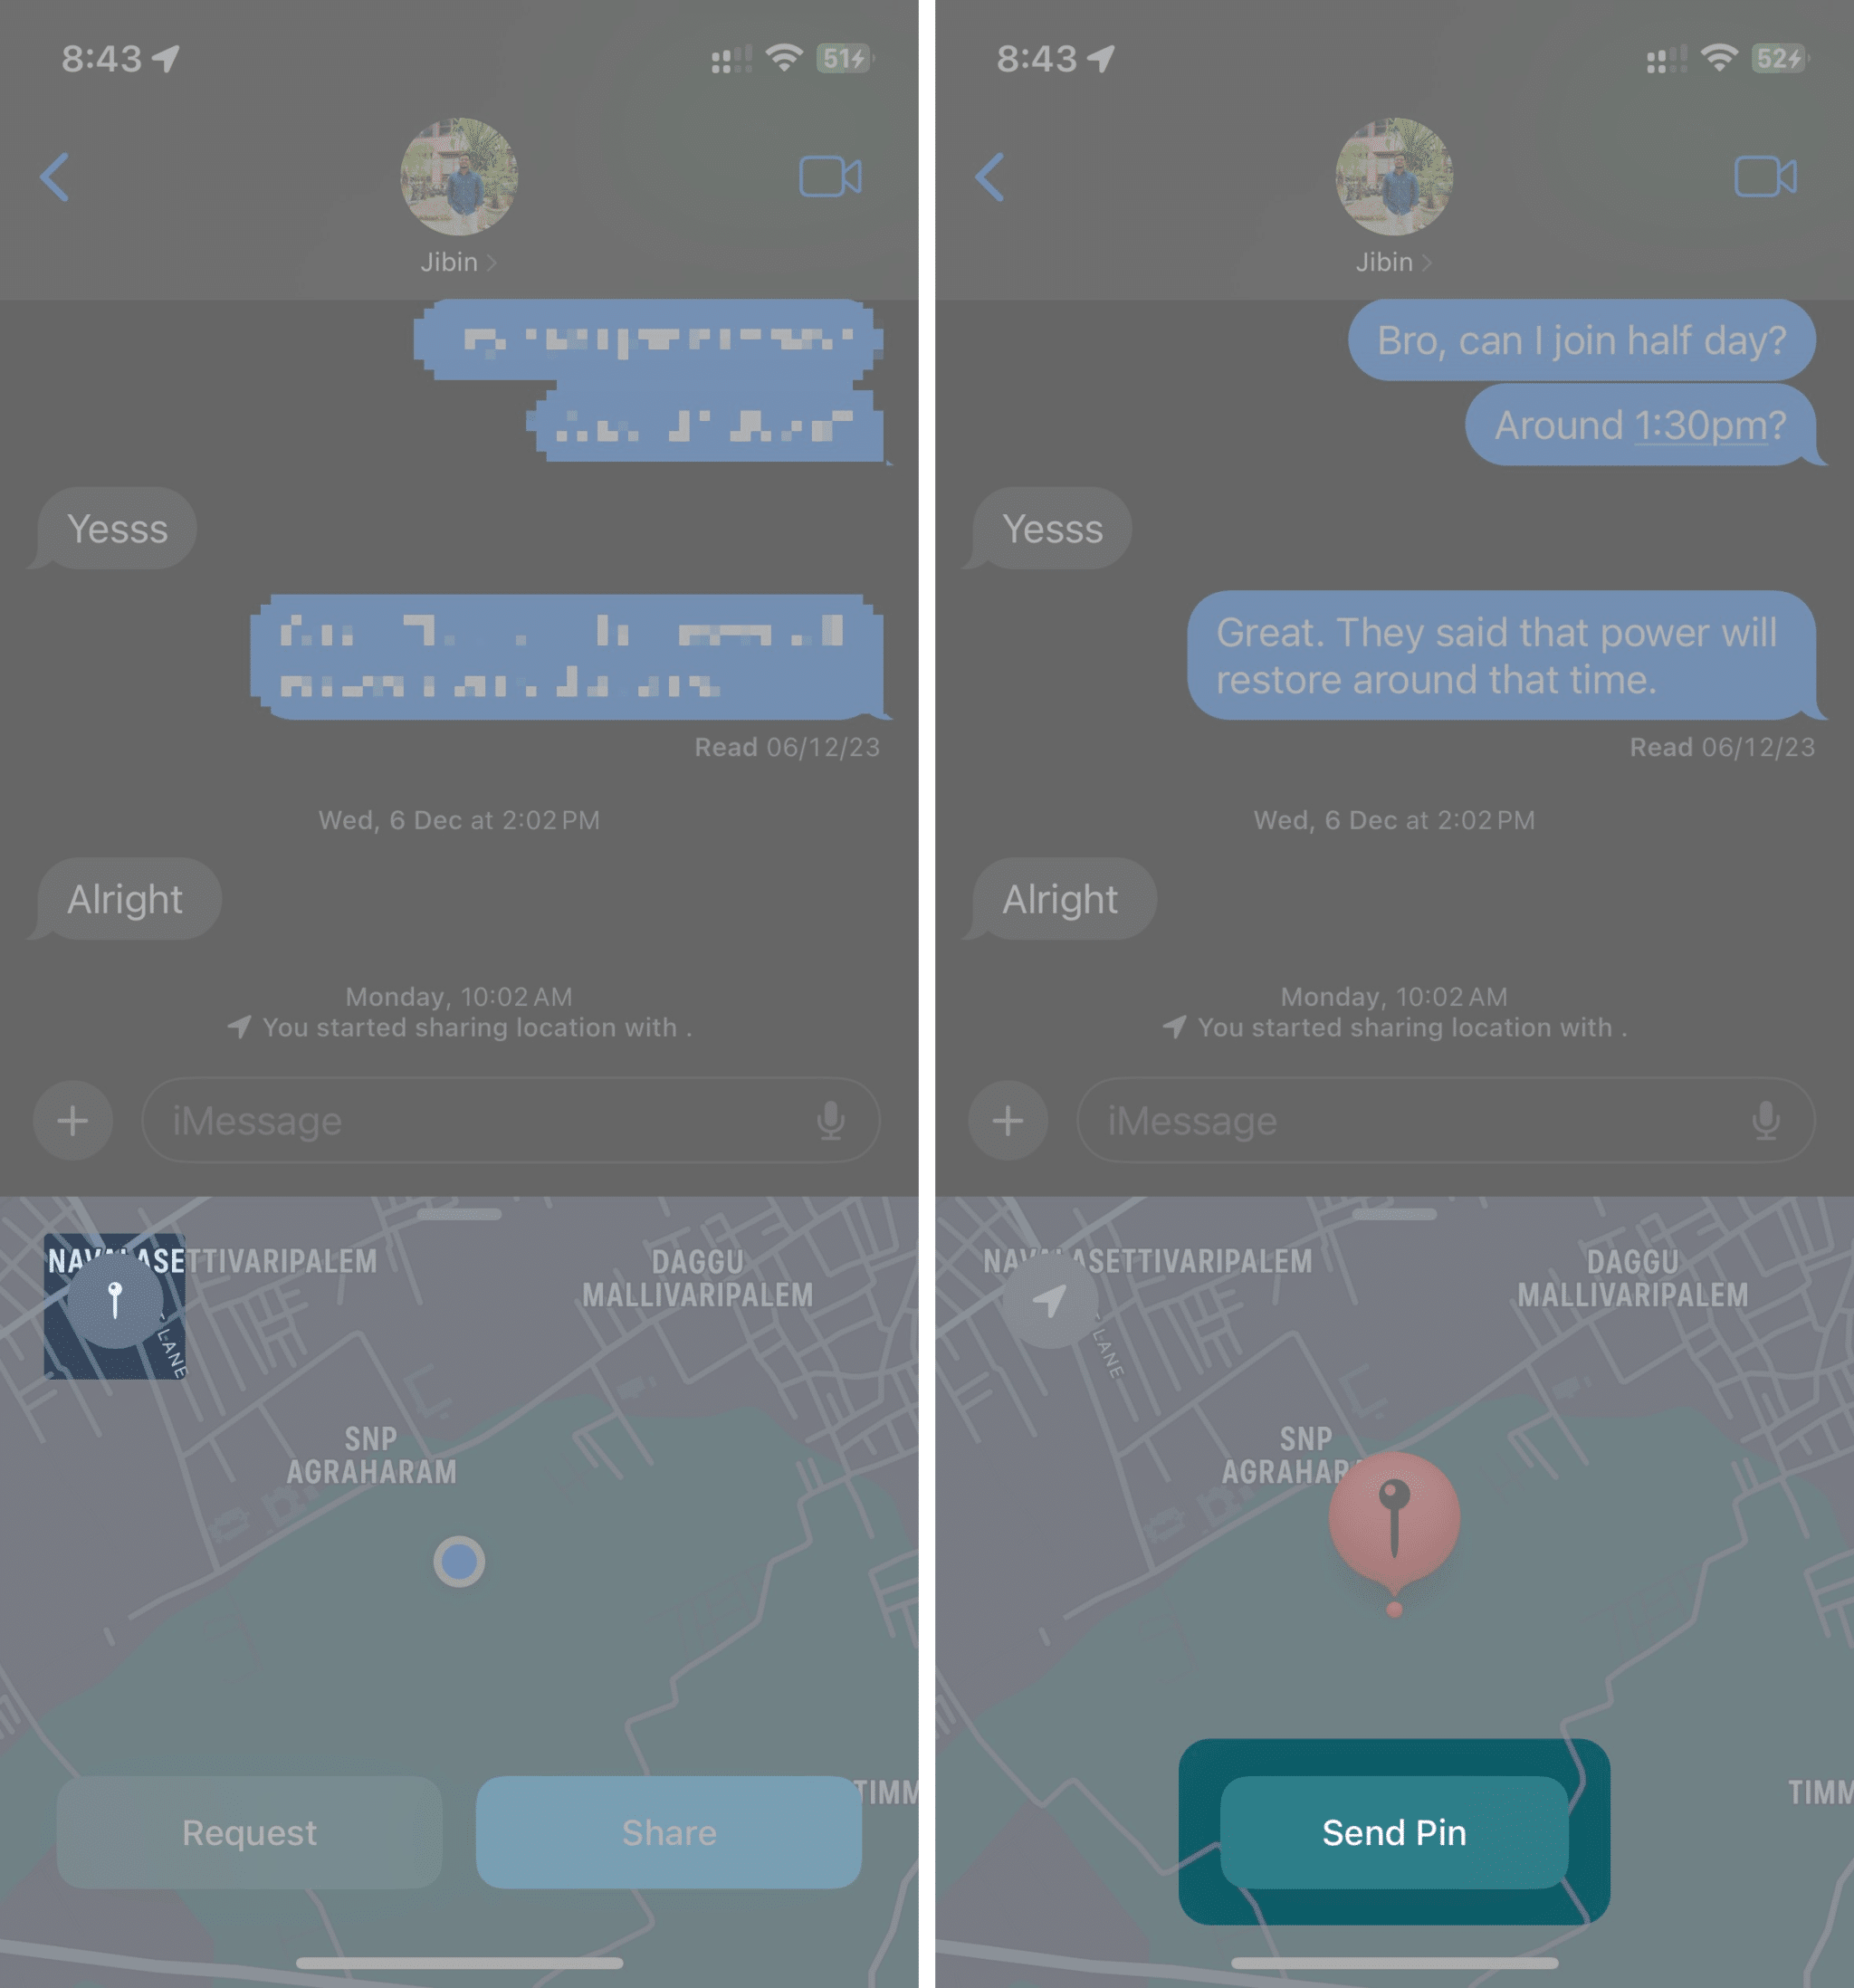
- Select Location from the list and tap the Pin icon once the map pops up.
- Choose Send Pin option → Send icon next to the text field.
BONUS: Use the “I am at” phrase
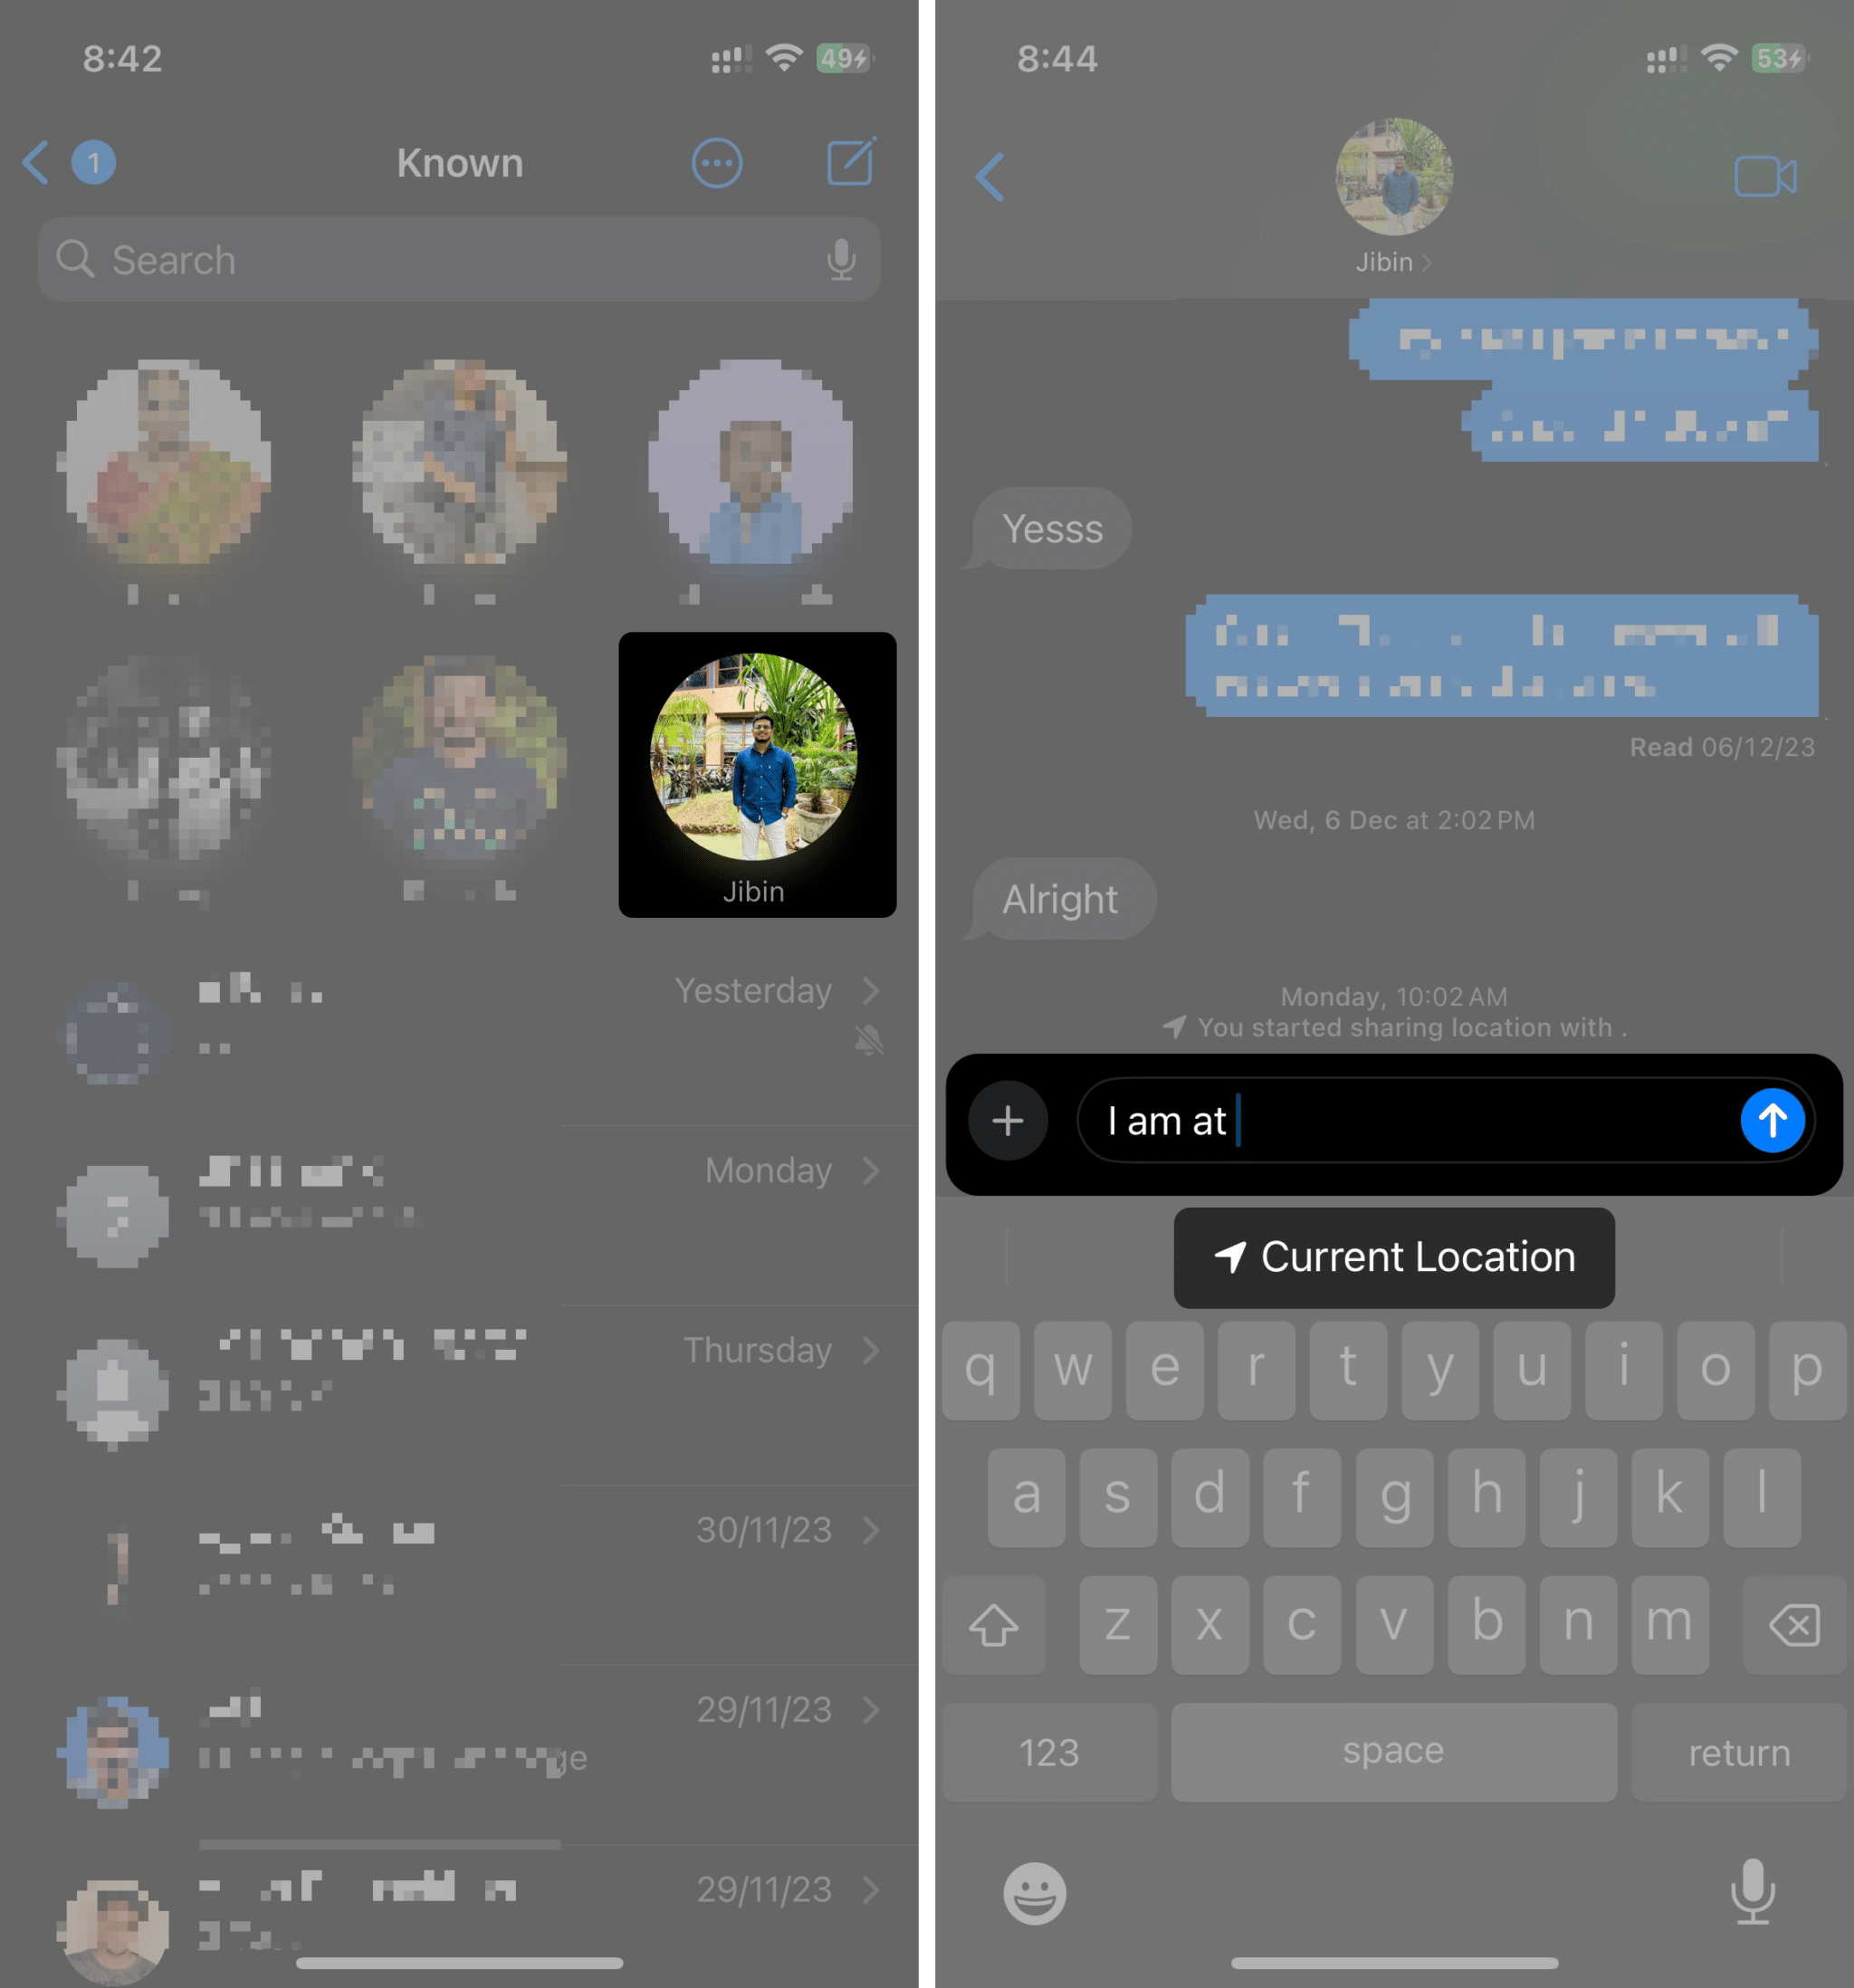
Another way to send your current location on an iPhone and iPad is using the “I am at” phrase in your conversation. Follow these instructions to learn how to send your current location using the “I am at” phrase:
- Open Messages and select the contact/conversation to which you want to send the location.
- Type “I am at” → tap the Current Location suggestion on your keyboard.
- Select Location from the list and tap the Pin icon once the map pops up.
- Choose Send Pin → Send icon next to the text field.

On Mac:
- Open Messages from Spotlight, Launchpad, or the Applications folder and select the contact/conversation to which you want to send the location.
- Click the Info (i) button on the top-right corner of the conversation.
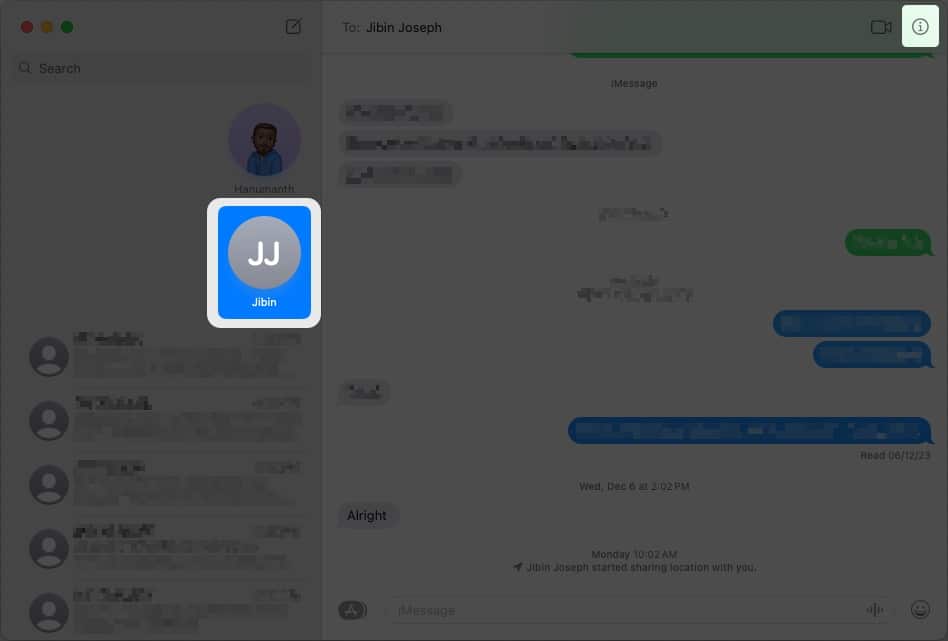
- Click the Send My Current Location option. A map with your current location will appear in the text box.
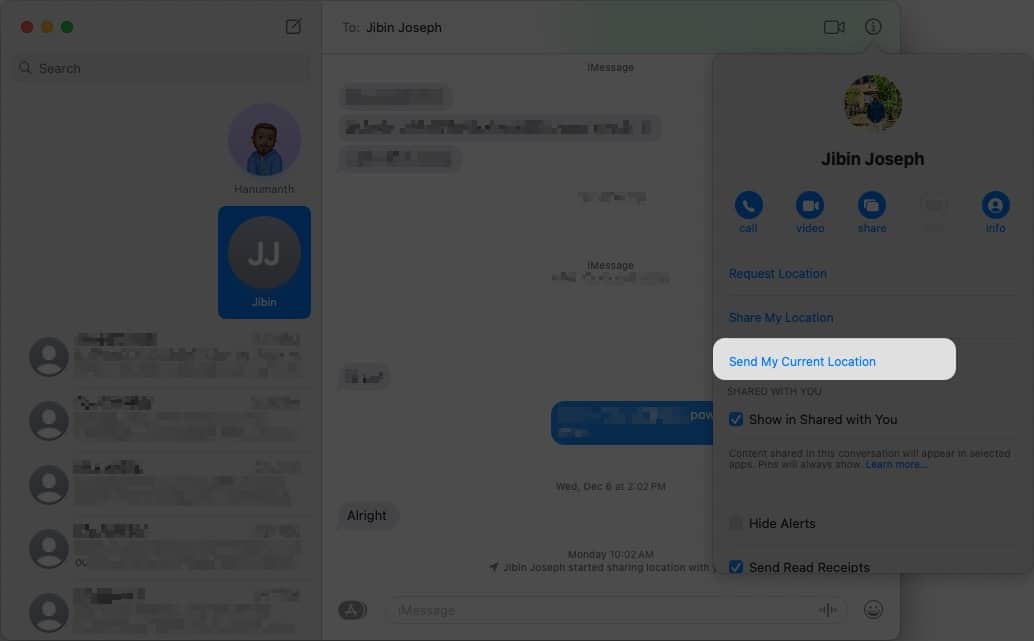
- Send the message by clicking the Send button or pressing the Enter/Return key on your keyboard.
If you want someone to know of your updated current location always, you can send it in iMessage. Again, it’s slightly different for Mac and iPhone/iPad, so here are the steps to share and update your location automatically in iMessage on iPhone, iPad, and Mac:
Become an iGeeksBlog Premium member and access our content ad-free with additional perks.
On iPhone and iPad:
- Open the Messages app.
- Select the contact/conversation you wish to send your location to.
- Tap the Plus (+) icon on the right side of the text field.
- Select Location from the list.

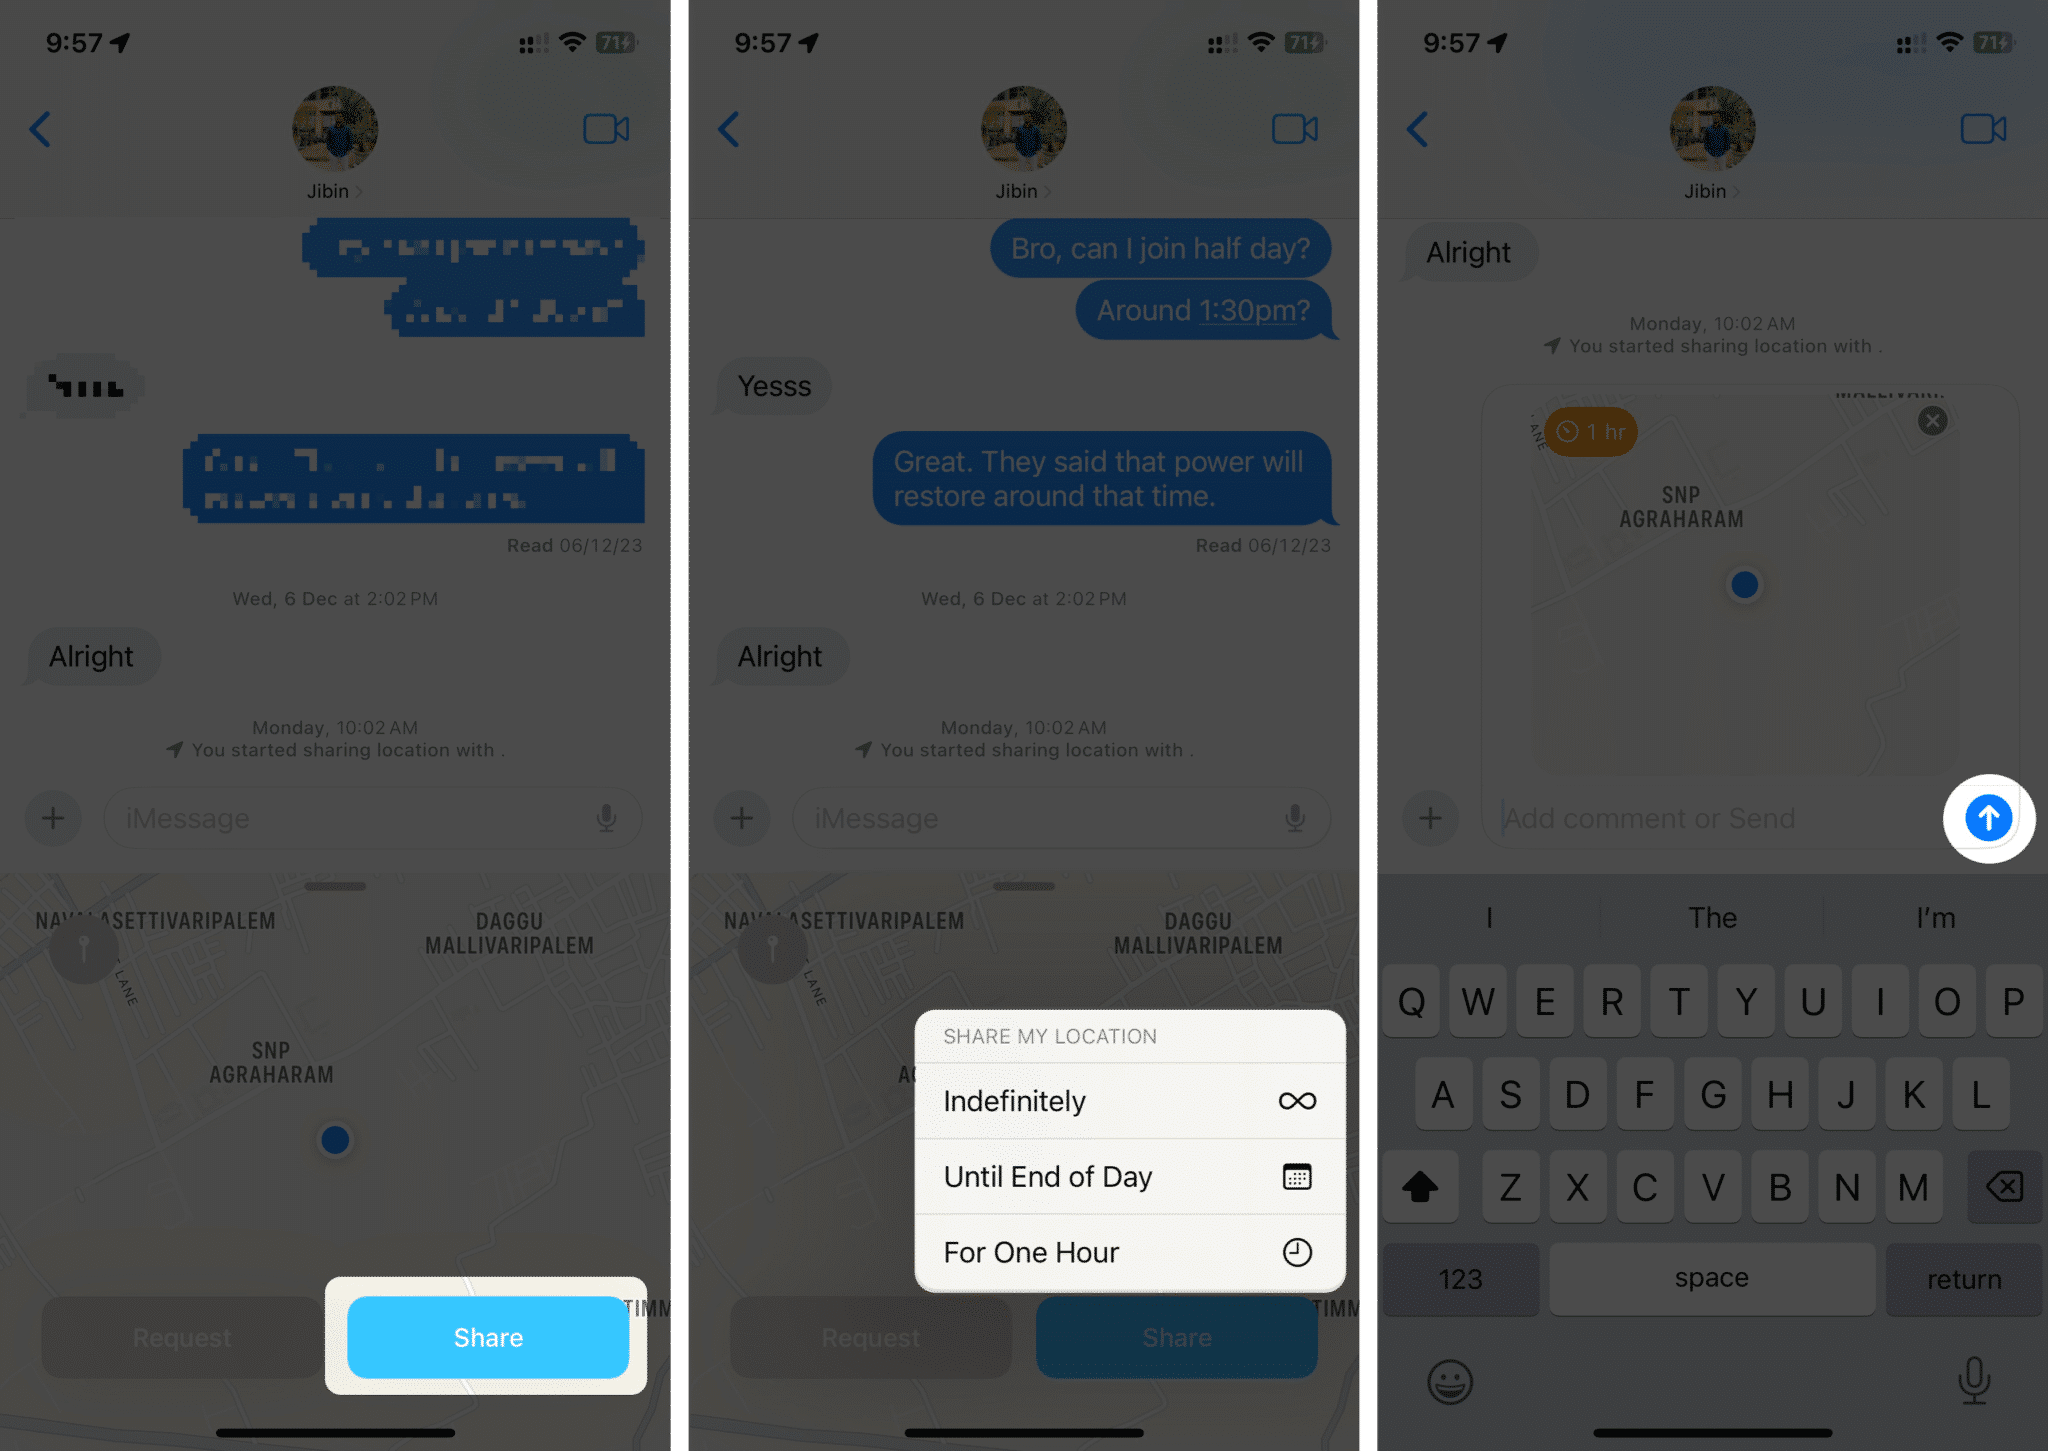
- Tap the Share option and choose one of the three duration options that suit your needs.
- Tap the Send icon next to the message box once the map loads.
On Mac:
- Open the Messages app from Spotlight, Launchpad, or the Applications folder.
- Open Messages from Spotlight, Launchpad, or the Applications folder and select the contact/conversation to which you want to send the location.
- Click the Info (i) button on the top-right corner of the conversation.

- Click the Share My Location option.
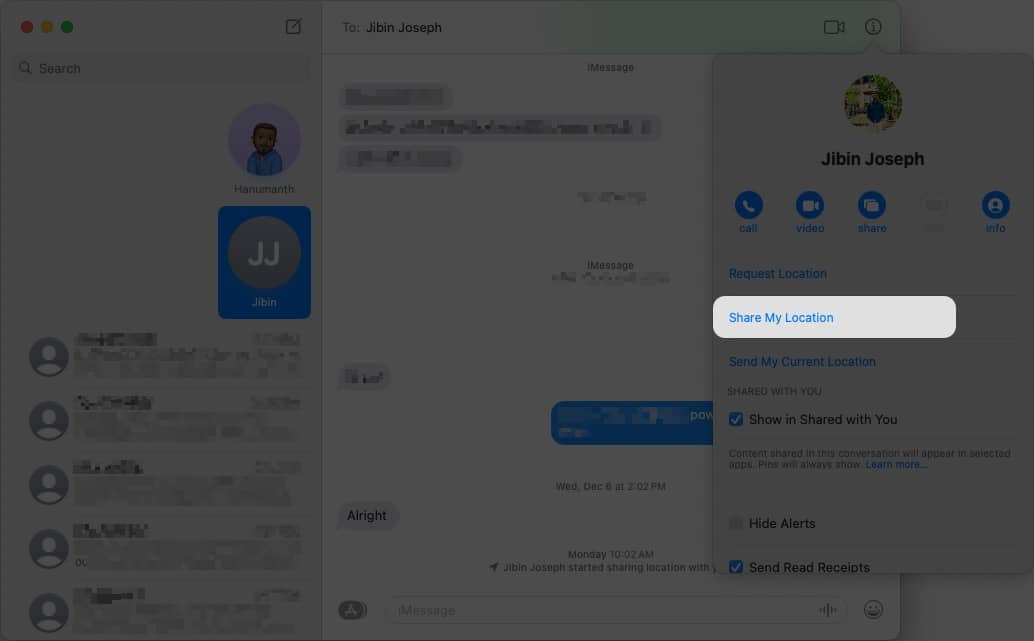
- Choose one of the three duration options. A map with your current location will appear in the text box.
- Send the message by clicking the Send button or pressing the Enter/Return key on your keyboard.
Another better way to share your live location is using the Check-in feature on iPhone
How to request someone else’s location in iMessage on iPhone and Mac
iMessage allows you to request others’ locations, and the process differs on Mac and iPhone/iPad. Here’s how to request someone else’s location in iMessage on iPhone, iPad, and Mac.
On iPhone and iPad:
To request someone’s location on an iPhone, follow these instructions:
- Open Messages on your iPhone or iPad.
- Select the conversation/contact from whom you want to request the location.
- Tap the Plus (+) icon on the right side of the text field.
- Select Location from the list.

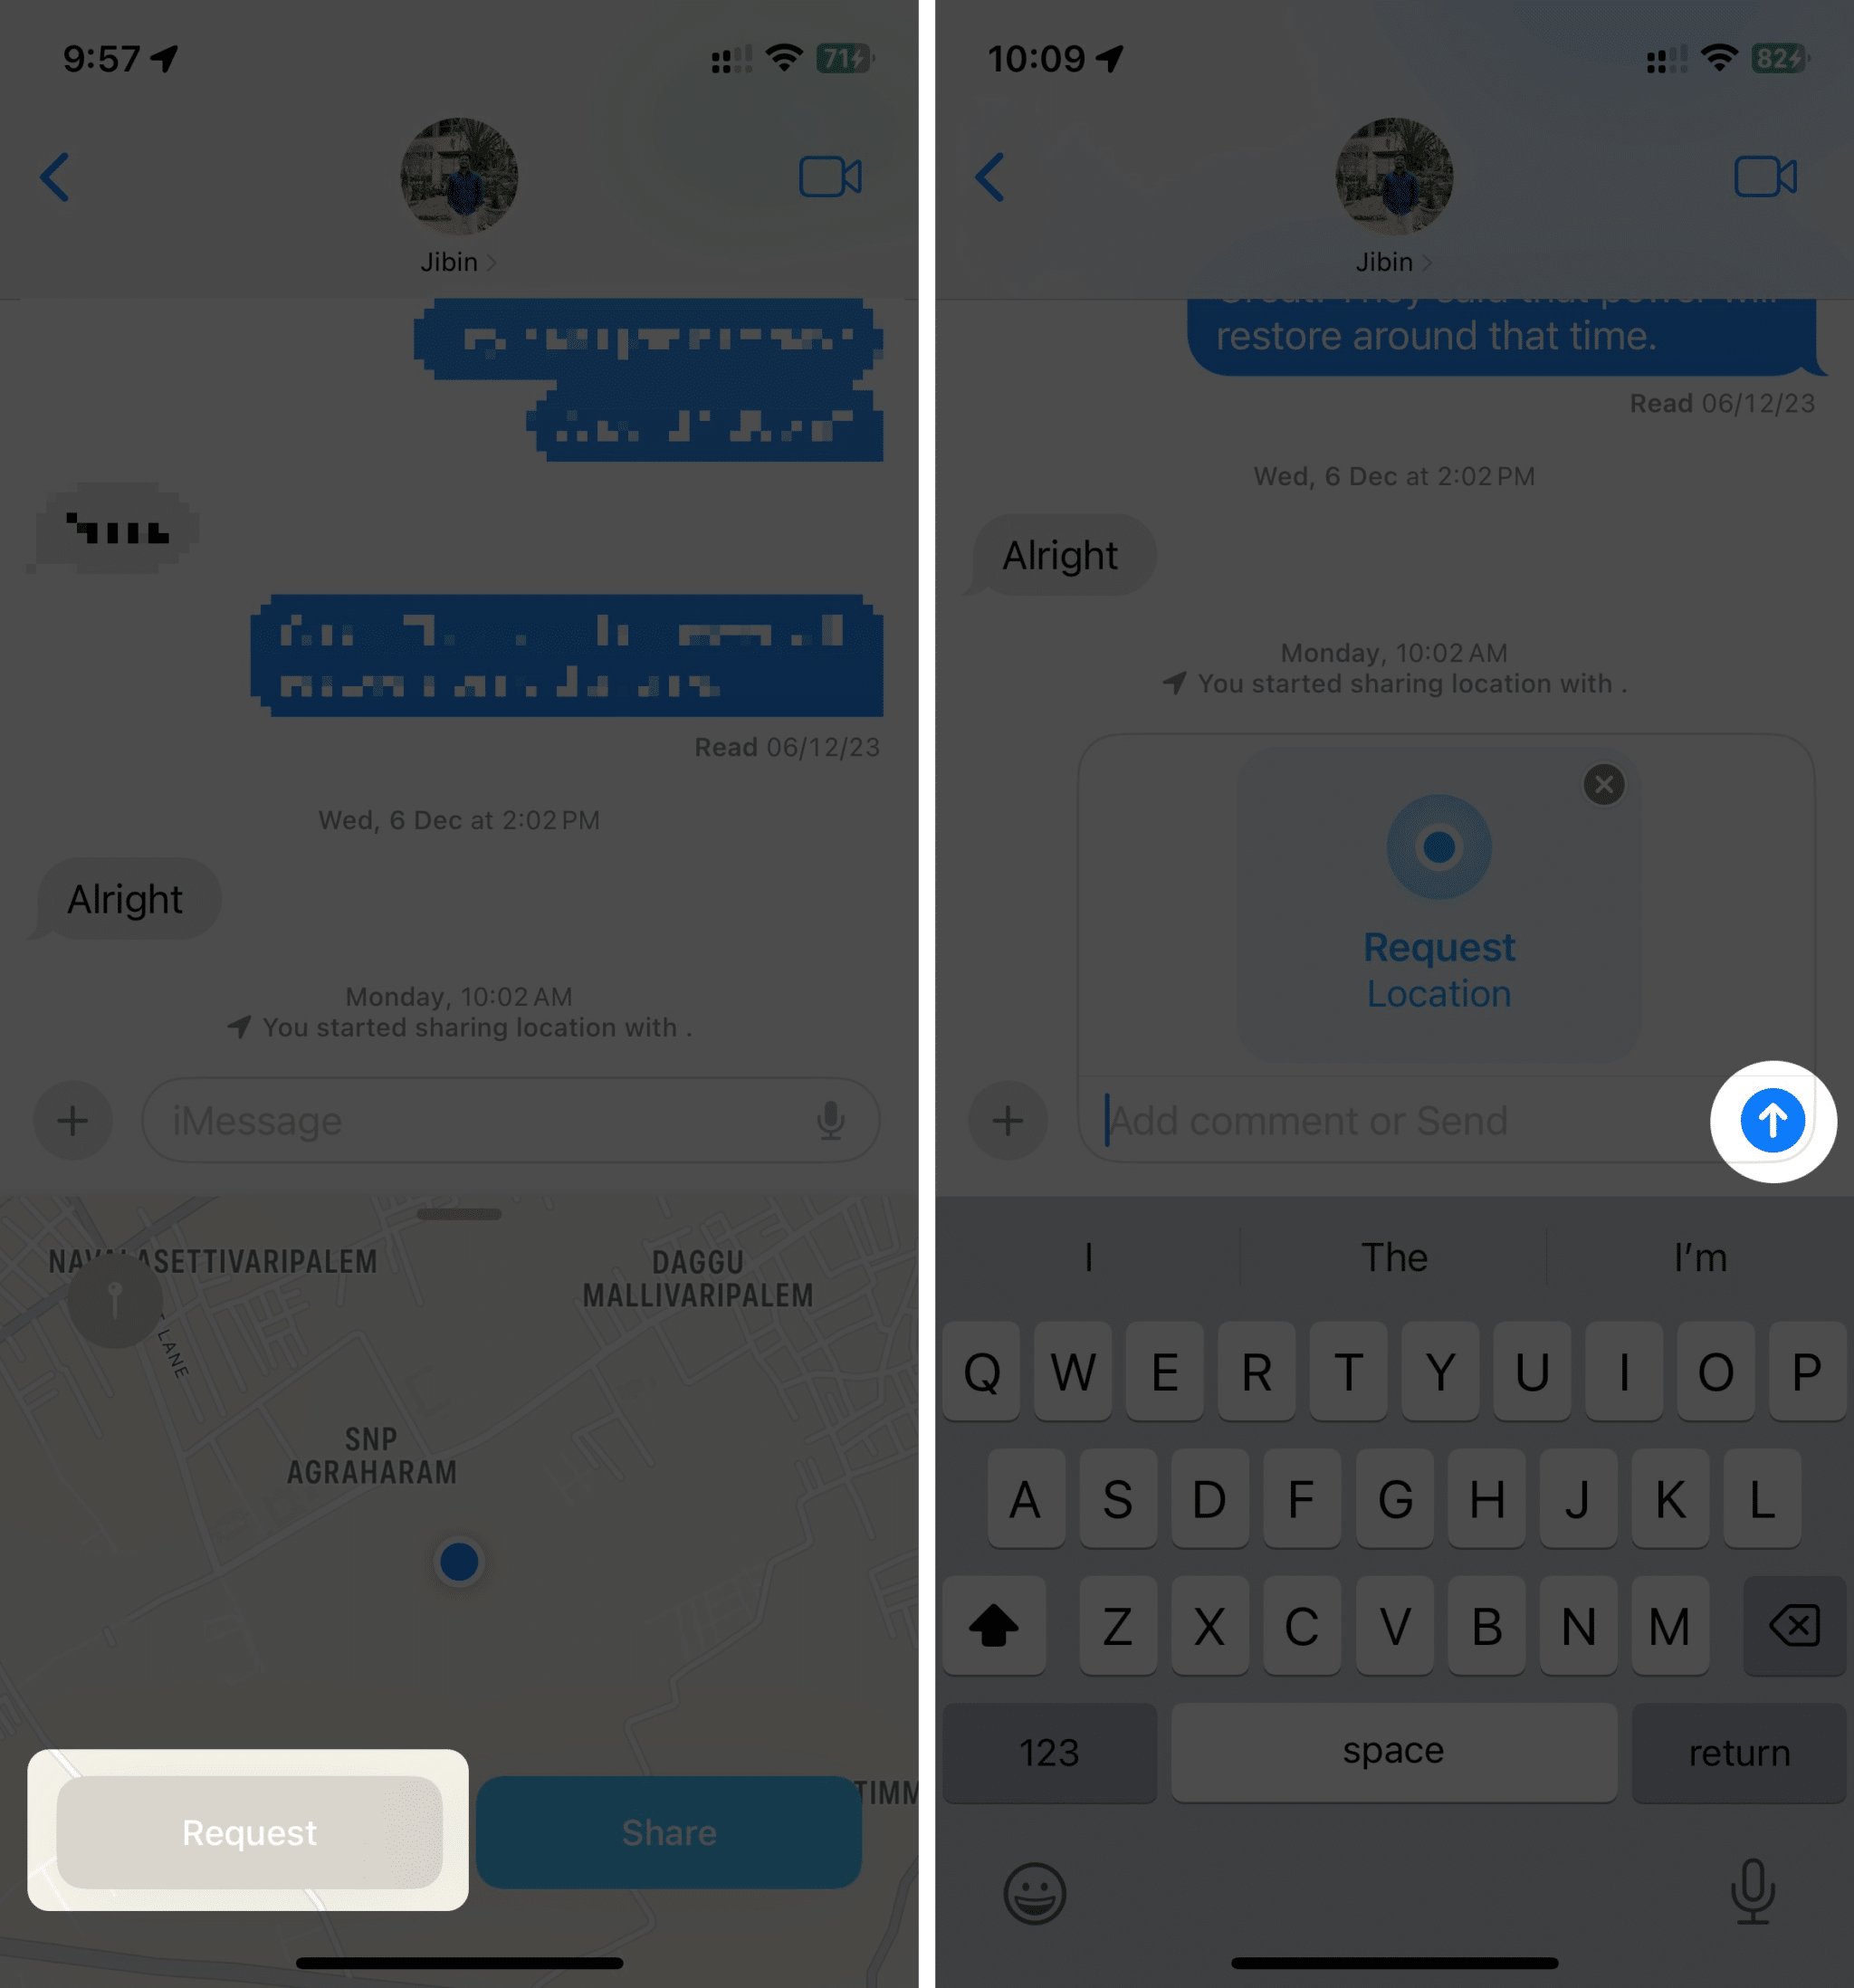
- Tap the Request option.
- Hit the Send icon next to the message box once the map loads.
On Mac:
Like iOS and iPadOS, you can do the same from your Mac. Follow these steps to request someone’s location:
- Open Messages from Spotlight, Launchpad, or the Applications folder and select the contact/conversation to which you want to send the location.
- Click the Info (i) button on the top-right corner of the conversation.

- Select the Request Location option.
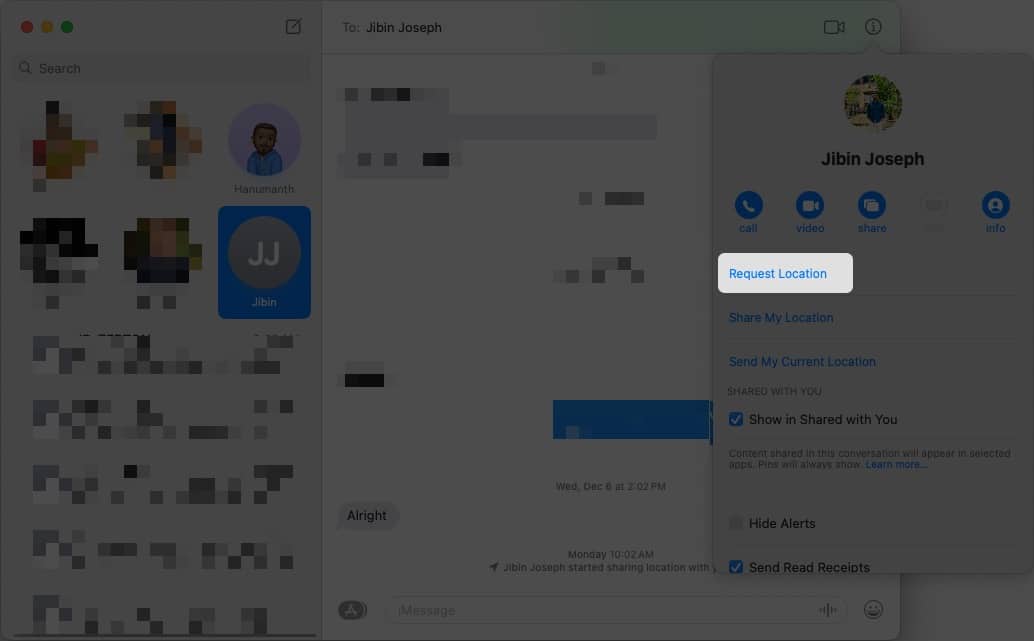
- Send the message by clicking the Send button or pressing the Enter/Return key on the keyboard when the map loads in the message box.
How to stop sharing your location in iMessage on iPhone and iPad
It should automatically stop if you’re sharing your location for a certain time in iMessage (such as For 1 hour, Until End of the Day). Otherwise, if set to Indefinitely, the other person can see your location until you stop.
NOTE: Although you can send your location through Mac, you can’t stop sharing your location on your Mac. In that case, it’s best to use your iPhone or iPad to stop sharing your location.
Hence, it’s important to stop sharing your location in iMessage. You can follow these simple steps to stop sharing your location in iMessage on iPhone or iPad:
- Open the Messages app on your iPhone or iPad.
- Select the contact/conversation where you sent your location previously.
- Tap the map sharing your location in the conversation.
- Select the Stop Sharing My Location option.
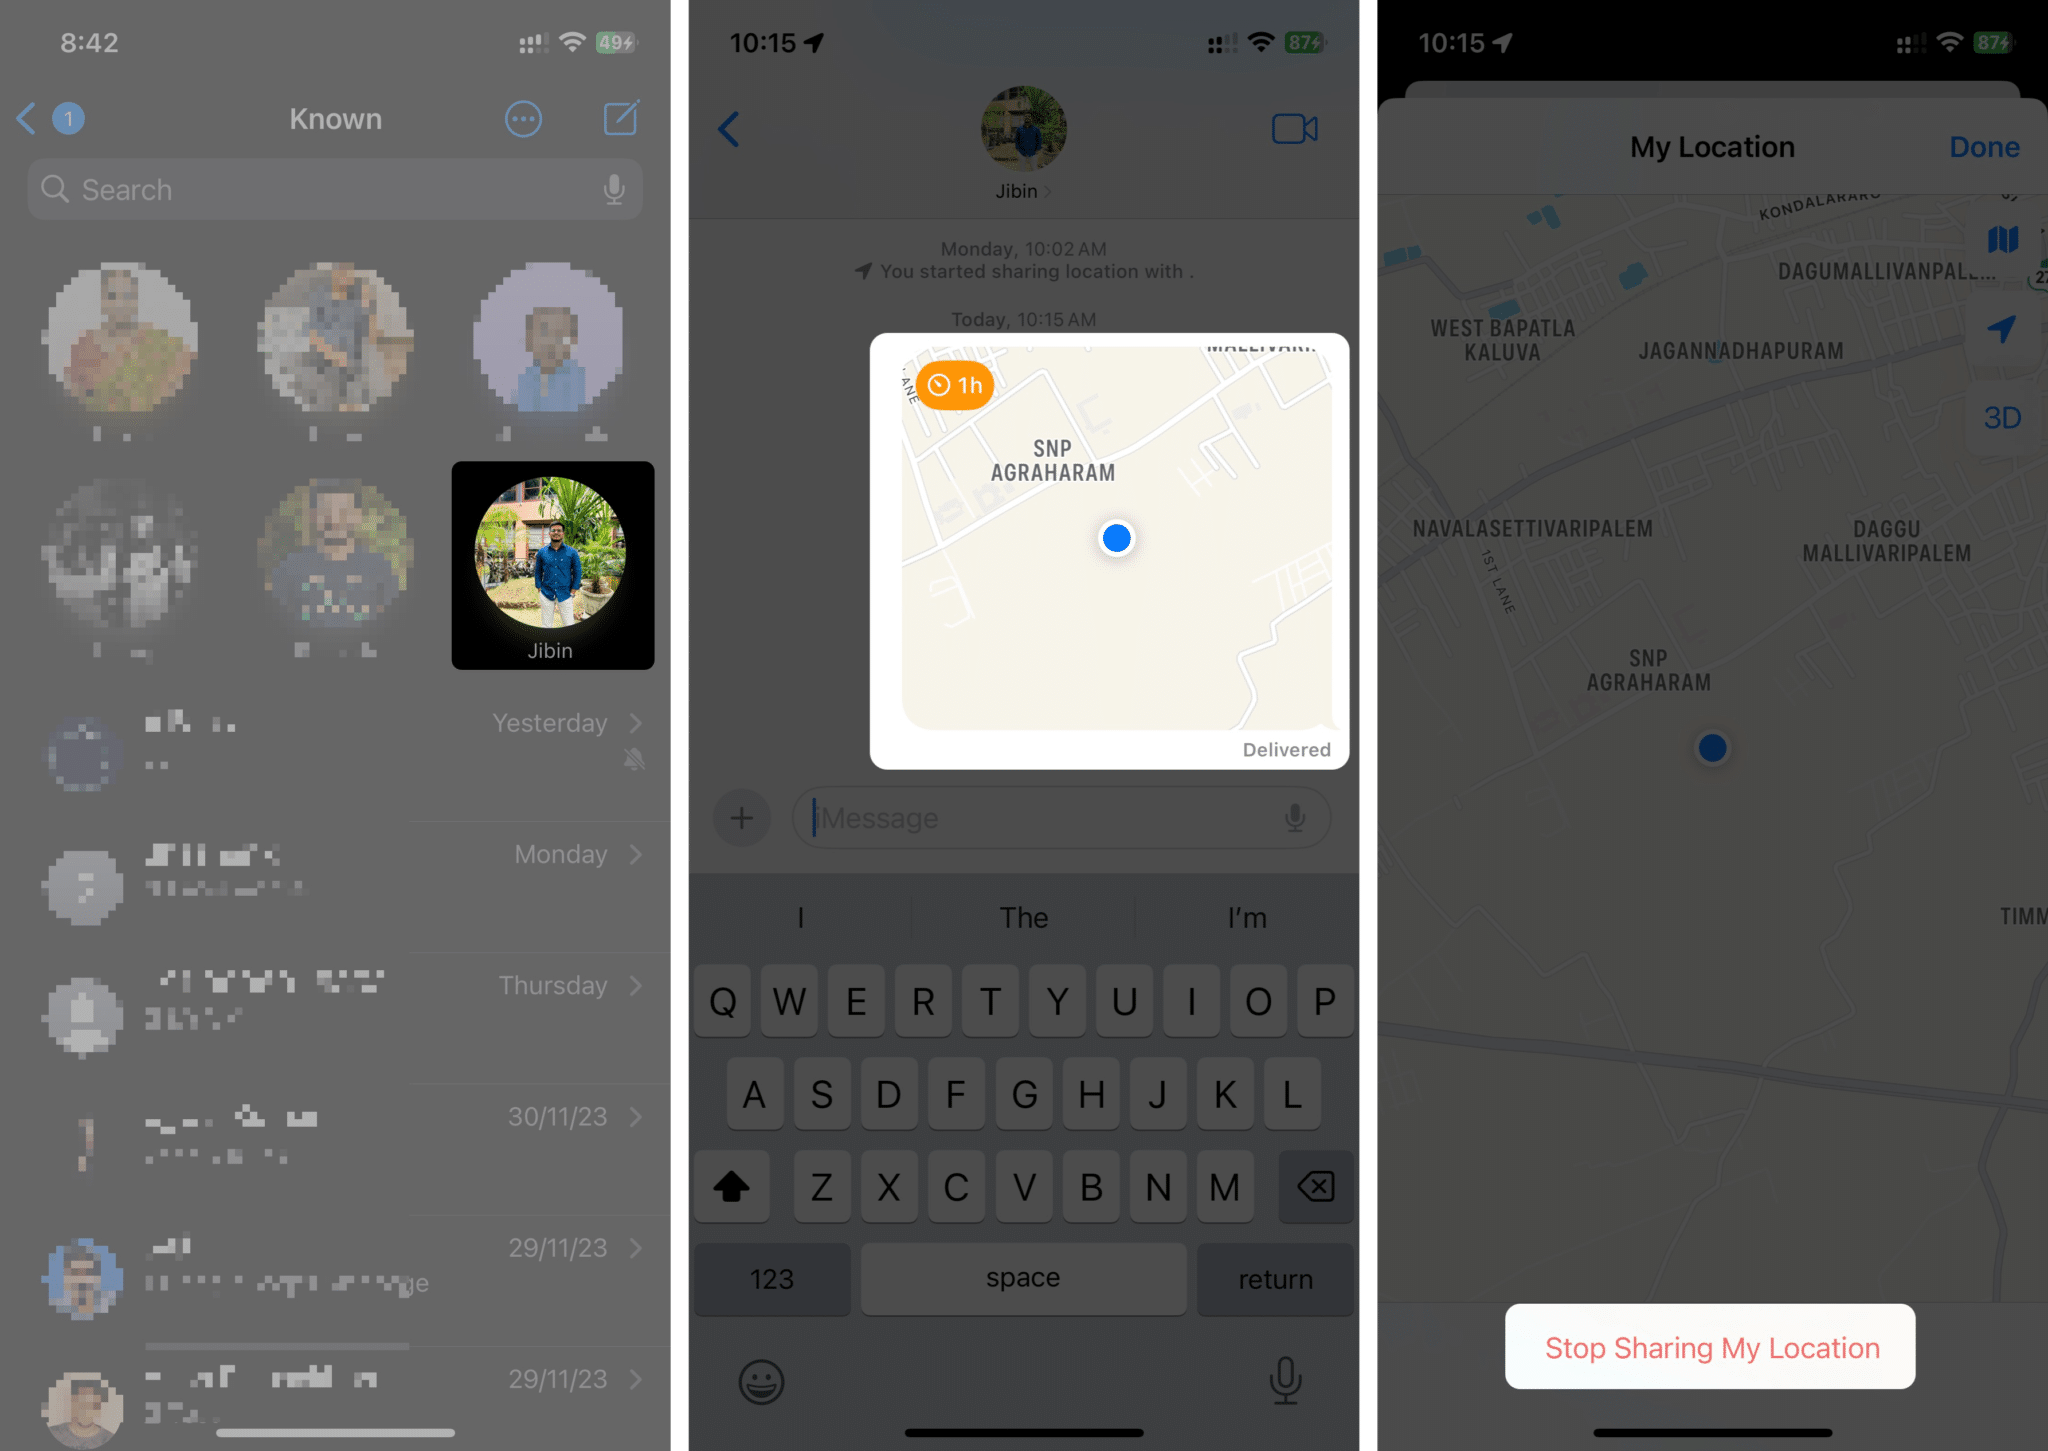
Once done, you’ll see the “You stopped sharing location” option. The other person will stop seeing your live location as a result.
Send live location with iMessage or maps
There are various ways to send your location in iMessage. While you can send it directly through the app, you can use apps such as Google Maps or Apple Maps to share your current location’s link if you don’t want to send your location through the Messages app. I hope this guide helped you to learn how to send your location in iMessage on iPhone, iPad, and Mac. If you’ve got any further suggestions or queries regarding this guide, please leave them in the comments below.
Read more:
