Apple’s MacBook lineup finally had a change of heart last year. The Cupertino-based company swapped the Intel-based MacBooks with an in-house M1 chipset. Both the 2020 MacBook Air and MacBook Pro come with Apple’s M1 CPU that vows to offer superior performance without sacrificing battery life.
Apple is promising mouth-watering endurance time on both – MacBook Air and MacBook Pro. If you are getting less than expected battery life, read along the best tips to improve your M1-based MacBook’s battery life.
To be fair to Apple, the company did introduce some battery-saving measurements in the macOS. That coupled with a careful selection of apps and other tweaks can extend the battery life on your M1 Macbook by quite a margin.
Tips to improve battery life on M1-based MacBooks
We will go through some battery-saving options from macOS System Preferences and include some third-party apps to see essential battery information and act accordingly.
- Use M1-optimized apps
- Opt for Safari or Microsoft Edge instead of Google Chrome
- Enable auto-brightness and turn off the keyboard backlight
- Use Activity Monitor on M1 Mac
- Stop apps from automatically opening during startup
- Keep an eye on the battery charge cycle
- Enable Battery Health Management
- Keep your MacBook up to date
1. Use M1-optimized apps
Apple terms Mac apps as Universal if they run natively on both Intel and M1-based Macs. If an app is yet to be updated for Apple Silicon, an M1-powered Mac will still run it, but it will do so by converting the Intel x86-64 code using Rosetta 2 emulation software.
The practice affects the performance as well as the battery life of your device. Instead, you should stick with apps that are already optimized for the M1 MacBook. You can visit this dedicated website that lists out all the M1-ready apps.
2. Opt for Safari or Microsoft Edge instead of Google Chrome
Google Chrome, the world’s leading browser, is infamous for excessive use of RAM and battery. If you live in the Apple ecosystem, I would highly recommend you try the Safari browser on Mac. It’s lightweight, efficient, battery-friendly, and the browser received a nice UI makeover with the latest macOS Big Sur update.
On the flip side, if you can’t live without all those nifty Chrome extensions, I would stir your attention to the Microsoft Edge browser built on the same Chromium platform and supports all the Chromium extensions.
3. Enable auto-brightness and turn off the keyboard backlight
This trick won’t improve the battery life by leaps and bounds. But hey, every small step helps, right?
- Go to the Mac System Preferences menu.
- Navigate to Keyboard.
- Turn the keyboard backlight off and choose an inactivity time.
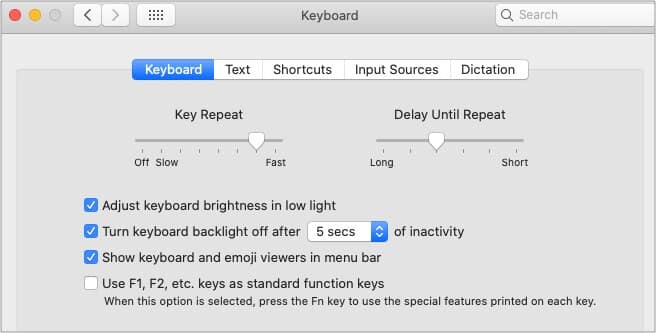
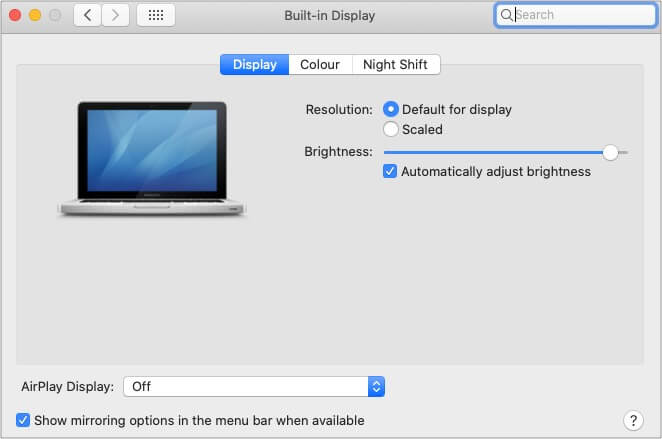
Another trick is to go to the Display menu and enable the Automatically adjust brightness option that adjusts the display brightness based on surroundings.
4. Use Activity Monitor on M1 Mac
Similar to Task Manager on Windows, macOS offers Activity Monitor to keep track of CPU and GPU usage by each app.
If your MacBook is getting unnecessarily warm, you should open the Activity Monitor and notice CPU usage from each app. If you observe an irrelevant high spike in usage, select the app and force close it using the ‘X’ mark above.
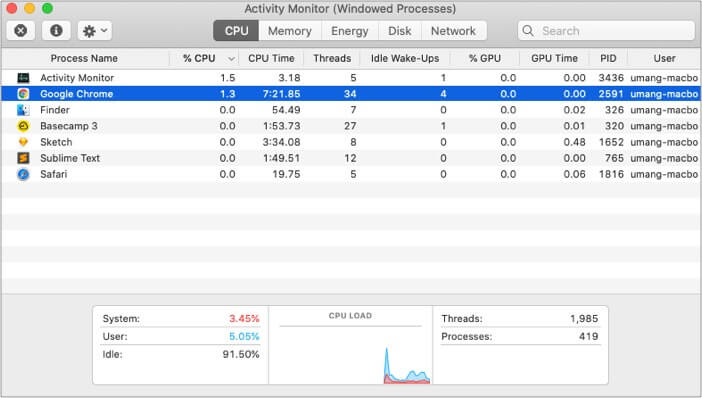
Last week I ran into a similar problem. I noticed my MacBook Air getting uncomfortably warm. I opened the Activity Monitor and glanced at high CPU usage by the OneDrive app. I had to force close the app to cool down MacBook.
Become an iGeeksBlog Premium member and access our content ad-free with additional perks.
5. Stop apps from automatically opening during startup
By default, apps like Slack, Dropbox, OneDrive, Adobe Creative Cloud, Alfred, VPN apps, etc., automatically open up during Mac startup. The practice makes sense for cloud storage apps as you want to keep the files in sync, but you should turn off behavior for other apps and services to save up some battery juice.
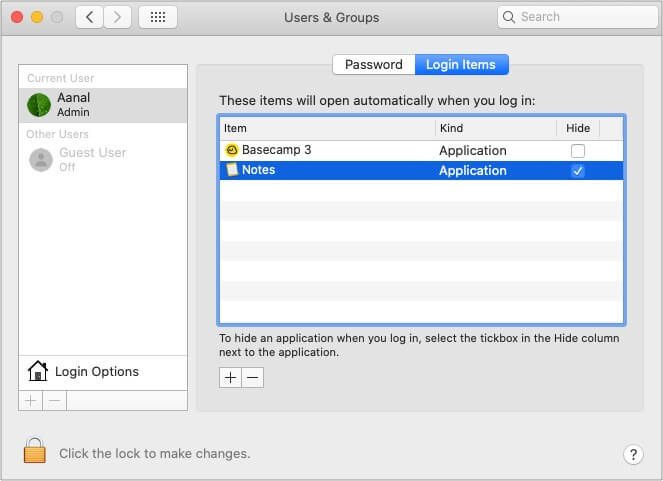
Follow the steps below to stop apps from automatically opening during Mac startup.
- Use the Command + Space keys, type System Preferences, and open the menu.
- Navigate to Users & Groups → Login Items.
- You will see the list of apps automatically opening during Mac startup. Select the app and click the ‘-‘ icon below to stop the behavior.
6. Keep an eye on the battery charge cycle
Every MacBook comes with a lithium polymer battery to provide maximum battery life in a compact space. According to the official Apple website, most MacBook Pro and Air models come with 1000 charge cycles.
You can check the current charge cycle under the Power option in the System Information menu.
- Use Command + Space keys to open Spotlight Search
- Type System Information to open the menu.
- Go to Hardware → Power, and here you will notice the current battery Cycle Count under the Battery Information section.
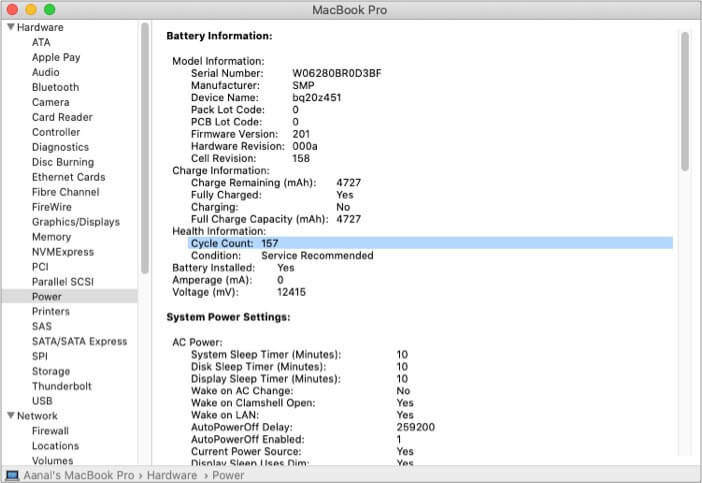
If the number is more than Apple’s suggested one, it’s time to replace the battery on your MacBook.
7. Enable Battery Health Management
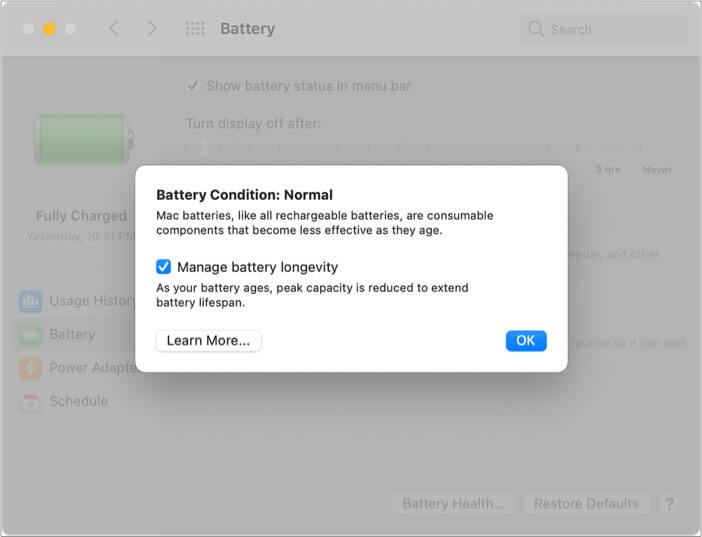
Let me get this straight. The Battery health management option isn’t designed to improve the device battery life. It’s focused on delivering a longer battery lifespan.
As I mentioned above, every MacBook comes with a fixed charge cycle. The Battery health management option learns your MacBook usage and limits the device to charge to 100% when necessary.
Open System Preferences → Battery → Battery Health → enable the Manage battery longevity option.
8. Keep your MacBook up to date
The below-average battery life on M1 MacBook might be due to a software glitch. Thankfully, Apple is quick to resolve such issues with a software update. You should open the System Preferences menu and go to the Software Update menu to download and install the latest macOS available.
Other tips to save battery life on M1 Mac
Last but not least, you should close applications that you no longer use. Those coming from the Windows camp should know that clicking the ‘X’ icon in the macOS menu bar won’t completely close the app. Use two-finger click on the app icon on the dock and select the Quit option.
We live in a work-from-home era, so I won’t advise you to turn off MacBook’s Bluetooth and Wi-Fi all the time. But once in a while, if you are working offline or streaming videos or music locally, you should disable Bluetooth and Wi-Fi from the macOS menu bar.
With your M1-MacBook optimized, charged, and ready-to-go, you won’t have to worry about stretching for a charger during working hours.
Go through the tips above and tell us which trick you found most useful in the comments below.
Read More:
